Once again, Class 3 is divided into two parts, and so I’ll continue to break those two parts into separate pages, which means you’ll find a link to the second half of this lesson at the bottom of this page:
Part 1 is going to be an examination of the various “CULPRITS” that might have interfered with your TIME assignments this past week, and then a subsequent re-working of how we will approach those kinds of shots in the future
Part 2 is going to be an introduction to LENSES, and the SPATIAL dynamics that lenses control.
Part 1: Time Culprits.
The key to these time and movement assignments is to remember that the REAL differential is not whether something in your scene is MOVING, but rather, whether or not something in your shot is CHANGING RELATIONSHIP WITH YOUR FRAME.
And so I’ll remind you that there’s a huge difference there. And while we touched on that distinction a bit last week, I find it usually takes several case studies before that concept fully sinks in for most students.
So let’s go through each of the assignments one by one, and discuss the primary culprits that might have undermined the image.
Keep in mind, I am interested in TIME culprits only, not LIGHT culprits, which means that if your image failed to come off because you couldn’t get the proper “exposure,” we’ll just set that shot aside for now. It’ll take a few more weeks before all of the ins and outs of “exposure” have been fully fleshed out, so for the moment, I’m only interested in TIME culprits.
Assignment #1, FROZEN ACTION:
Let me begin by stating that this assignment was by far the simplest that we’ll have throughout this entire Photography 1 course.
The likeliest reason a student might have experienced any failure here is more due to LIGHT, not the TIME.
For instance, if they attempted these kinds of shots indoors or at night, they were going struggle mightily to achieve a decent exposure with such fast shutter speeds and so little light to work with. But had they heeded the instructions to do this in bright daylight, they shouldn’t have had too many problems.
So in terms of “culprits,” there are really only two that anyone ever seems to experience here.
The first one was mentioned last week, which was that, in many cases, freezing the action of your scene often just serves to deprive the viewer of any knowledge that anything in the scene was moving:
How do we know the fan was even turned on?
The idea here was that freezing the action has eliminated any VISUAL CUE that there was movement in the scene.
Which isn’t necessarily a bad thing, you just need to be in control of whether you want a movement cue in the shot or whether you don’t want one. And as long as you’re making that decision consciously, I have no problem with it either way.
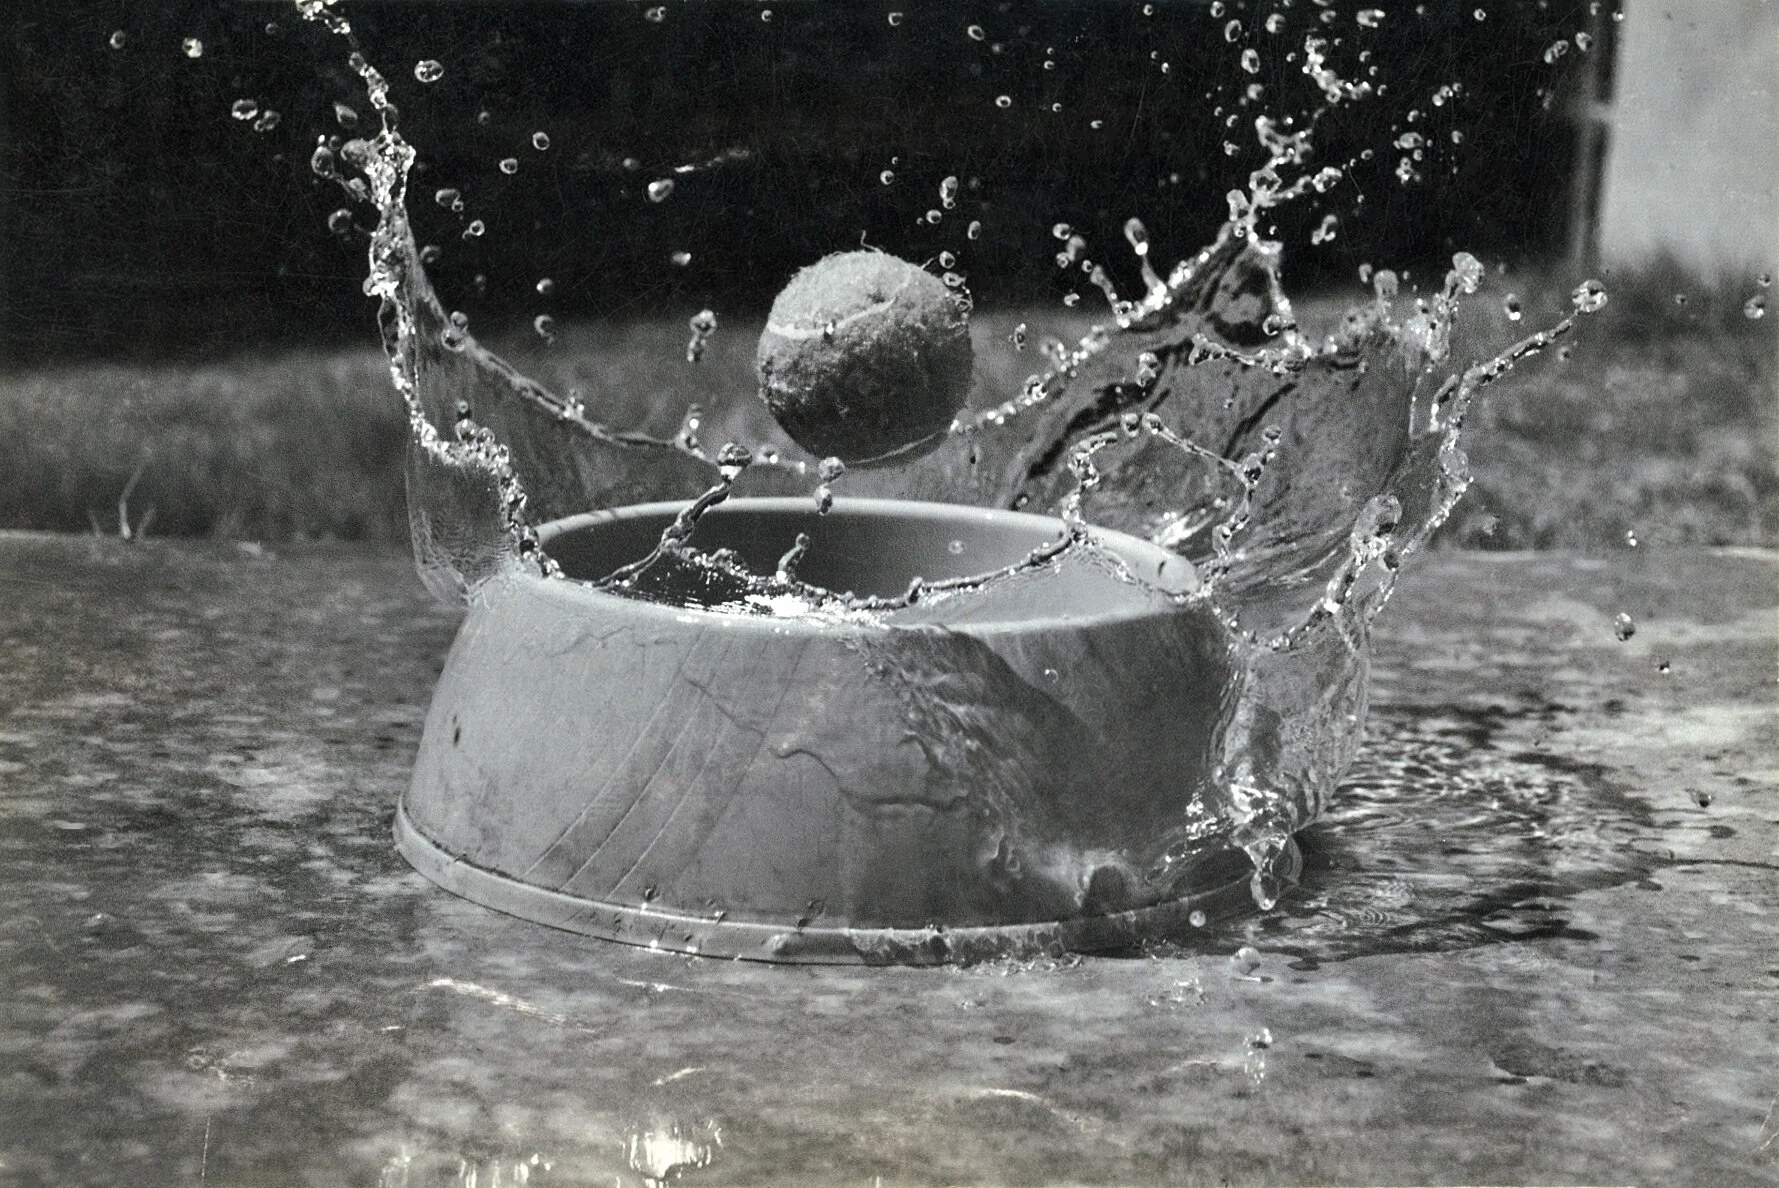
But the other ‘culprit’ people tend to encounter on this assignment is probably best illustrated with this case study here:

Students will see the examples of “frozen water” that I sent with the homework instructions, and then they’ll try to shoot a household faucet in their kitchen or bathroom, thinking they can freeze the water that’s spilling out. But then they find that the shot sort of looks the same NO MATTER WHAT SHUTTER they use.
See, the problem with a shot like this is that it violates our number 1 cardinal rule about time dynamics.
The “pour” of water coming out of this faucet is constant and regular, which means that it forms a solid “shape of water” …..and then that shape is permanently fixed in your image.
In other words, was something MOVING in our scene?
Yes.
Was anything CHANGING RELATIONSHIP WITH OUR FRAME?
No.
And remember….that’s all that ever matters to us.
So in essence, this is the same deal as the “spinning top” example I gave last week, wherein the top is literally spinning in reality, but isn’t moving in your frame.
For the top to move in the frame at all, it would need some imperfections in how it was moving, meaning that it would need to wobble a bit from side to side, or start moving around to different parts of the table it’s spinning on.
But if if it is spinning perfectly in place, then you have a solid, unchanging shape in one part of your frame, and that shape is never CHANGING RELATIONSHIP with your frame.
And similarly, the water pouring from your faucet can’t be a perfect, permanent, cylinder of water….it needs some irregularities too:

….so that something is CHANGING in your frame.
Or better yet, if the faucet was dripping:

….then you have an entire entity (an individual droplet of water) MOVING ACROSS YOUR FRAME.
But can you see, now, in retrospect, that in that first example…..nothing in the shot was changing relationship with the frame? Which means we didn’t have our DIFFERENTIAL. And if the differential doesn’t exist in your shot, then we can’t employ any strategies that might exploit that differential.
But like I said…..other than that, students don’t tend to hit a lot of snags on this assignment. Which is to say that they nearly always successfully “freeze” the action.
But does that mean they LIKE all of the pictures they’ve taken?
Of course not.
But if they “don’t like” the outcome of the shot, it’s usually for reasons that have nothing to do with the time aspects of the image.
For instance, perhaps they don’t like their composition, or perhaps the shot is a little “out of focus,” or perhaps they don’t think they’ve captured a very interesting moment, etc.
But again, we don’t care about any of those other things this week.
All we cared about was whether you were able to “freeze” the action. And so long as you were shooting in an environment with sufficient light, then the answer to that question was almost certainly ‘yes.’
In fact, you even had a pretty healthy margin for error to pull this off. If most action freezes by, say 250, then if you had used 500, the action should STILL have been frozen. Ditto for 1000. Or 2000. And so forth.
In other words, for most moving subjects you encountered (with the exception of some very extreme outliers….such as actual bullets and humming birds), you should have had a window of MULTIPLE different shutter settings that would have yielded the exact same result.
So by that metric, this was a relatively easy assignment, and one in which students tend to achieve nearly 100% success.
But then students get to assignment 2.
Assignment 2: Motion Blur

In contrast to Assignment 1, Assignment 2 was one of the most difficult assignments for this entire course, and usually results in an incredibly low success rate. Something closer to 8%.
Meaning students often have to attempt 40-50 takes just to bring 3 or 4 successful shots to class.
So why is that?
Well, there are two issues at play here. The first is whether or not the “movement cue” was accompanied by a proper “context cue.” Because without that context cue, these shots are very difficult to read and understand properly.
And the second issue is the “movement cue” itself. Whether it was executed properly.
So let’s begin with the “context cue” part of this.
Let’s take a look at a series of reasonable successful student assignments (in other words, some shots where the movement of the scene “makes sense” to most viewers), and then let’s see what happens when we eliminate the context cue.
Let’s start with this shot here:

Imagine what happens if we eliminate the opposite page of the book, so that we can ONLY see the motion blur itself:
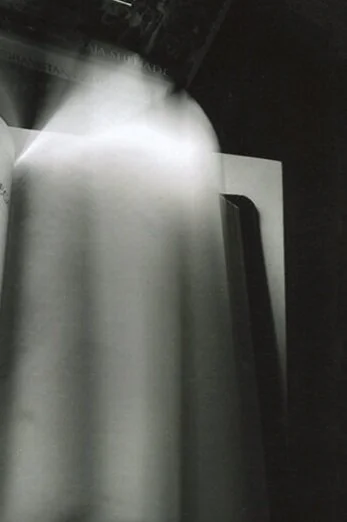
It becomes infinitely harder to decipher what we’re looking at here.
Or take this scene of a jogger going for a morning run:
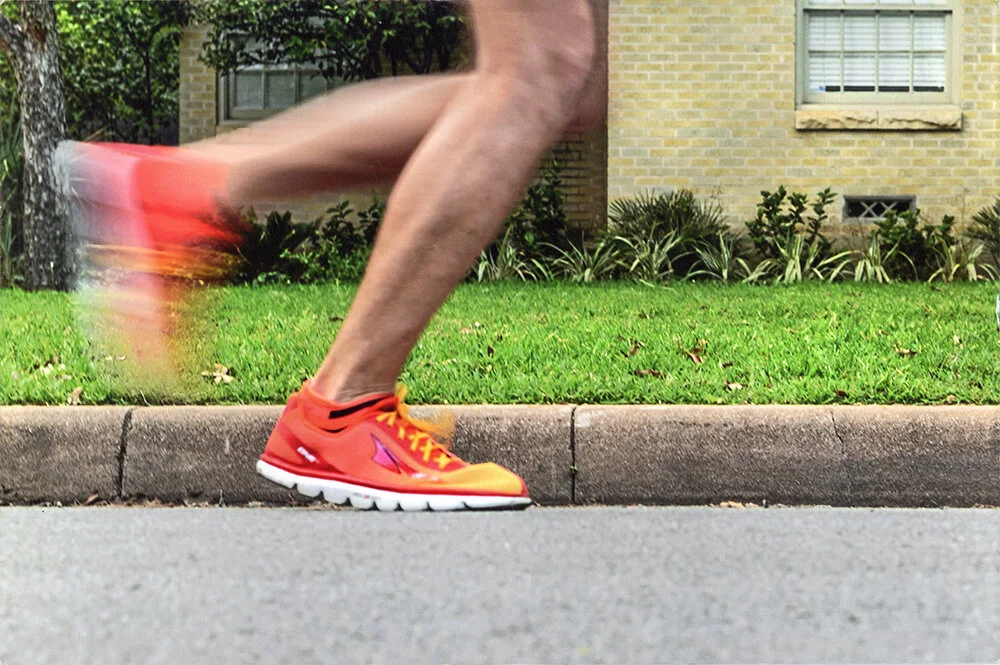
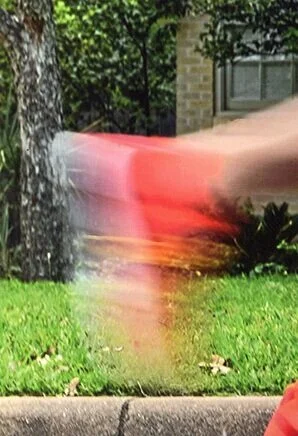
And let’s remove the opposite leg from the image:
Or take this person spraying a deck of playing cards into the air:
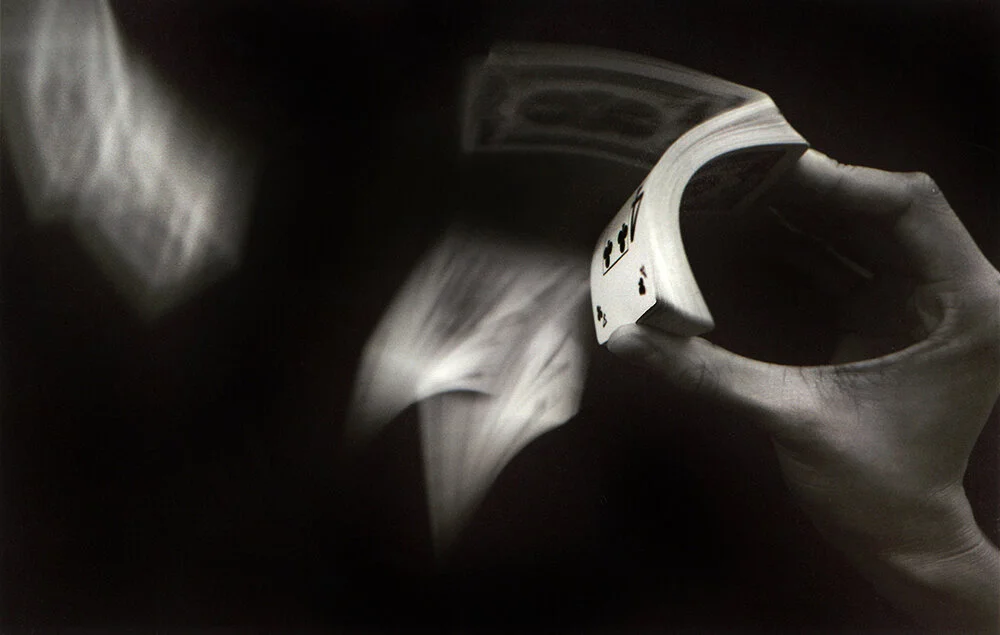
And then remove the more “stable” portion of playing cards at the right of the shot:
The way these shots work is that:
1) The viewer sees some kind of movement cue — some kind of “motion blur” — and then senses that SOMETHING is probably moving….
2) They pair that observation together with the “context cue” they’ve been given (ie: the deck of cards, the jogger’s opposite leg, the other books in the shot, etc.) until finally….
3) Their brains are able to put together exactly what’s happening in the scene.
Those are the “mechanics of communication” here.
That’s the “syntax” of the shot.
And in most cases you need a context cue in order to make sense of the movement cue.
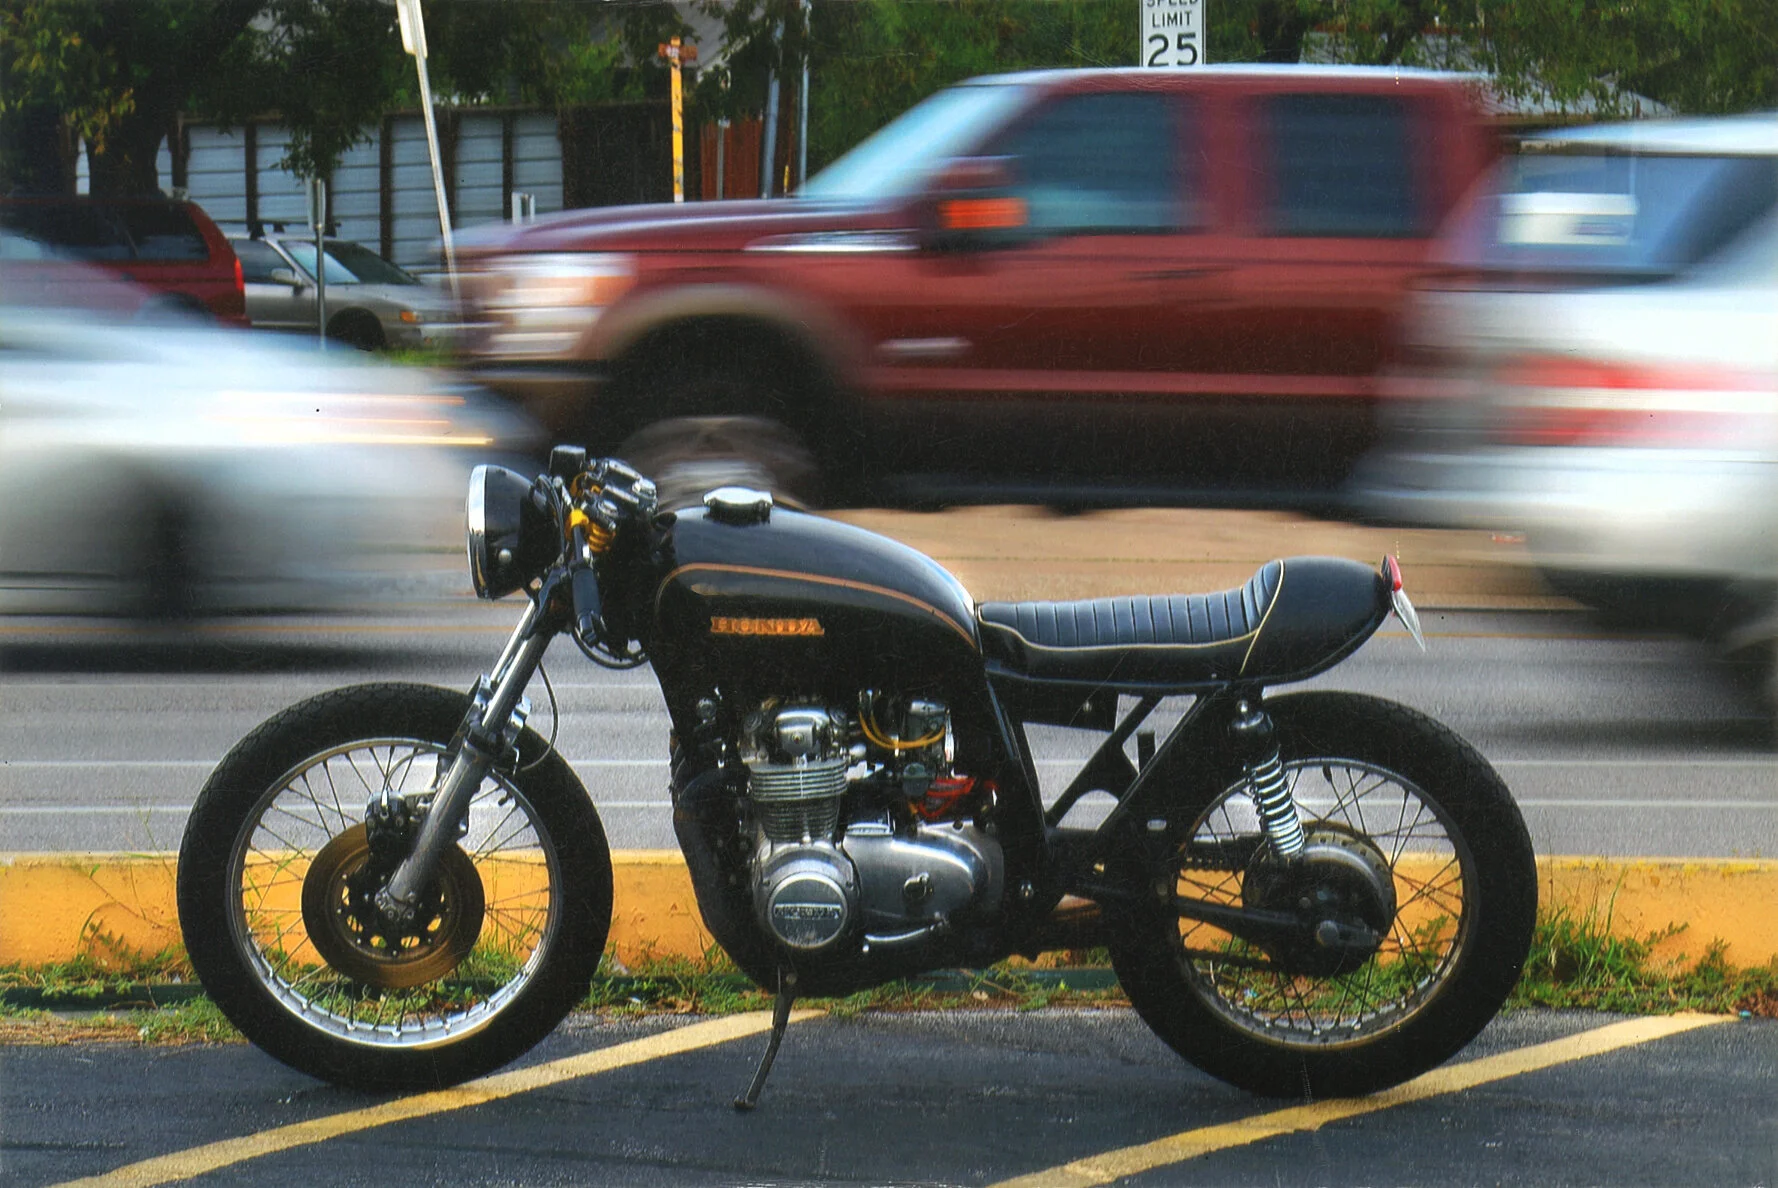
So let’s go back to something I mentioned last week. Remember I had said “qualifying action is easier to render than subjective action.” Meaning that it’s easier to convey movement in some SECONDARY part of the scene than it is to convey movement on the SUBJECT itself.
This discussion we’re having here today might give you a clue as to why.
When you’re setting up a shot with “qualifying” movement (such as the “motorcycle” shot above, or the “subway” shot from last week), not only is the motion blur occurring in some “lesser important” part of the scene (which often means the viewer won’t scrutinize it as closely), but even more importantly, you’ve set up the shot — inherently — so that there are two different parts of the scene in the first place: a subject AND a qualifier.
And that kind of “shot structure” inherently makes it more likely for the viewer to see RELATIONSHIPS in frame, which in turn means it’s easy for them to interpret both a movement cue AND a context cue.
But in assignments where students have placed only one thing in the frame (ie: JUST a “subject”), it’s very difficult for us to perceive that shot as successful, because there is no context cue that helps us make sense of the motion blur.
So what often has to be the case for shots like that to be successful, is that BOTH the movement cue, AND the context cue, have to come from the same source….from the subject itself.
So looking at the examples above, note how in the shot of the jogger, there is a both a movement cue (the left leg) and also a context cue (the right leg)…..and again, both are coming from the same source. From the same jogger.
Or similarly, look at the shot of the book (with “flipping pages”). That one works well because there is both a movement cue (the pages on the right) and also a context cue (the pages on the left)….and both are coming from the same source. From the same book.
So one more time, the underlying “culprit” here is that when a student sets up a shot with both a foreground and a background (like the shot of a motorcycle in the foreground with moving traffic in the background), not only have they set up the shot in such a way that the movement is happening in a less important part of the scene (and therefore won’t be closely scrutinized)….BUT ALSO, they’ve set up the shot so that the viewer is already prepared to “read” and connect the RELATIONSHIP BETWEEN THE FOREGROUND AND BACKGROUND.
Whereas when a student who sets up a shot where there is nothing in the frame but a moving SUBJECT, and no secondary part of the scene to relate it to, it means the “context cue” is ALSO going to have to come from the subject itself, and not some other part of the scene.
And that can be a lot more difficult to organize and to manage….particularly if you aren’t even aware of that requirement before you begin shooting.
It makes it very unlikely that a student will succeed at this kind of shot so early in the learning process.
So long story short, on this assignment, a lot of students either set themselves up to succeed, or condemned themselves to failure, just with the TYPE of shot they choose.
But they’re rarely aware of it at the time.
Ok, so the first thing we’ve established here is that you really need the “motion blur” to play agains a “context cue” somewhere else in your scene.
But as I said a moment ago, there are actually two things you have to “get right” for these shots to come off. You need a context cue, but you also have to nail the movement cue itself.
The “context cue” is about human psychology. It’s about anticipating how the viewer will read and understand the relationships in the scene…..and then it’s about guiding them toward connecting those specific dots.
But the movement cue is less about psychology and much more about raw physics of the scene.
So let’s get to that part.
There are about 3 different culprits when it comes to getting the motion blur ITSELF to look “right.”
First, there’s the margin for error on your shutter.
In other words, there may only be a small window of one or two shutterspeeds that will properly render your action, and if you miss that window, the motion blur might not “read” properly.
So for instance, if your shutter is a bit too long, and the moving object moves TOO FAR across your frame, you may begin to lose its identity:
On the other hand, if your shutter is too fast, the object may not blur ENOUGH, which may not look like movement at all, it just might look a bit “out of focus:”
So you really have to be “Goldilocks” here and get the shutter JUST RIGHT:
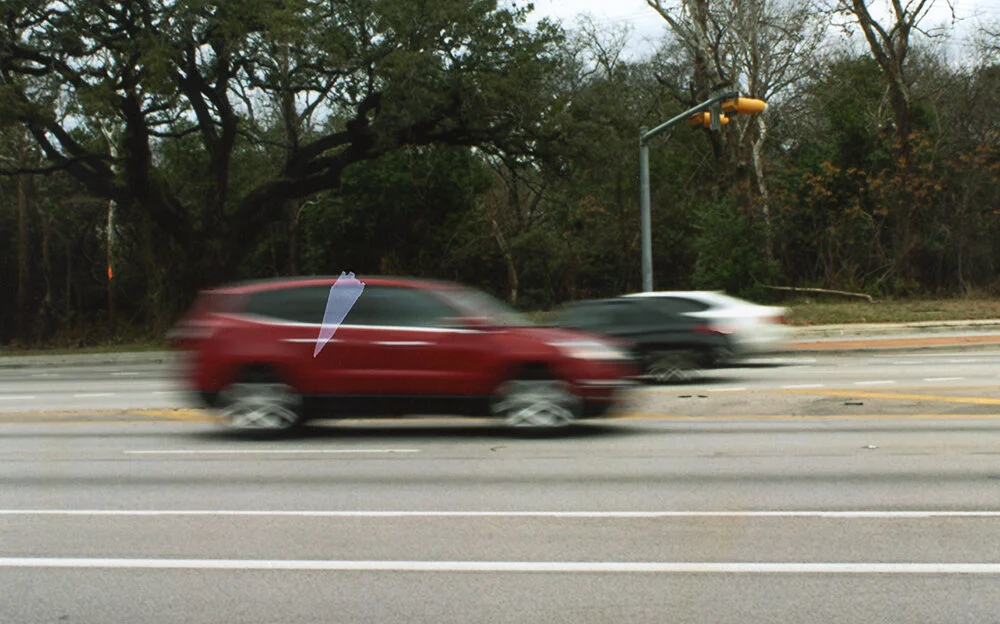
The shutter you’re trying to achieve here is the one with the perfect overlap of being able to identify the make and model of the car while still also giving a solid sense of movement.
And that first shot in this sequence does a great job of implying movement, but we’ve lost any sense of what kind of car it is.
The second shot does a great job of maintaining the precise identity of the vehicle, but it doesn’t reliably convey a sense of movement.
But this last one here is the perfect overlap of both of those two concerns.
But I would also state that this particular “culprit” is pretty intuitive.
We’re basically saying you have to “get your shutter right.” Which is pretty obvious.
The question is, HOW do you get your shutter right?
Well, let me first ask this: what factors would affect WHICH shutter speed we should be using for a given subject?
The first answer I always get is “How fast the object is moving.”
For instance, is the car going 20 mph, or is it going 75mph?
And believe it or not, as counterintuitive as this is going to sound, the speed of the object is NOT going to be a big factor for us.
In fact it will be nearly irrelevant.
Instead, let’s begin with DISTANCE.
Distance is HUGE here.
Suppose we have two objects in our frame - two different cars - and BOTH of them are going the exact same speed in real life (let’s say 50mph).
But one is very near to us, and one is very far:
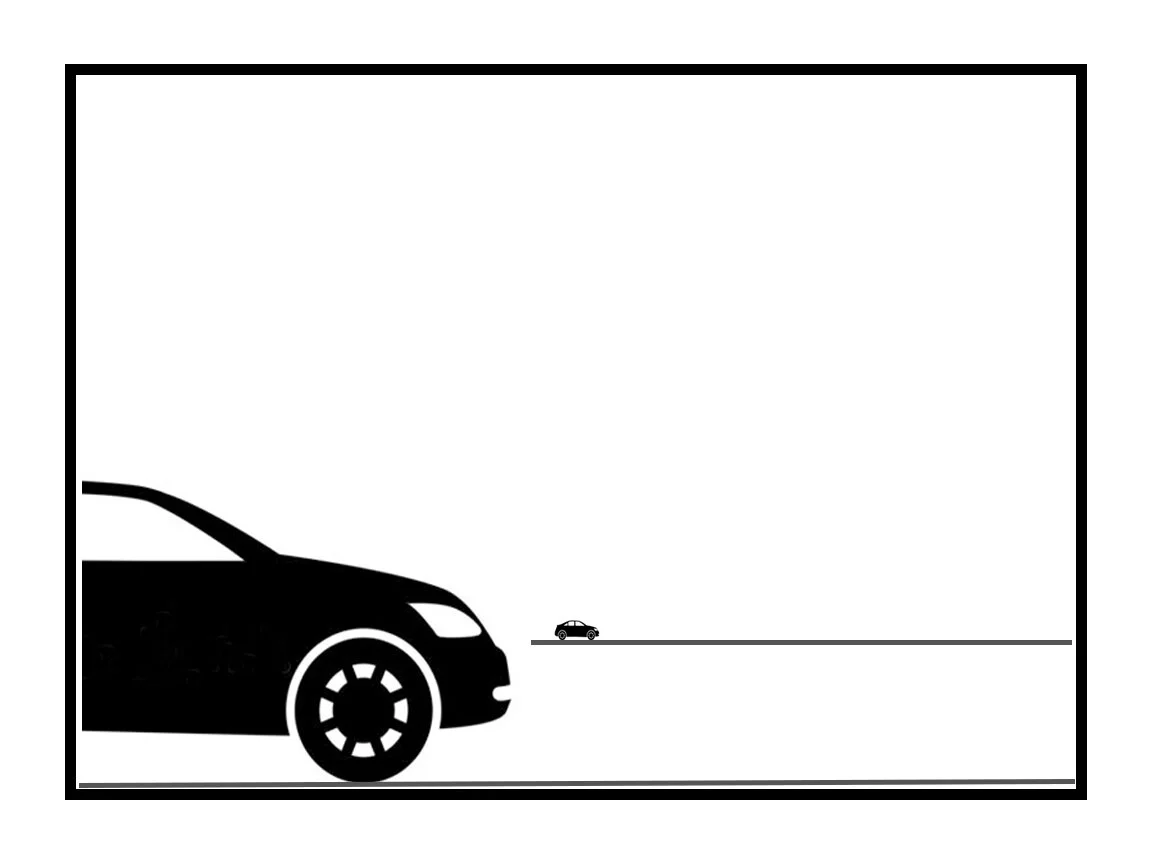
Are they moving across our frame at the same rate?
Not even close.
The car in the foreground will clear our frame in a fraction of a second, while the car in the distance might take 4 seconds to go entirely across our frame.
But they were moving the same speed in real life, weren’t they?
So I’ll state the cardinal rule again: it never, ever, EVER matters to us how something is moving in reality…. it only matters how it moves with respect to our frame.
And one of those cars clears our frame in about an 1/8 of a second, and the other car will clear our frame in 4 seconds.
So our DISTANCE is going to impact our strategy WAY more than the actual speed of the object.
But the next factor is even more important than distance……ANGLE.
The angle of movement, or the “Type” of movement, completely made or broke this shot for most students.
In fact, this is probably the biggest ‘culprit’ here.
So before we go any further, let’s get down to brass tacks about this. What are we even doing with this assignment? What’s the actual task here?
Well most people will say we’re trying to ‘record movement,’ but that’s not what we’re doing at all. We CAN’T actually ‘record movement.’
Videographers and cinematographers can, but we are SINGLE FRAME PHOTOGRAPHERS. We aren’t in the business or recording movement.
We’re in the business of generating a visual cue that SUGGESTS movement to the viewer’s psychology.
And while there are a few different ways to SUGGEST movement to the viewer, the most reliable cue occurs when the moving object exposes in DIFFERENT PARTS of your frame.
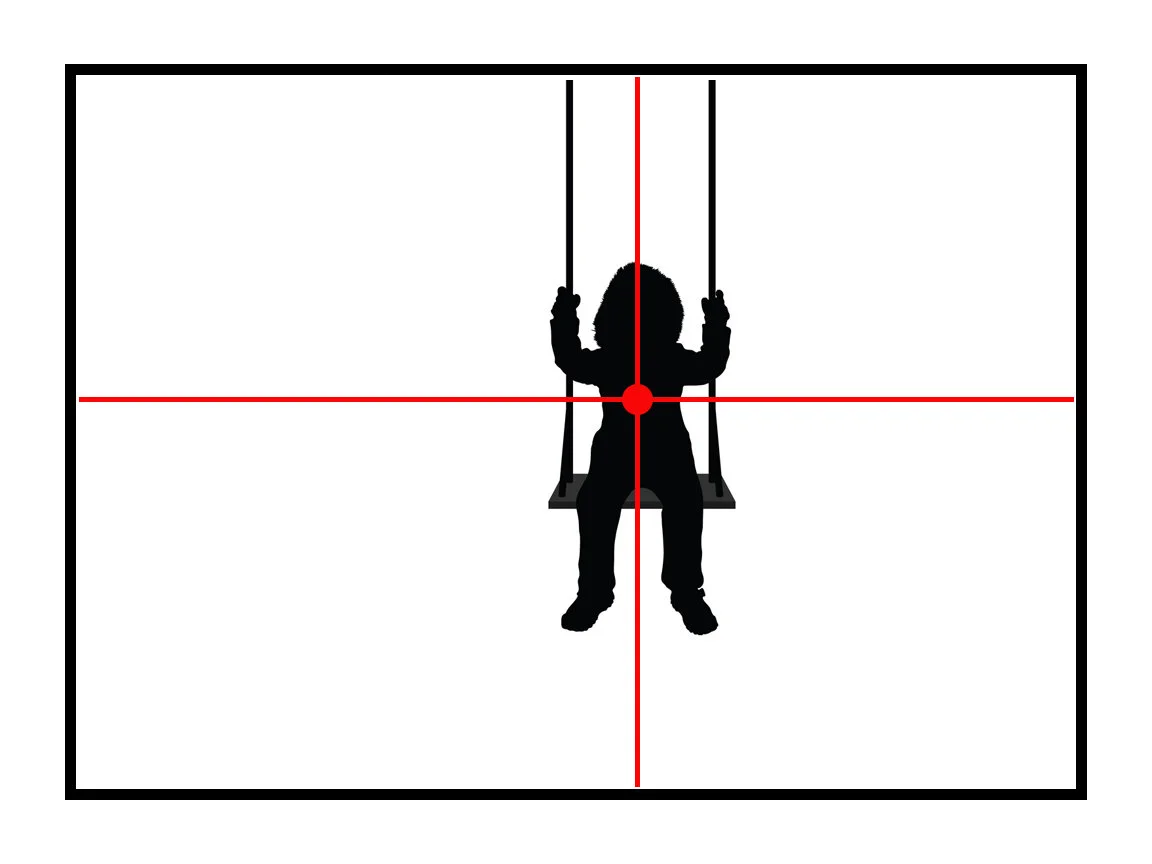
As an illustration of what I mean, let’s consider one of the most common case studies my students ever bring me: the “swingset shot.”
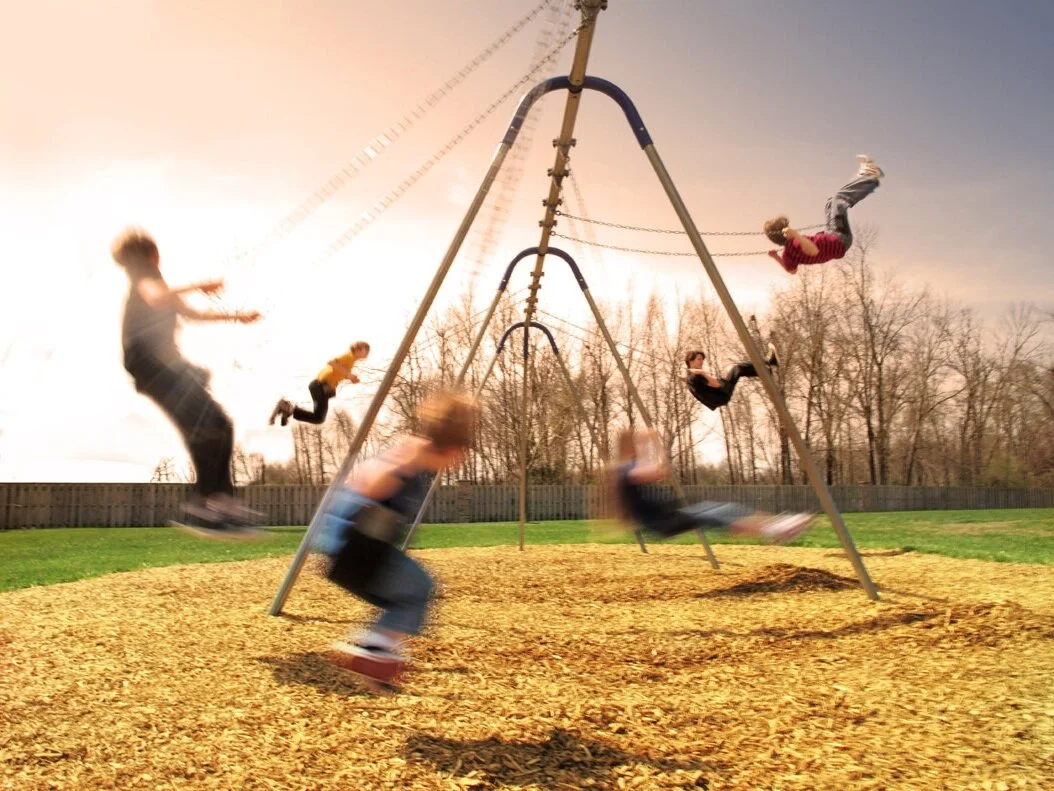
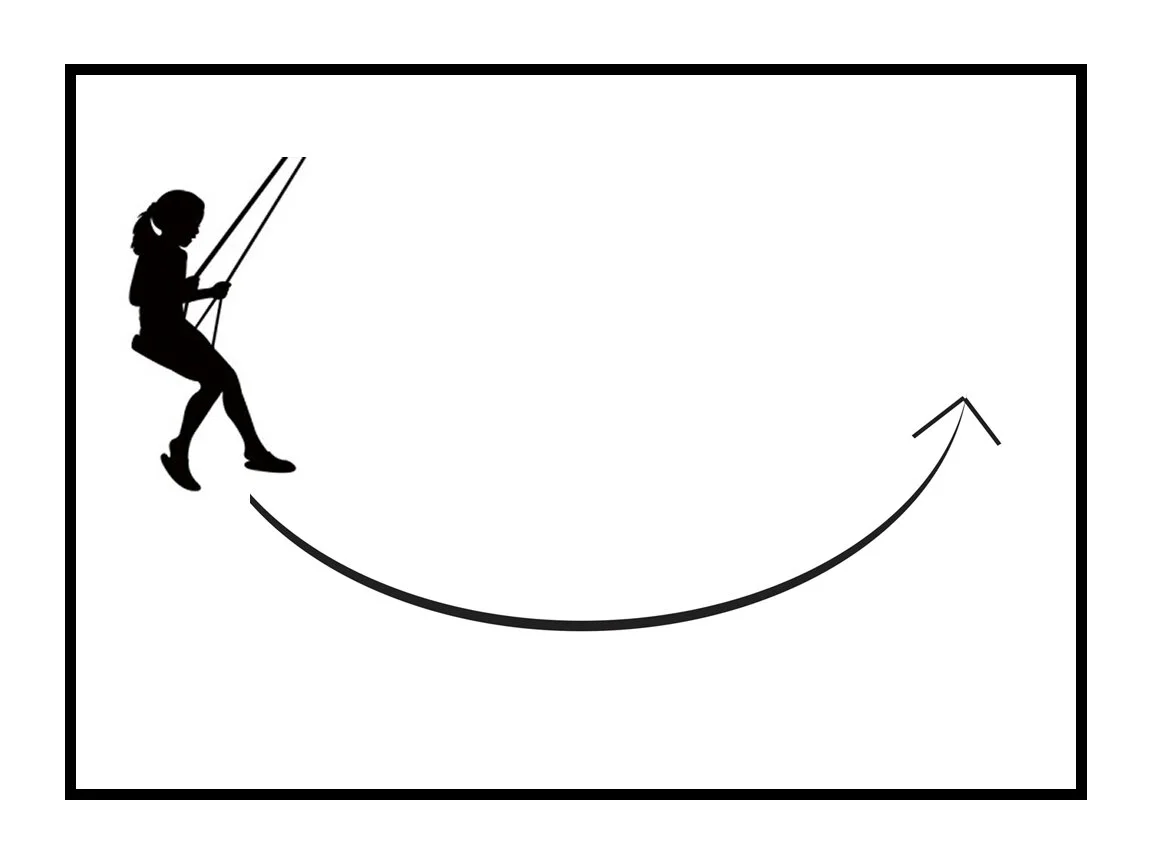
Imagine that we set up the shot from this angle, with the kid swinging from left to right across our frame:
Next, we decide we’re going to take the image at a shutter speed of 8.
Ok, so let’s slow this process down to super slow motion in our minds, and let’s consider what’s going to happen at each step in this sequence.
First, you pull the trigger when the kid is at the back of the swing, just as they start moving from left to right.
And because the kid is in THIS position at the very moment the shutter opens:
…..the kid will expose in THIS PART of your frame. Right?
But then, because the shutter is open for so long (for an entire eighth of a second), the kid has time to move from this spot in the frame…..to THIS spot in the frame:

….where the camera will now record the kid AGAIN, but now in THIS part of your composition.
And then, finally, the shutter closes, sealing the image.
And what we’re left with is a kid who has recorded in two different parts of the frame. Which means the viewer might now be able to perceive that something in the shot was “moving.”
And that ALONE might not make much sense to the viewer, but when it’s been paired with all of the other context cues (the swingset, the other children in the background, etc.) our brains are very likely to read and understand this scene as “A child swinging.”
But that entire enterprise was predicated on two things. We needed SOMETHING TO EXPOSE IN DIFFERENT PARTS OF OUR SCENE, and then we needed it to play against a context cue.
And that “different parts of the frame” thing is CRUCIAL.
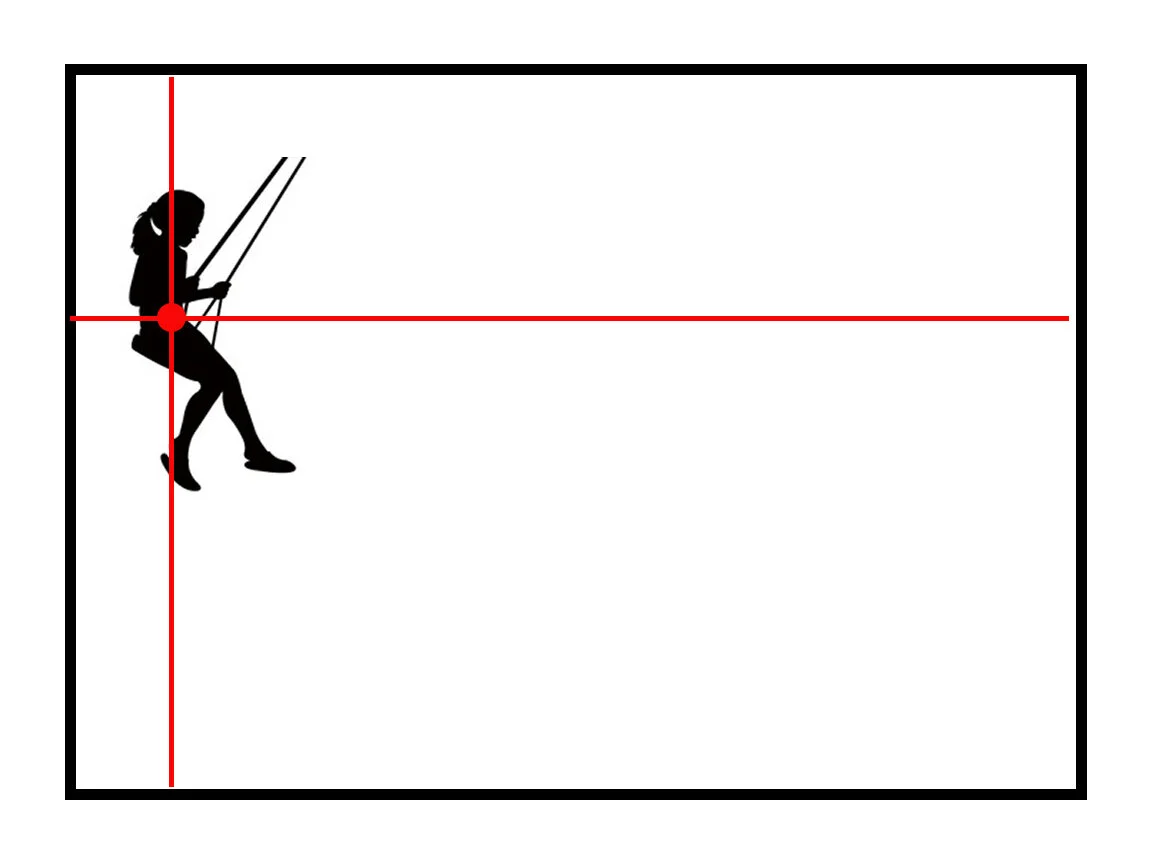
So let’s try the exact same thing again, but this time from a different angle. Let’s use the exact same shutter speed (8), and then let’s even TIME the picture so that we pull the trigger at the exact same moment.
Everything about our strategy will be the same EXCEPT the angle we choose. This time, we’re going to take the picture with the child swinging TOWARD us, not across our frame.
Ok, so if the child is at the back of the swing - about to swing FORWARD - as we pull the trigger, then the child will be relatively small (because they are farther away), and they’ll occupy a very specific spot in our frame:
But then as they begin to swing TOWARD us, they become much bigger…..but they will remain in the EXACT SAME SPOT IN THE FRAME:
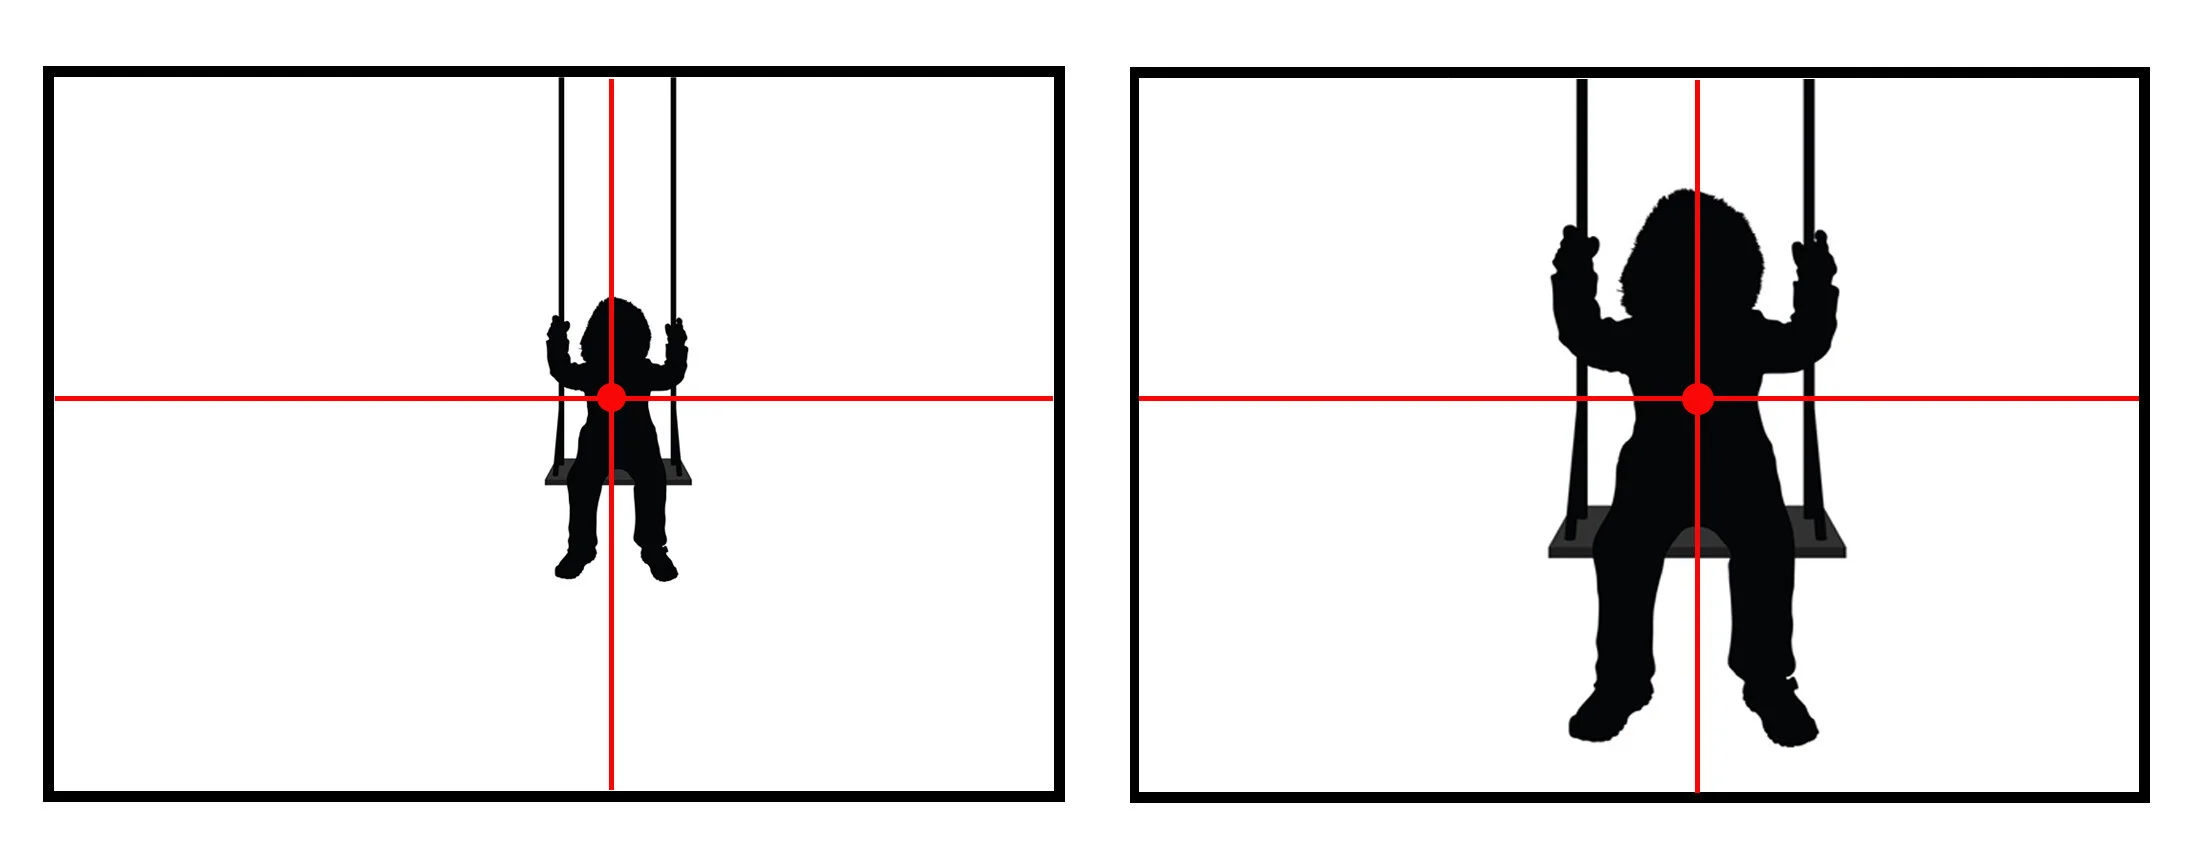
So can you see that, from this angle, the child will keep exposing in the same spot in the frame (ON TOP of where he USED to be) over and over and over again.
And will that read to the viewer as a coherent “cue of movement?”
Probably not. It’s more likely to look like a totally incoherent mush.
So here’s the takeaway from this case study: Certain kinds of movement are near-impossible to render, at least with any reliability. And one such movement is going to be MOVEMENT ALONG THE “Z-AXIS” of the shot.
“Z axis?” Wait, what’s that?
Well, remember back in high school when they gave us that “graph paper” that we could use to plot and chart a graph?
And there was always an “X axis,” which was horizontal (it went from left to right)….and then there was always a “Y axis,” which was vertical (it went up and down) ….but then there was also that pesky “Z axis,” which went INTO the page, it was the “depth” axis, and it was impossible to draw on a 2-dimensional sheet of paper.
Well one common factor in most of the more “successful” shots we see on this assignment is that the movement was happening along either the “X axis” or the “Y axis.” Things like traffic moving from left to right along the “X axis,” or waterfalls moving down the “Y axis.” Etc.
But if a student was unfortunate enough to have attempted “Z axis” movement, they probably weren’t especially happy with the results they got.
Another kind of movement that can’t be reliably signaled is something that we discussed last week with the “spinning top” example: movement that doesn’t change relationship with your frame at all. Rustling leaves that “vibrate” in one part of your frame - stuff like that - often doesn’t RELIABLY convey movement to the viewer.
Ok so let’s pause here and recap 1) what our task is here, and 2) what we need to understand about it strategically:
First, remember, we aren’t in the business of ‘recording movement.’ Cinematographers and videographers can record movement, but WE can’t. We’re single-frame photographers….and by definition we can’t “record” movement.
So we have to do the next best thing. We have to generate a set of visual cues that reliably SIGNALS to the viewer that something in our scene was moving.
That’s our ACTUAL task here.
And it’s very important to understand that distinction.
Next, we’ve established that the way you generate the “idea that something is moving” is:
1) You have to ALIGN your shot so that movement can expose in DIFFERENT PARTS OF YOUR FRAME. The movement has to be oriented and aligned so that it moves either across your “X axis,” or up and down your “Y axis.”
2) You then have to choose a shutter that will blur the movement just the right amount, and the way that you will determine that shutter is going to be more based on the DISTANCE to the movement, and not the speed of the movement (the closer you are, the faster the shutter you will need, the farther you are, the slower the shutter speed you will need).
3) You then need to compose and structure your shot so that the movement cue can be REFERENCED against a context cue. So you need something else in the scene that helps us make sense of what that movement is.
And that’s how these shots work.
That’s what makes them tick.
And if you neglect any single one of these responsibilities, your shot will almost certainly end up in your out-take pile.
And remember that, for this week, in all likelihood, the huge pile of ‘outtakes’ you accumulated were the product of neglecting any or all of these factors. While the 4 or 5 “successful shots” you achieved occurred ONLY when all of these factors just HAPPENED to be aligned in your favor.
So as I was saying last week, most success or failure in these early weeks is down to sheer luck of whether these factors aligned in your favor, or whether they were aligned against you. But for 99% of students, this is all happening beneath their awareness.
So the first step here is AWARENESS.
You need to comprehend, very clearly, why certain shots “worked” and other shots “didn’t work.”
Then, once you’re aware of these factors, the next step is to begin controlling them.
And then, finally, the very last step is mastery.
Ok, so how do you begin controlling these factors?
Well for anyone seriously interested in mastering this technique, here’s my exact prescription:
The first thing you need to do is develop very strong associations between what shutter you have to use, at certain DISTANCES.
So begin with the absolute easiest shots imaginable.
In other words, begin with the most successful shots that students happened to luck into on this assignment.
So what are the most common, “lucky” shots that students fall into for this exercise?
Well, they’re usually shots that have exactly 2 things in common.
First, the movement is either left-right or up-down.
And second, the movement is CONSISTENT and stable, which means that the student doesn’t have to fuss too much with TIMING the shot correctly (ie: no matter when they pull the trigger, the shot will probably look the same).
For instance, if a student was shooting a waterfall that was cascading down the ‘Y axis,’ that kind of shot would qualify here, because not only was the movement oriented in the proper direction, but the movement was also constant, so it didn’t matter at all when the student pulled the trigger.
Busy highway traffic is very similar. If you align it so that it is moving left-right, and the traffic is consistent enough, it won’t matter much WHEN you pull the trigger.
These are the most successful shots that students tend to luck into on this assignment.
And I ask you to start with those shots not because it might boost your ego (although it can’t hurt), but more because these shots eliminate all other factors besides DISTANCE, which allows you to concentrate EXCLUSIVELY on the relationship between distance and shutter.
So pick a scene with consistent movement - a left-right swingset scene would be perfect.
As the swing is going back and forth across your shot, keep moving closer and farther to see what impact that has on the shutter you have to use.
What you’re going to find is that when you’re standing 2-3 feet from the swing, you have to use a much faster shutter speed than you expect, because the swing clears your frame very quickly. You might even need to use 60.
And when you stand very far away, the swing becomes relatively small in your composition, and so you’re going to need to give that swing a lot more time to move across your frame, which means you might need something closer to 4 or even 2 in order to achieve the same kind of motion blur you had a moment ago when you were closer.
If you spent even just one single afternoon doing exercises like this, you’ll develop a sufficient ASSOCIATION for how you might need to alter the shutter as you get nearer and farther.
It’ll also give you an understanding of how RELATIVE the shutter is to your distance, which is why the notion of memorizing any specific “magic number” for your shutter speed is ludicrous.
Next, after you feel like you have a reasonable set of associations for changing shutter speeds at different distances, then you want to bring TIMING into the mix.
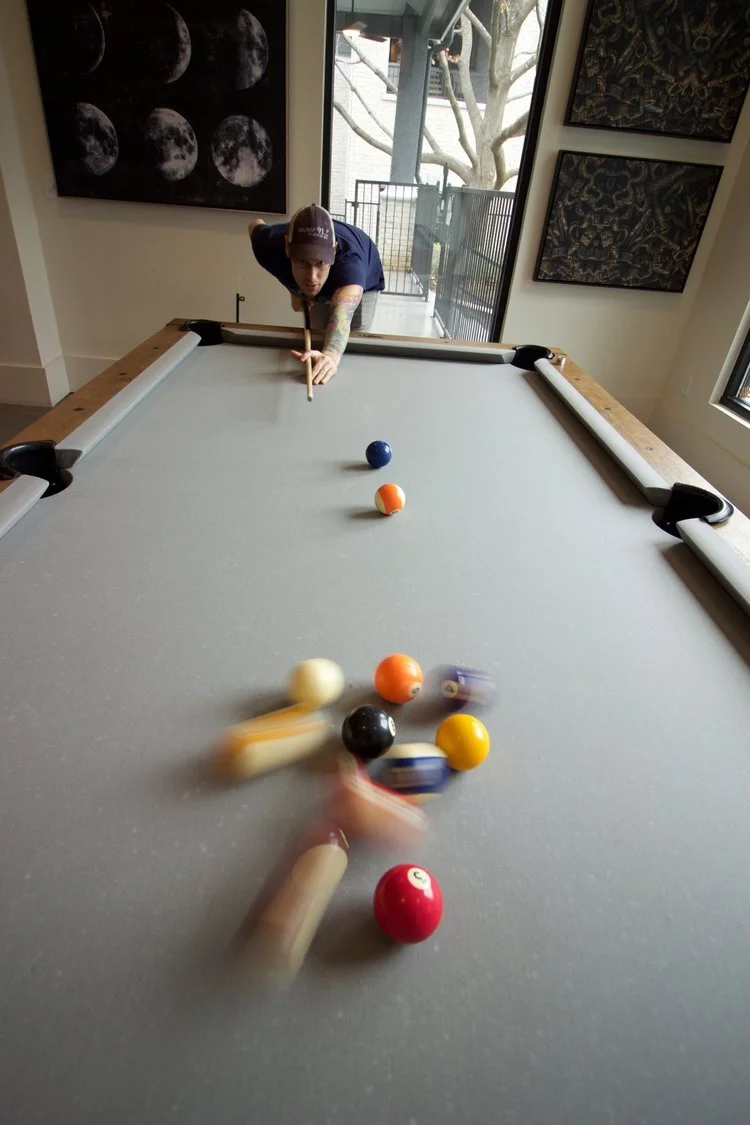
In other words, you want to graduate to scenes where pulling the trigger at one moment as opposed to another will have a tremendous impact on the outcome of the shot. So maybe some more erratic human movement, like sports or dance, etc.
I’ll use skateboarding as my example here.
ASOP students seem to shoot skateboarding a lot. In part because skateboarders aren’t especially shy, and rarely have any problem with students shooting them, and also in part because it’s so repetitive - ie: the skateboarders attempt the same tricks over and over again until they land them, which gives students a lot of ammunition to work with.
But most of those students (at this stage in the course) don’t know much about how any of this works, so what typically happens is that they just shoot 70-80 images, and maybe 5 or 6 come out they way they wanted, and they just dismiss the other 67 failures as “outtakes.”
But it’s extremely important to understand that the 67 “misfires” were all shots in which at least one of the factors we’ve discussed here had been either neglected or misaligned….and the 6 shots that “came out” were likely the only 6 attempts in which these factors were all perfectly aligned in their favor (probably through pure happenstance).
And the problem with deleting those 67 misfires while keeping only the 6 “good takes” - and then calling it a day -is that you’re never going to improve as a photographer.
And more importantly (and as I keep saying) you’re never going to be able to COMBINE these techniques at a later date if you keep relying so heavily on trial and error.
So let’s try to do this all a bit more consciously, shall we?
The protocol for this kind of shot (or any sports or dance shot), is that you need to begin with TIMING. You want to have a good handle on WHEN you’re likely to want to pull the trigger in advance.
Which is very easy to do if you’re familiar with the sport (ie: if you know which wide receiver is likely to receive the ball on 3rd and 17, you’ll probably do much better at shooting football than someone who doesn’t).
So if you AREN’T familiar with shooting skateboarders, the first thing to do here is just spend 10 minutes watching their movement (without even having a camera in your hands)….just getting used to where they like to jump, what positions they like to put their bodies in, etc.
After 10 minutes you’ll have several ideas for shots you want to take.
So let’s say you want a shot where a skateboarder is jumping off a staircase and is right at the peak of their jump.
Ok, now you know WHEN you want to pull the trigger.
Now watch how all of the dominoes necessarily fall from that one decision:
First, you have to get to an angle that allows the skater to move ACROSS your frame, not to and fro.
So one option would be to stand 20 feet away as she jumps from left to right across your frame.
Another option would be to lie down on the ground at the bottom of the staircase, pointing the camera straight UP, so that she jumps OVER you (this option is far more dangerous….but….it doesn’t violate any photographic principles! : )
What you CAN’T do is have here jumping toward you or away from you.
Ok, now watch the next domino fall.
Once you’ve chosen your position (based on the angle of movement you needed), you then need to choose a shutter speed…..based on your DISTANCE.
So if in the previous step you chose to stand 20 feet away shooting the skater in a left-right orientation, because you’re farther away, you’ll need a longer shutter speed here, something closer to 4 or 8.
Whereas if you chose to lay underneath the skater, and shoot up at her from only 3 feet away, you’ll need something much faster, like maybe 60, because she’ll fly through your frame much more quickly.
Remember the skater is moving the SAME speed, either way…. in real life…. but we adapt our shutter more to the distance here than the raw speed.
Ok, so let me pause here and very clearly state that entire chain of logic, but in reverse: the shutter was determined by the distance we were at……the distance we were at was determined by the angle we needed in order to get our movement to go ACROSS our frame..….and, in turn, the angle was determined by the SPECIFIC MOMENT we were choosing to capture.
So again, the order of operations was:
1) choose your moment (your timing),
2) choose your positioning/angle,
3) choose your shutter (based on your distance).
The reason I want to make sure that’s all very clear to you is because if you follow this train of logic, and you’re thinking CONSCIOUSLY about these factors when you’re shooting, then if you go and shoot 70-80 images, you won’t just get 6 lucky successes…. you’ll actually get MOST of your shots to come off.
But MORE IMPORTANTLY, any shot that doesn’t come off….you’ll completely understand WHY.
You’ll realize you need to get to a better angle, or move closer or farther, etc.
You won’t just shrug and think to yourself, “Eh, some shots work, some don’t.”
Far, FAR too many photographers are still relying on trial and error. Including far too many professionals.
Finally, before we move on to our last homework assignment, the last thing I want to do here is revisit those two shots we discussed last week - the “Stop Sign” shot and the “Hula-Hooping” shot.
And see if that case study doesn’t make more sense to you now.
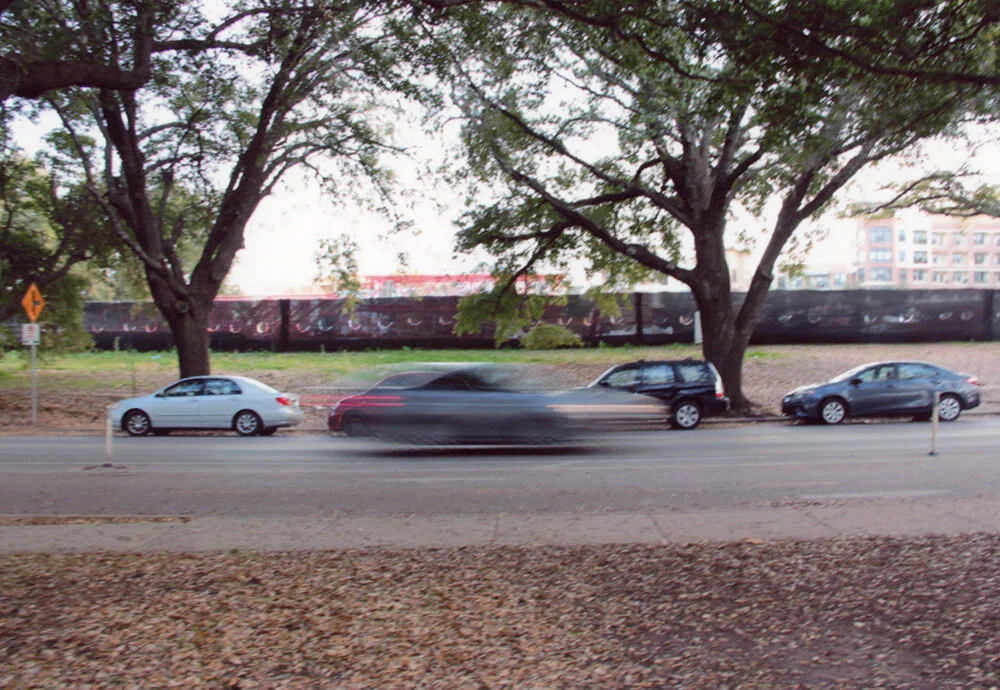
So let’s take all that we know now about how this stuff works, and let’s count all the reasons the student who shot the “Stop Sign” image (the stop sign in the foreground with a lot of moving traffic in the background) had just about everything stacked in their favor:
1) They chose a scene with left-right, “X axis” movement.
2) They chose a scene with constant movement - so that the timing of WHEN they pulled the trigger didn’t especially matter.
3) They chose a scene with “qualifying” action, which means they didn’t especially have to be perfect with their shutter speed. If they were even CLOSE to the correct shutter, the viewer will be satisfied.
Can you see now why that student was DEFINITELY going to succeed?
Heck, they might even get that shot to come off on the very first try. Even if they’re totally inexperienced.
But now recall the other student who shot their daughter hula-hooping. Let’s count all the reasons that this student was going to fail:
1) They chose “Subjective” action, which tends to be much more scrutinized by the viewer. “Close” won’t cut it… you have to get the movement to read perfectly.
2) The movement is repetitive and largely confined to one part of the frame (ie: it doesn’t move ACROSS the frame), and moreover, the little girl will be moving forward and backward along the Z axis as much as she moves left to right.
3) The movement itself is also erratic, so TIMING is absolutely crucial here. In fact two images shot a half-second apart from each other might turn out totally different.
So this student is likely to attempt 20 versions of this shot…without it ever coming off.
So I can’t stress this enough. So much of the successes and failures you’ll experience in these early stages is down to sheer dumb luck (either way).
And it’s really important to keep that in mind. Because on one end, you don’t want to get discouraged if you happen to attempt a shot that involves several factors we haven’t even discussed yet….and on the other end, you don’t want to get too cocky about your abilities if you happen to stumble into a shot that didn’t.
Finally, I’d like to mention here that nearly every famous photographer I’ve ever heard speak (at a symposium, or an “artist talK”) has at some point during the talk made some kind of witty and “humble” remark in which they insist that a lot of their own photography is down to luck.
Which may be technically true in their case, but I find to be endlessly disheartening. Because these photographers are supposed to be both role models, as well as ambassadors for this medium, and in an attempt to sound humble, they’ve basically advised the hundreds of aspiring photographers in the audience to spend the rest of their careers chasing “good luck,” or to just hope they win the “photography lottery.”
And I can’t think of any kind of less productive advice than that. Particularly when it’s so easy to demonstrate that you don’t actually have to depend on luck at all.
Assignment 3: Panning:
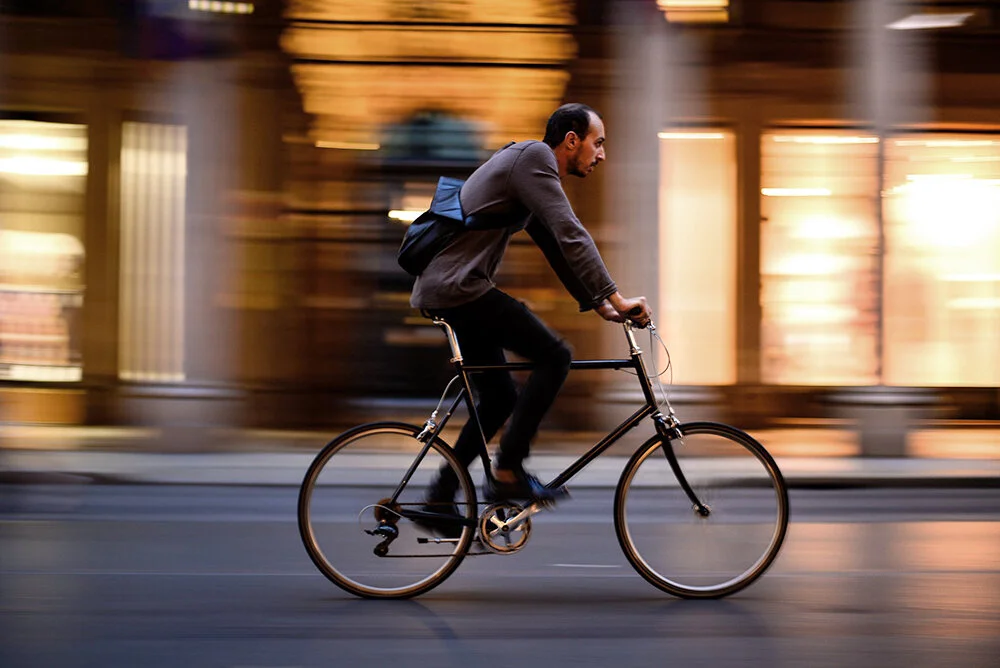
Ok, first, let me remind you again that this assignment is a perfect illustration of the fact that the differential in question here is HOW SOMETHING CHANGES RELATIONSHIP WITH THE FRAME, and not just whether something is moving.
Because the bicycle is moving in reality, but not in our frame.
While the city in the background is NOT moving in reality, but it IS moving in our frame.
Just want that idea to sink in as much as possible.
I find that the more someone wraps their head around what the TRUE differential is here, the better they can manage these results.
Second, despite how difficult this shot SOUNDED when it was first assigned (I made a big deal about the hand-eye coordination, and the muscle-memory), the pan shot actually turns out to be one of the most successful assignments in this entire course, which is to say that nearly every class I teach tends to bring back at least 30-40 pristine examples of this technique.
Why?
Well, because this technique didn’t have nearly as many culprits as the last assignment.
Think about it. How many people attempted to “pan” something that was moving TOWARD them.
It’s exceedingly rare.
People tend to orient this shot left-right to begin with - it’s almost inherent to the technique itself. Although, very occasionally they might compose movement that’s occurring up-down along the Y axis (like maybe a kid coming down a slide at the playground).
Further, your TIMING doesn’t matter nearly as much here, because if you were perfectly panning the car or the bike across your field of vision, you would have gotten the background to blur no matter WHEN you chose to pull the trigger.
And finally, the exact shutter you used didn’t matter quite as much, either….for very similar reasons. As long as you were perfectly panning the movement across your field of vision, the background was going to blur a little more or a little less depending on the shutter….but because the background isn’t the SUBJECT of the picture, we aren’t likely scrutinize the preciseness of the blur.
In other words, the blur is ALWAYS on the qualifier in this shot, and never on the subject.
So there were almost no Time culprits for this assignment at all. All of the factors were more INHERENTLY aligned for you to succeed.
But wait, does that mean you shouldn’t have had any failure?
Not at all. You should have experienced tons of failure.
But in this case, it was less about “culprits,” and more simply about your not having developed the right muscle-memory yet.
In other words, the failure here was less down to the “theory of how this works,” and more just down to “user error.”
You just weren’t panning as perfectly as you needed to at first.
But as dissatisfying as that statement sounds, it’s actually good news.
See, most students eventually get this shot; it’s just that it takes about 20-30 tries before their muscles finally begin to cooperate.
But then their next successful shot might come after only another 10 tries, and then the next after 5 tries, and so on….unitl they begin to get the shot to come off more often than not.
Again, this is muscle memory. It’s more like developing a tennis serve, or a jump shot in basketball.
And the good news is that, really, this is one of the very few things in photography that requires that kind of muscle memory. In fact, NEARLY EVERYTHING ELSE WE EVER discuss will be the kind of skill that, if you UNDERSTAND how to do it - intellectually - then you can probably do it.
Maybe even without any practice.
But panning is one of the very few things in photography where just KNOWING how to do it isn’t enough. You have to develop the proper muscle memory as well.
So if you didn’t get this shot this past week, you probably gave up too soon.
If you didn’t get it on 15 tries, then you needed to do 30. And if not after 30, then 50. But if you keep doing it, your muscles will eventually cooperate.
But here’s the thing, you weren’t lacking any understanding of any crucial factor in this shot. There were no culprits.
You simply needed blunt force practice.
And that won’t be true for almost anything else in photography.
Think about the last assignment. Assignment 2. Would blunt force practice have worked?
For instance, if you had aligned the swingset shot so that the child was swinging TOWARD YOU.… you could have tried the shot 100 more times, and it still would not have worked.
In other words, the reason that particular shot wasn’t coming off was because you were FUNDAMENTALLY misunderstanding the task.
But for this pan shot, almost no one was “fundamentally misunderstanding” the task here….you just needed some blunt force practice.
And again, that may not sound very satisfying, but there is a huge difference between the failures people achieved on this assignment, as opposed to the last one, and I’d like you to understand that distinction.
So finally, before we end this discussion of TIME, and move on to our new topic (Lenses), let me give you two last case studies that will embody everything we’ve been trying to establish here.
First, a pop quiz.
Imagine you’re shooting a rodeo, and you want to create some motion blur on a horse that’s galloping across the arena floor.
The horse is moving from left to right across your field of vision, and when it enters your frame you pull the trigger at a shutter speed of 8.
But the horse becomes TOO blurred.
It just isn’t recognizable.
Now, every textbook in the world is going to tell you to just use a faster shutter speed here. But just know that doing so might trigger a chain reaction that affects other aspects about your image, such as your exposure, or the aperture you might have to use, etc.
So can you think of a solution to this problem that doesn’t involve changing your camera settings?
You can change your distance.
Take one large step backward.
If you just increase your distance to the horse by a few feet, then you will reduce the amount of blur you’re getting WITHOUT having to change your shutter….which in turn won’t affect your exposure, or the aperture you’re using etc.
And by the way, the knowledge we acquired last week (regarding how changing your composition a little bit shouldn't’ at all affect your exposure settings) will come in handy mightily here.
Now, is this the CORRECT solution to this problem?
No. There’s no “right answer” here.
But a good photographer needs to know several solutions to any given problem, so that they can choose the best, or least disruptive solution.
And the greater point I need to make here is that MOST OF THESE SOLUTIONS WILL HAVE NOTHING TO DO WITH YOUR CAMERA SETTINGS.
Good solutions are about understanding the dynamics in your scene that are giving your problems, and then RE-ALIGNING and GAMING those dynamics to your advantage.
Good solutions are almost never about pressing the right button on your camera.
Although Canon and Sony have a strong, vested interest in making you think that’s how this works.
So I can’t stress this enough:
Your camera settings are genuinely less than 10% of what you need to know about how photography works. These underlying dynamics and culprits we’re discussing are over 90% of what you need to know.
You’ll find I have a lot of “pet peeves” about how the mainstream photography tends to distort and mislead the public about many facets of this medium.
And one of my biggest pet peeves is how often photographers - especially online - tend to post one of their images, and then underneath it, post the aperture and shutter settings they used.
This happens A LOT.
And it is SO misleading to aspiring photographers.
It’s essentially the equivalent of a driving instructor telling his class “Ok guys, in order to get here today from my house, I drove East for exactly 38 seconds, before then turning right 90 degrees, and then traveling South for exactly 147 seconds…..…..Now….all of you go out and do exactly the same.”
If those students are driving on any other road than the one the instructor was on, that advice will put them in a ditch.
Because when you’re driving, yes, you need to learn HOW to turn left, or turn right, or stop, start, and speed up….but then every time you do so thereafter, it is a response to the exact situation you’re in, or to the exact road you’re on.
And “camera settings” are no different.
Don’t get me wrong - you NEED to understand your camera settings.
But anyone who posts their camera settings online without a 1,000 word description of the exact circumstances (the distances involved, the speeds, the angles, etc.) is revealing themselves either to be profoundly ignorant of how photography actually works…. or just a straight-up snake oil salesman.
Most likely they’re just the type of photographer who shoots a dozen images at those same camera settings, and then aren’t totally sure why THIS image came out and all the others didn’t. They just keep all of their “takes” and delete all of their “outtakes.” And then if someone asks them what settings they used, they tell them “I used shutter speed 8 and aperture 5.6”
But they don’t tell them they used those same settings for all of their failed outtakes as well.
Finally, I’d like to take you through one last Time-related case study.
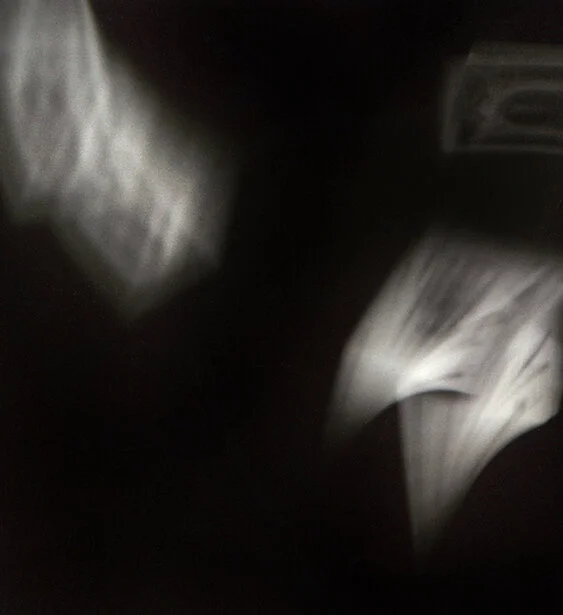
Take a look at this image here:
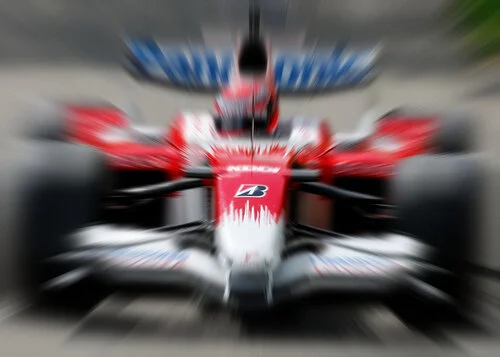
The way you achieve this result is by using a long-ish shutter speed, similar to the ones we used on assignments 2 and 3 this week (for instance, shutters in the neighborhood of 4, or 8 or 15), and then “zooming in” with you lens, WHILE the shutter is open.
This technique is often called a “zoom burst,” and it’s the perfect example to end this lesson with, for several reasons.
First, why did this photographer think they needed to use this technique here?
You guessed it.
It’s because the movement was along the “Z-axis,” which meant traditional “motion blur” techniques were never going to work here.
Second, this is the perfect example of how we aren’t in the business of RECORDING movement. We’re in the business of generating a visual cue that SUGGESTS movement to the viewer.
And it turns out that there are multiple ways of doing that.
If we were to apply this technique to ANY subject matter, it would make that subject matter appear very “ACTIVE,” including this bed of flowers:

In other words, if this construct implies a sense of “Activity” with a bed of flowers, then when it’s applied to something as contextually exciting as a racecar, it will almost certainly reinforce the idea that we’re looking at an ACTIVE scene.
Which once again reinforces the idea that it is not the SUBJECT that does the communicating…. it is PHOTOGRAPHIC STRUCTURE being applied to that subject. In this case the sense of “ACTIVITY” in our shot doesn’t come from the flowers, it comes from the construct of the shot.
The third reason this is a fantastic case study to end on here is that this is another example of what the true differential is here. Remember, the differential isn’t SOMETHING MOVING IN YOUR SCENE…. the differential is how something changes relationship with the frame. And that works whether the subject was moving, or whether the frame was moving.
And in this case, it was the frame that was moving, not the subject.
Finally, the fourth reasons that this is the perfect example to end the lesson on is because we’re now about to begin discussing the use of lenses in order to control SPATIAL DIFFERENTIALS.
And you’re already seeing an example of how we might start to COMBINE these ideas here. This particular shot required some understanding of Time differentials, and some understanding of lenses.
So on to Part II of this week’s lesson: Lenses and Space
-