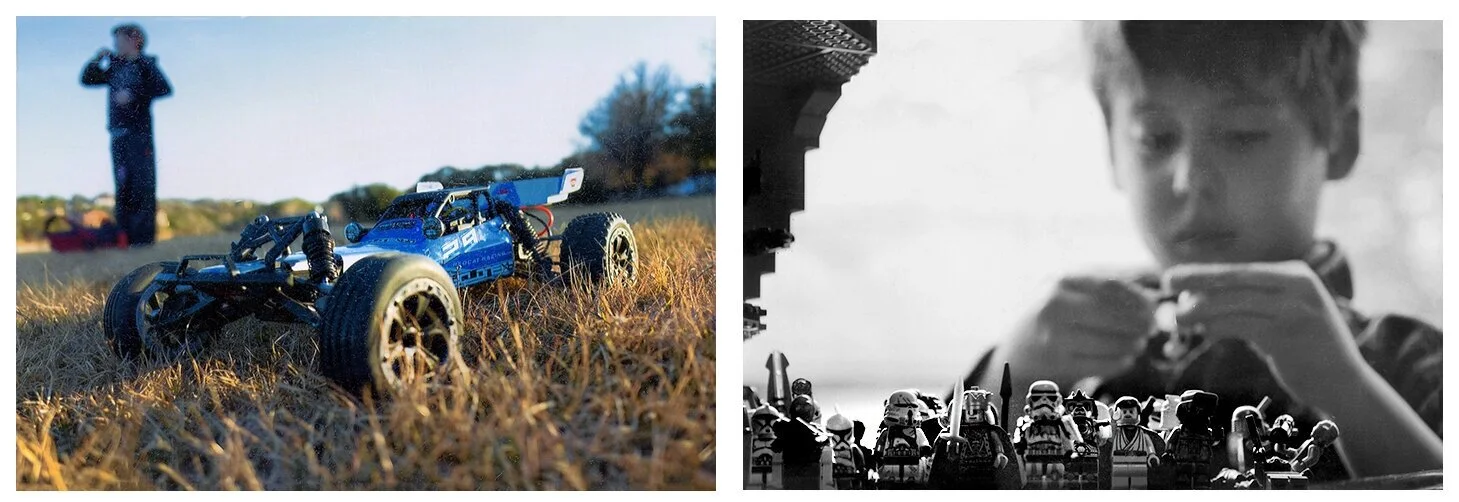
Alright, Part II of this lesson will address the topic of Lenses, and how they can be used to manage Spatial Differentials.
A quick note: the first half of this lesson is unfortunately pretty dry, while the second half is both fascinating and crucial. I apologize for the dryness of the first half, but this information absolutely can’t be avoided - you simply HAVE to understand this material before we move on. But please do your best to power through the first part so that you can get to the ever-so-important (and far more interesting) second part.
Ok, so first, any discussion of lenses needs to begin with the most important characteristic of a lens….its length.
Lens Length
You’ve probably heard photographers talking about their lens lengths before.
For instance, if you’ve ever heard someone say “I’m shooting with a 100mm lens,” or a photographer might ask you “How long is your lens?”
Now, most people will assume that when a photographer talks about their ‘lens length,’ or asks you “how long is your lens?” that they’re probably talking about the literal length of the lens itself.
But technically, “lens length” is actually slang for a very specific measurement inside your system: the FOCAL LENGTH.
So what exactly is ’Focal Length?’
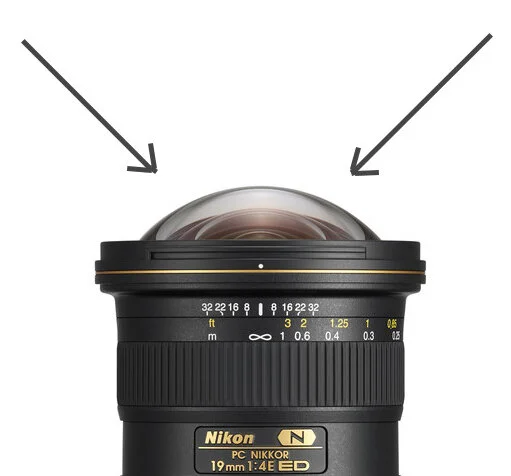
Well, to understand that, let’s take a look at this diagram here:
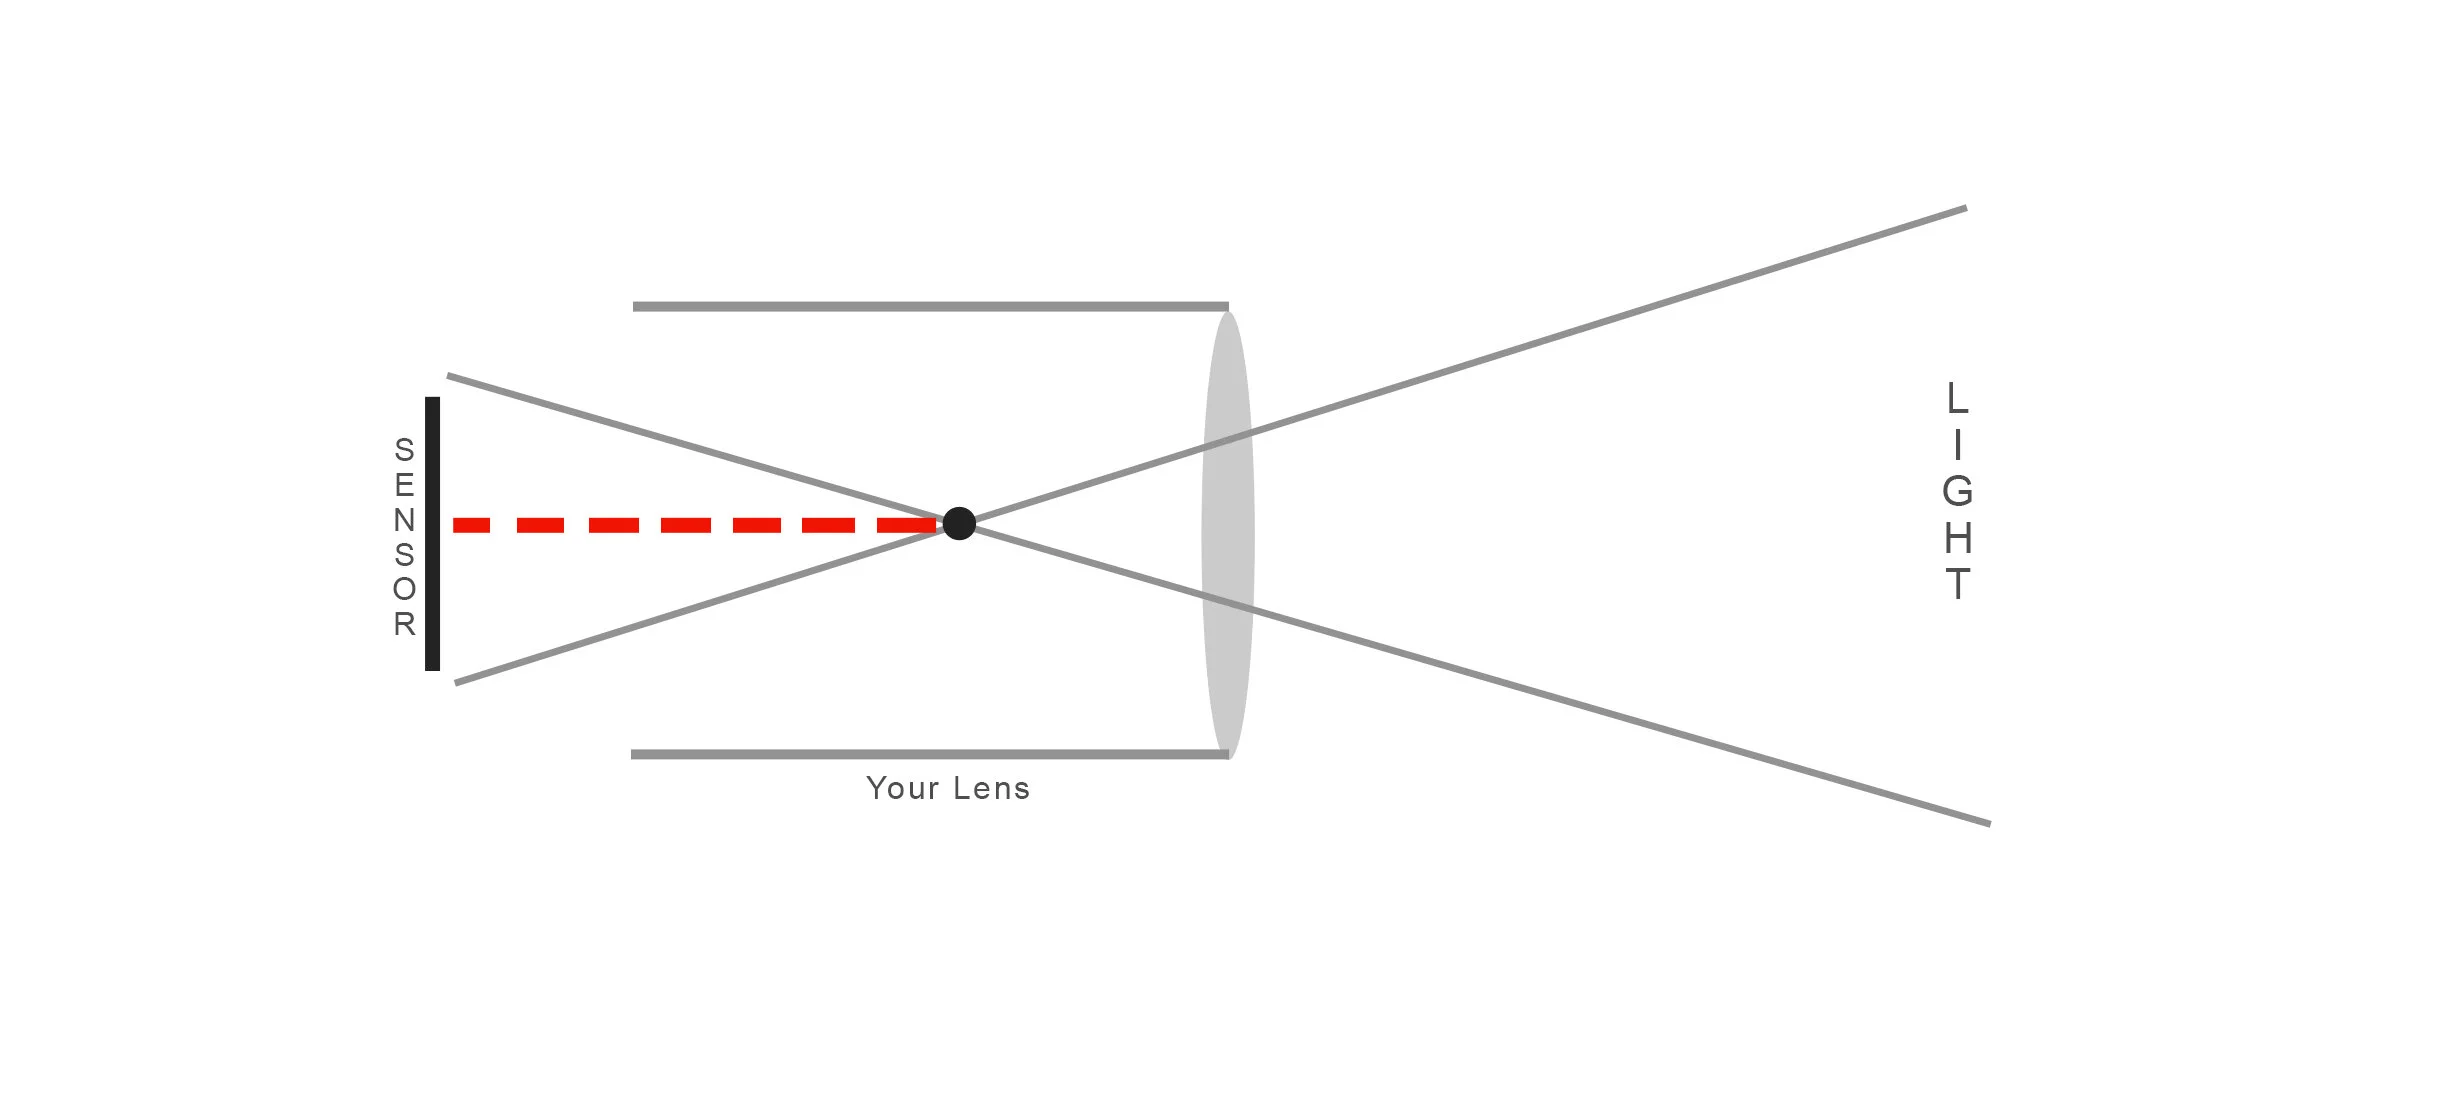
When light comes through your lens, it actually criss-crosses (it inverts) somewhere in the middle of your lens. Which means that when your image hits your camera’s sensor, it’s technically being captured upside-down. [which no one ever notices because your camera’s been programmed to immediately flip the image around when you view it]
But that means that there is a point somewhere inside your lens where the light inverts. And the distance between THAT POINT AND THE CAMERA’S SENSOR - which has been illustrated here by the dotted red line - is called the FOCAL LENGTH of the lens.
So it isn’t really a measurement of the lens itself, it’s more a measurement of the distance the light has to travel when it projects against your sensor.
But over the years we’ve simplified this concept so that it’s usually just called “Lens Length.”
So why does any of this matter?
Well, the “Focal Length” of a lens is actually the DEFINING CHARACTERISTIC of that lens.
In fact, it’s what NAMES your lens.
There are actually different categories of lens length, and I’ll bet you’ve heard of some of them.
One CATEGORY of lens length is called WIDE ANGLE.
And I’ll bet everyone reading this has heard of a ‘wide angle’ lens before.
Another category of lens length is called TELEPHOTO.
And I’ll bet everyone reading this has heard of a ‘telephoto’ lens before.
But the last category is called NORMAL. As in a “normal lens.”
And hardly any of my students have ever heard of a “normal lens” before. In fact, I find about 1 in 25….maybe.
So let’s start with that one. What is a “Normal Lens.”
To understand what a normal lens is, I have to explain one other aspect of your camera system.
Your “Format.”
The ‘Format’ of a camera is essentially shorthand for “how big your camera sensor is.”
Our digital cameras can have very differently sized sensors, and this can greatly affect the price you paid for your camera. In fact, as I hinted at the beginning of this course, this is really the only thing about your camera that substantively matters.
So to give you a bit of trivia as to where these different “formats” come from, let’s dive back into photo history for a moment.
Thinking back to when we used to shoot film (instead of digital)….. if Kodak wanted to “cut” their film into a slightly bigger shape, it really wasn’t that big of a deal, in fact it only increased the cost a little bit.
Whereas today, our modern digital sensors become exponentially more expensive to manufacture with any increase in size at all.
So back in the days of film, the reason we settled on the common ‘35mm format,’ was not necessarily because it was more cost-effective, but more because the 35mm format was the “Goldilocks” of film formats…. it was just right.
In other words, we found that if you made the film any smaller at all, you ended up with a lot of logistical problems and compromises with certain types of lenses.
And if you made the film any bigger at all, you ended up with a lot of logistical problems and compromises with OTHER types of lenses.
But 35mm was ‘just right.’ It allowed relatively uncompromised use of ALL types of lenses.
So in the 20th Century, we CHOSE that format, very consciously, for some very logical reasons.
But now flash forward to the year 2000.
Digital cameras are becoming all the rage. And the engineers at Canon and Nikon really wanted to keep the exact same “format” for digital cameras.
In other words, in a perfect world they would simply replace the film at the back of the camera with an identically sized digital sensor. That way nothing would really have to change about the physics or mechanics of how we practice photography.
But the problem was, back in the year 2000, installing a “full frame” sensor (ie a sensor that was exactly the same size as a 35mm film negative) was insanely expensive. Like $10,000. And almost no one was willing to pay that much for a camera.
So in order to “‘tide everyone over’ for a few years, camera companies began giving consumers a much smaller sensor, one that could be sold for closer to $2,000, which was a lot more reasonable.
And that smaller format is called the “APS Format.”
Finally, flash forward all the way to today, and the prices of both these formats have come down a lot.
APS cameras can now be purchased for closer to $400, instead of $2,000
And “Full Frame” cameras can be purchased for closer to $1400, instead of $10,000.
But that means my students are divided. Some of you have APS cameras, and some of you have Full Frame cameras.
So why does this matter?
Well, it has to do with your lenses. Your lens BEHAVES differently if it’s having to project the light against a bigger sensor as opposed to a smaller sensor.
So back to our diagram.
In order to understand what a “Normal Lens” is, we have to first know which camera format you’re using.
Any time the “focal length” measurement of your lens is EXACTLY THE SAME AS THE DISTANCE ACROSS THE FACE OF YOUR SENSOR, we call that lens “Normal” for your format of camera:
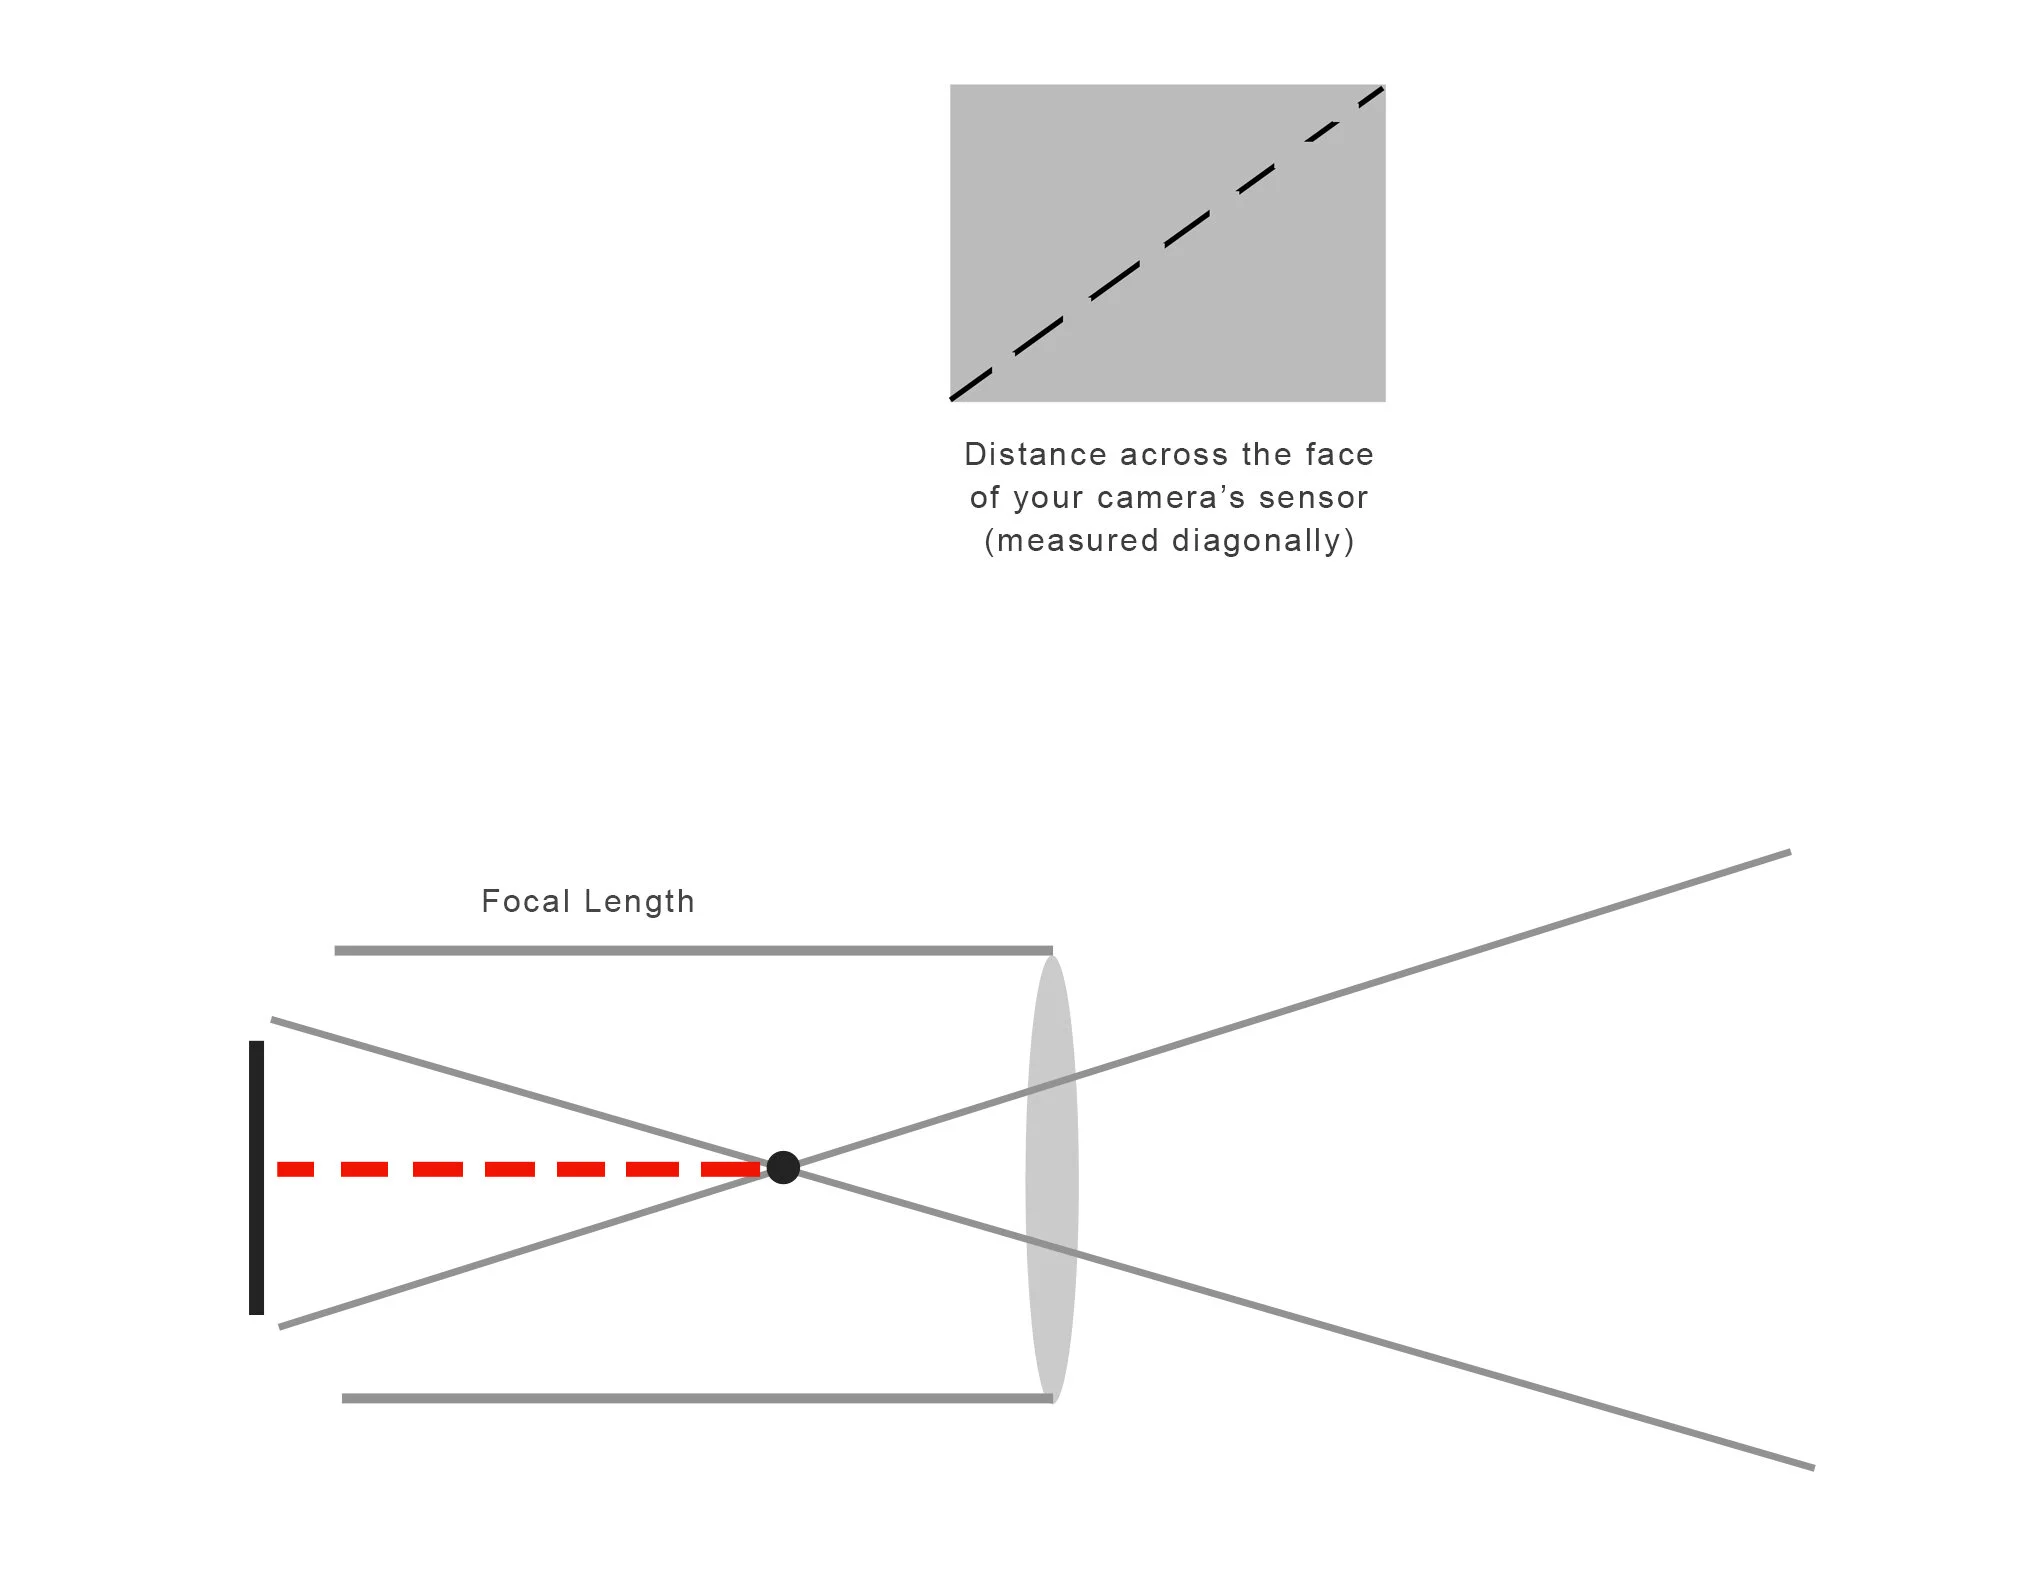
So again, when those two measurements are the SAME, then you have a “Normal lens.”
And again, that means that the lenses are all a bit RELATIVE to your “format” of camera.
But we’re getting pretty deep in the weeds here, and a lot of this information is pretty pedantic, so let me boil this down to the part you REALLY need to know:
If you’re shooting with a Full Frame camera, you’re “Normal Lens” is 50mm.
And if you’re shooting with an APS camera, your “Normal Lens” is 35mm.
Ok, so if that’s the DEFINITION of a ‘Normal Lens.”
The FAR greater question here is “What does a Normal Lens do?”
In short, nothing.
The reason it’s called a “normal” lens is because it’s the one type of lens that WON’T ALTER THE SCENE in any way.
In other words the scene will be rendered exactly how our eyes would perceive it in real life. In terms of distortion, distances, spatial relationships etc.
So pause.
I’ve just given you two very interesting pieces of information here, and I’d like you to see if you can put them together for me.
First, I just told you that a “Normal” lens will render the scene as FAITHFULLY as possible
Second…..none of you have ever heard of a ‘Normal Lens’ before.
You’ve no doubt heard of Wide Angle lenses and Telephoto lenses….but most of you have never heard the term ‘Normal lens’ before today.
So why is that?
Well it’s because, statistically, they’re the least used lenses.
So let me give you those same two facts again, but this time in slightly different terms: on the one hand, normal lenses are very faithful and very accurate to the scene…..on the other hand, no one is using normal lenses.
Why aren’t people using normal lenses very often?
Well, there are a few ways we could answer that question.
First, the cynical answer.
The obvious cynical response here would be that “people don’t want ‘truth’ in their images.” They want their images to lie…..if only even a little bit.
Now, that sounds remarkable cynical.
But what if I put it to you this way instead……. imagine you’re a professional portrait photographer….do you think you’ll be in business very long if you make people look EXACTLY how they look in real life?
Or if you’re a real estate photographer, do you think you’ll be in business for very long if you make that kitchen look EXACTLY how it looks in real life?
Some would argue that, if you’re a commercial photographer, the very purpose of your portfolio is to demonstrate to clients how adept you are at making things look BETTER than they looked in reality.
And the same people might argue that, for photojournalists, the purpose of their portfolios is to showcase the ability to sensationalize the events they shoot - to make them look more dramatic, more exciting, more powerful.
But that’s the cynical outlook.
Personally, I’m going to take a very different stance on this.
The reason we don’t tend to use a lot of normal lenses in our photography is because normal lenses are terrible at communicating.
What do I mean by that?
Well, throughout this course, I’ve been dropping hints about the “syntax” of visual communication, and how the viewer psychologically reacts to the image, etc.
And I want to step that kind of rhetoric and vocabulary up a notch here today, because the farther we go in this curriculum, the more our lessons will become about communication….and the more we’ll begin to see photography as a “Visual Language.”
And with specific regard to “visual literacy,” my current concern is that most of the people in our society are only half-literate. Which is to say they know how to ‘read,’ but they don’t know how to ‘write.’
In other words, let’s do a quick thought experiment.
If you were to open a newspaper page, or a magazine page, and on that page are two very different photographs, sitting right next to each other: one of them is a journalistic shot, informing you of something that’s happening somewhere in the world right now, and the other shot is an advertisement, it’s trying to sell you a product.
And you are never EVER confused as to which is which.
And you may think the distinction between the two is self-evident…. that it should be inherently obvious to anyone that looks at them.
But that’s not true at all.
If we were to use a time machine to pluck someone out of the distant past, perhaps someone from 500 years ago, and we were to show them those two images, there is exactly ZERO chance that their reaction would be “I say, sir….clearly one of these images is informing your citizens of events-current…..while the other image is peddling some kind of product in your modern marketplace!!!”
Again, zero chance.
The difference between them is obvious TO YOU, because you’ve become very acclimated to seeing it.
Journalistic images tend to be STRUCTURED differently than commercial images…and after seeing each type of image nearly every day for decades-on-end means that you can now identify them, very easily, upon sight.
So again, most people in our culture can READ images…as in, they know what those images are supposed to MEAN.
But now let’s add another layer to this thought experiment.
Suppose we took a journalistic photograph and put it next to a commercial photograph, and went out and asked strangers on the street whether they could identify which is which. I’d wager nearly 10 out of 10 people would probably pass that test.
But now let’s give them the second part of the test.
Once they’ve identified which is which, let’s hand them a camera, and then also hand them an object to shoot (any kind of subject matter at all) and instruct them to “First shoot this object using ‘journalism’ syntax….and then shoot this object again using a commercial construct.”
They probably wouldn’t have the foggiest idea where to even begin.
So as a society, we’re only half-literate.
Nearly everyone in our culture can READ and understand a professional photograph….but maybe 1% of our population fluently knows how to communicate a very specific message photographically.
Now, putting aside how concerning that is…..my point at the moment is that, if our task is to learn how to FLUENTLY express ideas photographically….you have to know what you’re in for here.
The thing about VISUAL communication is that it can be really tricky to learn, especially if you’re an adult.
In fact, the problem with learning this stuff as an adult is that you’ve now lived long enough to completely take for granted how you view the world.
In other words, whenever you look upon a scene (without a camera, just with your own human eyes), there are a million cognitive processes happening inside your brain that are LEADING you to perceive that scene a certain way, or to come to certain conclusions about that scene.
And most of those cognitive processes are totally invisible to us. We aren’t even aware that they’re occurring.
Which means that when those cognitive processes inevitably LEAD YOU to you a certain conclusion or observation about that scene, you think those conclusions and observations are self-evident. You think that anyone else looking at this scene would inevitably come to the same conclusion or observation.
And so what most people do when they take a picture is they think “Oh that’s interesting,” and they snap a picture of it….and then they expect that the viewer will find the scene or subject interesting as well.
Which is not a given at all. In fact, it’s not even likely.
Whenever two people look upon the same scene, depending on what they’re eyes are drawn to, and depending on what prior associations they have with that subject matter, and depending on what mood they’re in, etc., etc. ….those two people are going to take very different things from that scene. They’re going to pick up on very different relationships throughout that scene.
Ok, so given all that, what do you think would happen if you took a ‘Normal Lens,’ which takes the ENTIRE scene — every object in that scene, and every relationship within that scene — and then captures it “as is,” ……and then simply presents that scene to the viewer, “as is"…..
…..don’t you think the viewer is going to make whatever THEY want out of it?
In other words, if you showed that picture to 10 different people, all 10 might get a completely different message or narrative out of it.
And thing is, capturing a scene in that way might be more “truthful” or more “faithful” in some abstract sense….but I’ll tell you what it isn’t……..it isn’t communication.
Communication is, by definition, a SUBTRACTIVE process.
For instance, when I speak to you orally, I don’t present you with the entire English language, or a large word bank, and then ask you to make your own sentence out of it. No….when I speak, my task is to SELECT a particular sentence, one of my own choosing.
And photographic communication is no different.
The idea is that, of all the ways you COULD perceive this scene, I’m asking you to perceive it THIS way.
I’m emphasizing a very specific relationship, or a very specific dynamic within the scene.
I’m NARROWING down how I want you to look at this scene.
That’s what photographic communication is at its very essence.
And the fact of the matter is…..normal lenses aren’t very good at doing that.
So…..is there a mountain of evidence out there that commercial photographers and journalistic photographers blatantly want to mislead or deceive us?
Sure.
But my point is that, even if that WEREN’T the case…even in the noblest of societies….I still don’t think we’d be using normal lenses all that often, because they don’t tend to highlight anything specific about the scene.
Ok, so if photographers tend to use Wide Angle and Telephoto lenses for most of their shooting, then what are those? Let’s discuss what those do instead.
First, the definitions.
Any time the ‘Focal Length” measurement is LESS than the distance across the face of your sensor, that technically classifies as a ‘Wide Angle Lens’
So anything shorter than ‘Normal.’
That means for a Full frame camera, anything LESS than 50mm
And for an APS camera, anything LESS than 35mm.
And then on the other side of this: any time the ‘Focal Length” measurement is GREATER than the distance across the face of your sensor, that technically classifies as a ‘Telephoto’
So anything LONGER than ‘Normal.’
That means for a Full frame camera, anything MORE than 50mm
And for an APS camera, anything MORE than 35mm.
Ok, so those are the definitions
But what do these different lenses do?
Well let’s start with your associations.
I’ll bet everyone reading this probably has the association that ‘wide angle lenses’ have a WIDER ANGLE OF VIEW, as in, they “get more in the shot.”
But notice that’s not what I’ve told you.
All I’ve told you is that a wide angle lens is SHORTER than average.
So why does a SHORTER lens see more of the scene?
Well remember, when we say a lens is “shorter,” what that really means is that the light will invert much CLOSER to the camera sensor. Which, as you can see from this diagram, means that it HAS to produce a wider angle of view.
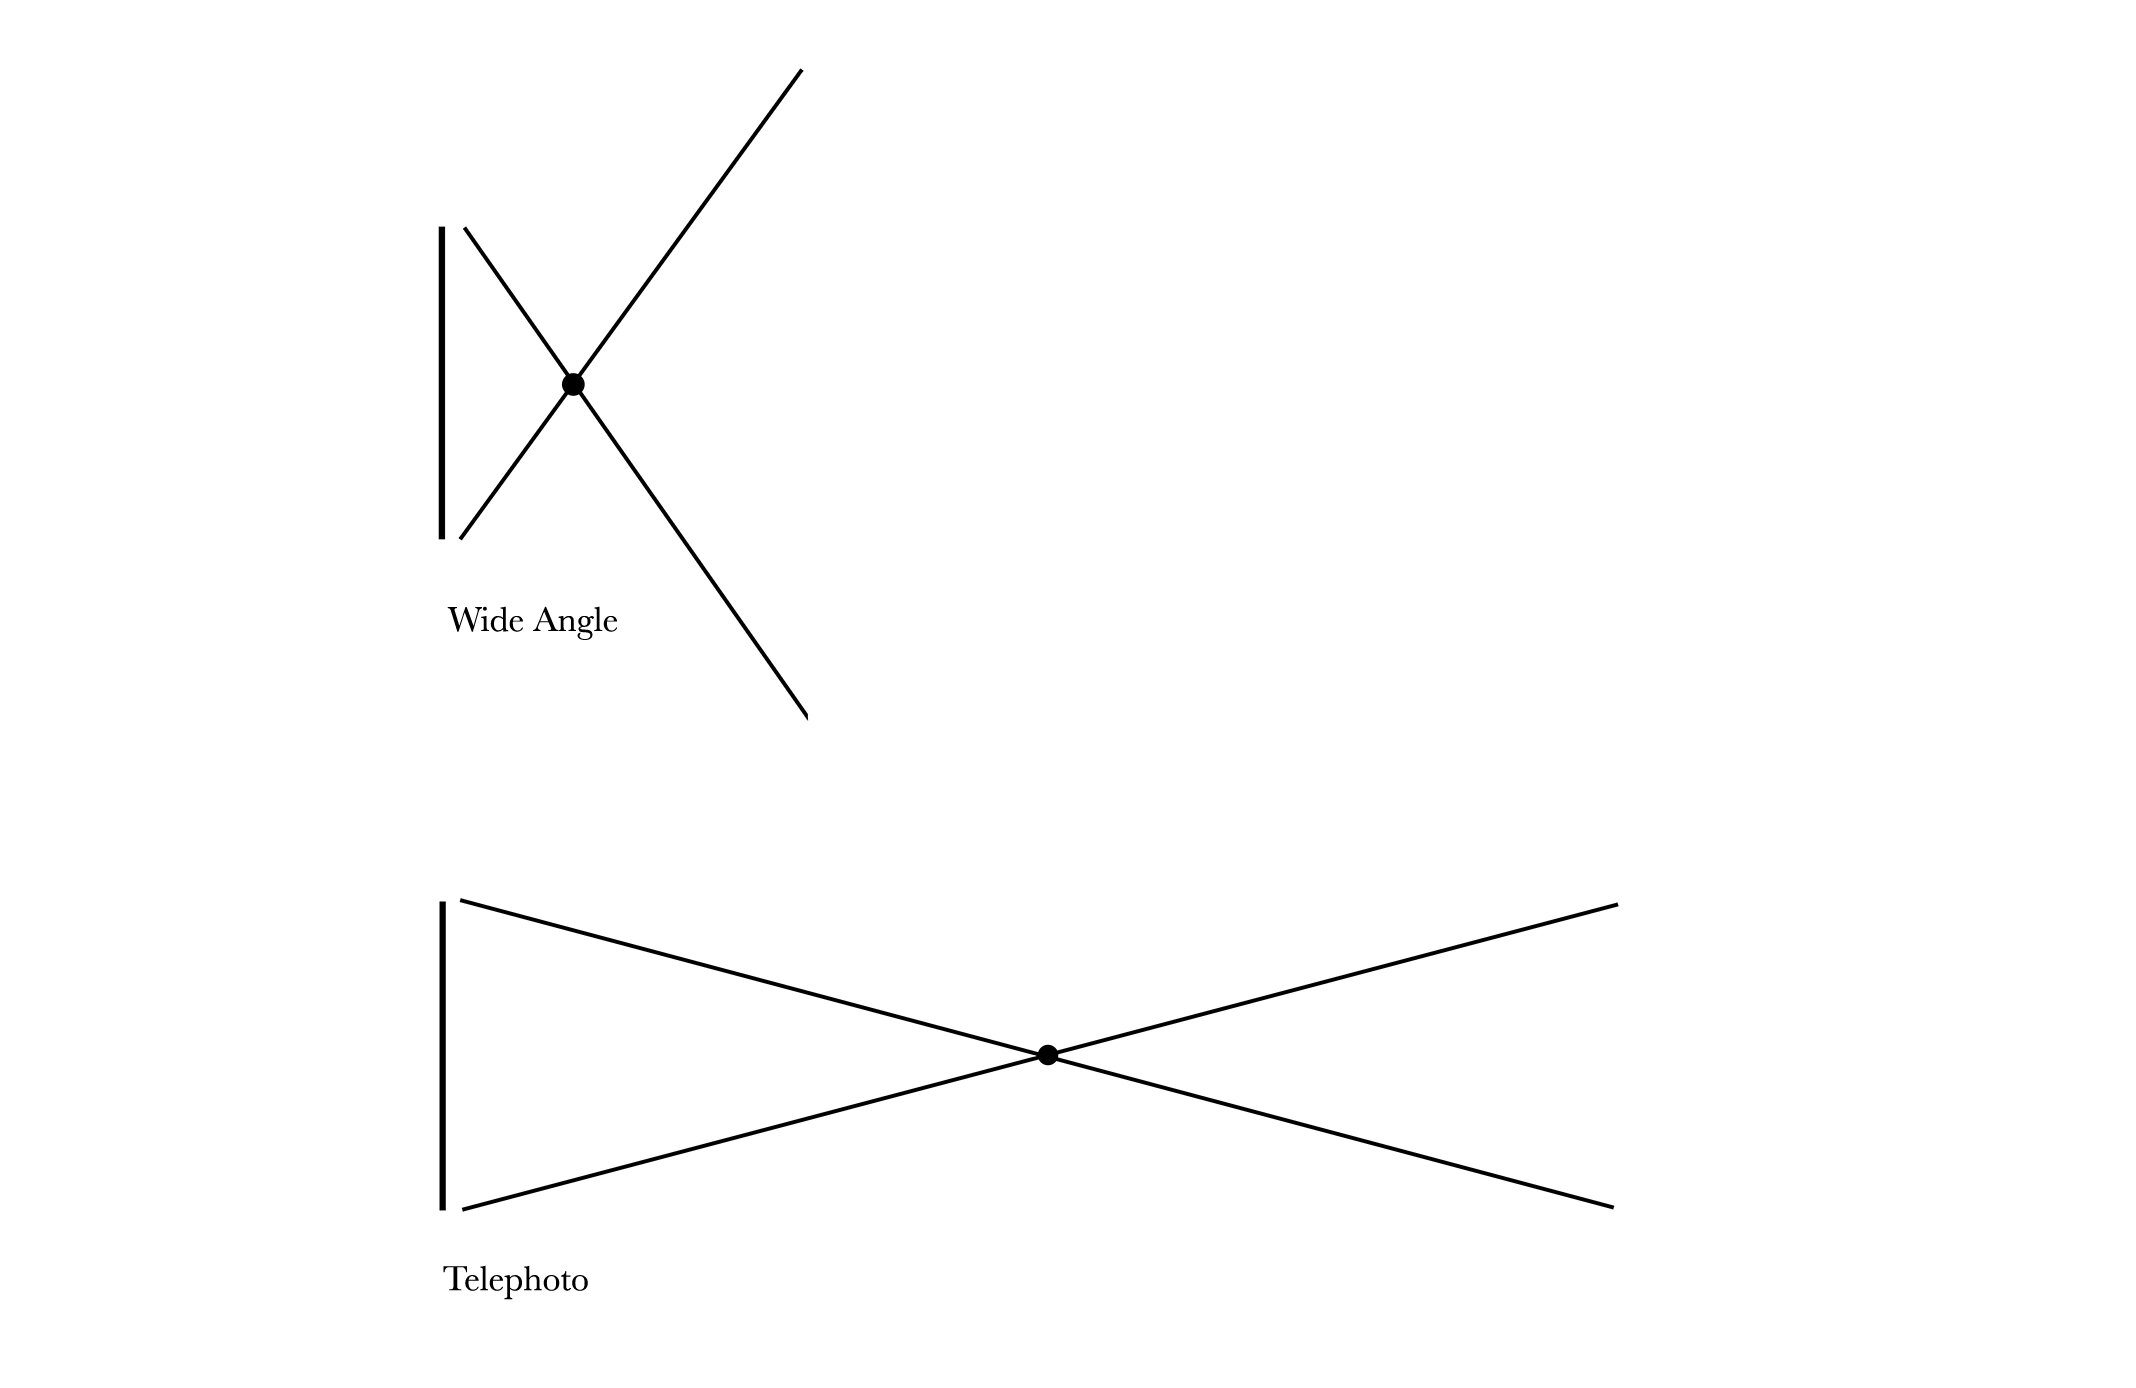
Whereas the FARTHER the light inverts from the sensor, the narrower the angle of view is going to be.
This is why SHORTER lenses see MORE….. and LONGER lenses see LESS.
Ok, but what do these lenses DO to the picture?
Well now we’re getting to the good stuff. These lenses don’t do what most people think they do.
Let’s start with Wide Angle lenses.
Wide angle lenses have a much greater angle of view, which means you can get a lot more of the scene in your photograph. For instance, if you have a lens that gives you 90 degrees of coverage, it means that if you stand in the corner of a room, you can get the entire room in the picture.
But all that coverage comes with some alterations to the image.
Specifically, a Wide Angle lens will alter an image in two ways:
1) It will distort the image
2) it will change our perceptions of the spatial relationships within the scene.
First, the distortion issue.
Why do wide angle lenses distort an image?
Well think about it, in order to capture light from 90 degrees (or from “90 different angles”), that lens is going to have to have a pretty bent or curved glass, so as to see in all of those different directions at the same time.
And so when the light comes through that bent glass, it BENDS YOUR PICTURE a little bit.
But here’s the thing. Right now, I don’t want you to be that concerned with this distortion.
When we get into advanced applications later in this curriculum, we can revisit this, but for now, this issue won’t be fundamental to what we’re learning here today.
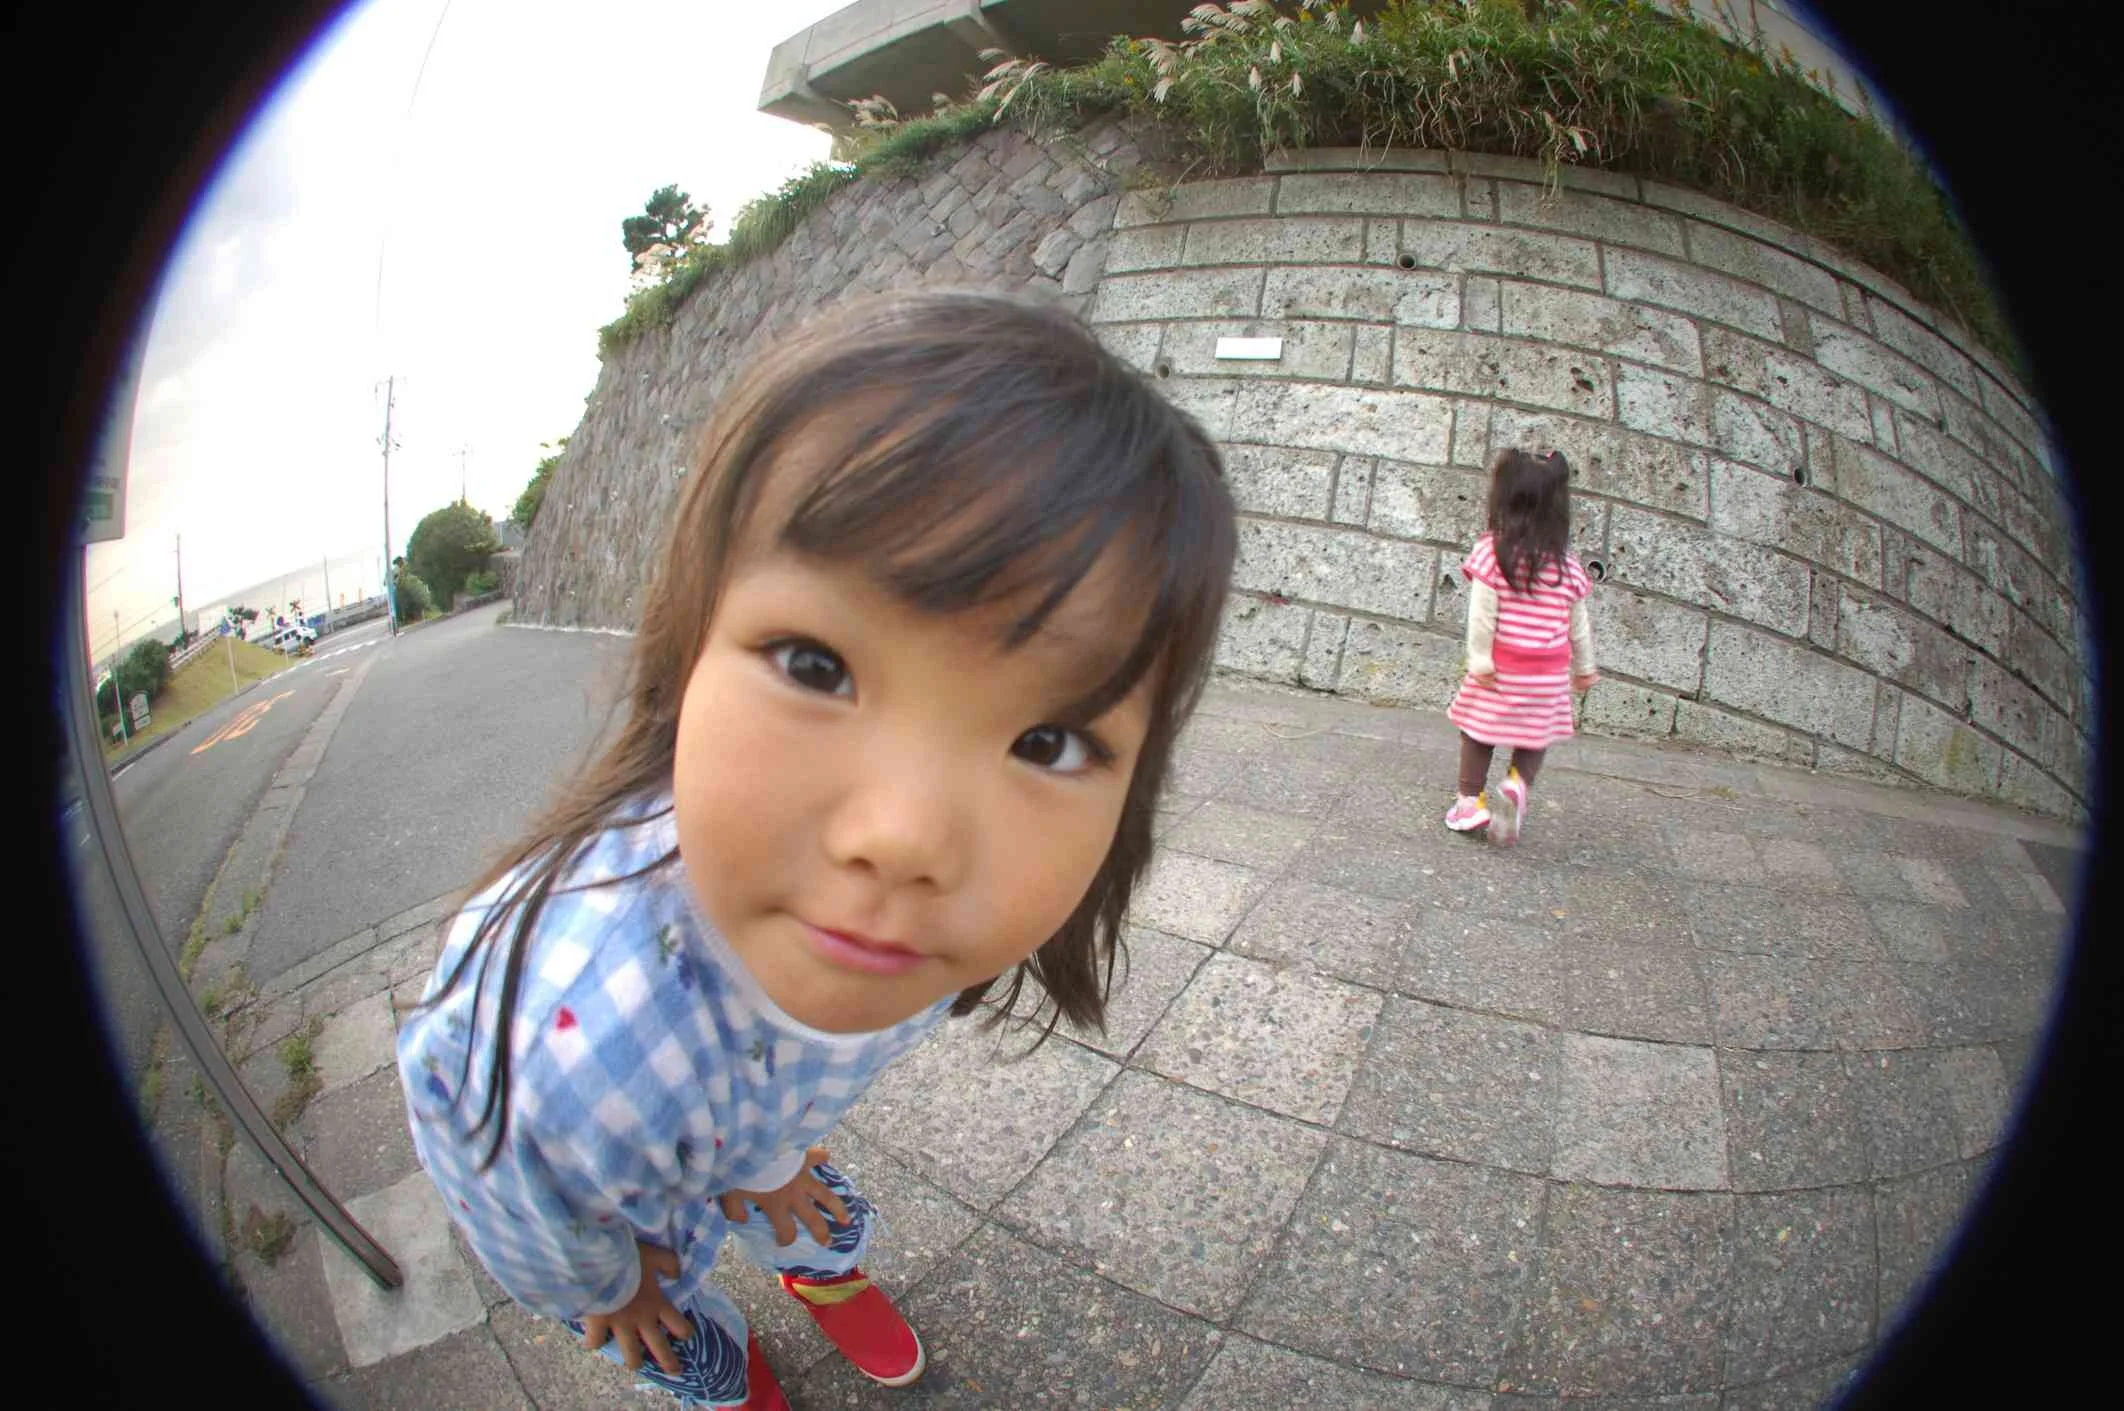
In fact, most viewer’s won’t even notice this distortion until the lens gets VERY VERY short, at which point you have what’s often known as a “fisheye lens” and your scene starts to look a bit like a funhouse mirror.
At that point the distortion is obvious to anyone who looks at the image.
But your lens doesn’t become “fisheye” on a fullframe camera until you get down to about 18mm (or about 13mm on an APS sensor), and the overwhelming majority of my students don’t even have such lenses.
So just to put this in perspective, the VAST majority of cell phone images you’ve taken throughout your life were TECHNICALLY taken with a wide angle lens…and how often did you experience NOTICEABLE distortion in those images?
Again, it’s there if someone really wants to scrutinize the image closely, but at a glance, most people won’t notice it.
So for the moment, don’t worry too much about this distortion issue, it’s more of an “FYI” kind of thing for the time being.
What I really want to talk about is that second issue.
The fact that wide angle lenses will alter our perceptions of the spatial relationships in the scene.
Specifically, wide angle lenses will STRETCH the space in your scene, and make objects look farther apart than they are.
For instance, if you were to shoot a tabletop with two bottles on it….. if those bottles are only 3 feet apart from each other, they will LOOK like they’re 10 feet apart.
And now I want to pause here and state very clearly that: THIS is why you use wide angle lenses.
But before we dive too deeply into that, let’s first explain what ‘telephoto’ lenses do…..and then we’ll discuss how to use these different lenses going forward,
As mentioned before, the associations that most people have when it comes to telephoto lenses are that they’re longer, and they see less of the scene (a narrower angle).
So the first thing you need to know is that telephoto lenses have no distortion associated with them.
And this is because you’re capturing light from only one angle, or only one direction, thus the lens doesn’t need to be as bent or curved, it can have a much more flat glass element.
So no bent lines in your image.
Ok, but what about that other thing? The whole “changing spatial relationships in the scene” thing?
Yep. Telephoto lenses are going to do that in spades.
Specifically, telephoto lenses will COMPRESS the space in your scene, and make objects look much closer together than they are.
So for instance, if you were to shoot a tabletop with two bottles on it, and those bottles were 3 feet apart from each other, they will LOOK like they’re directly next to each other, on one single plane of space.
And again, I want to pause here and state very clearly that: THIS is why you use telephoto lenses.
So why am I being so emphatic about that?
Because that’s NOT how how people are using their telephoto lenses, are they?
In other words, if I went up to the random stranger on the street and asked “why would you use a telephoto lens?” What would they say?
Well, they may not totally understand what that term “telephoto” really means, so if I were to use the more ‘layperson’s’ term, I would ask, “Why would you ZOOM IN with your lens?
See, “Zooming in” just means making you lens longer so as to narrow the view of the camera. Ie: The more you “zoom in,” the more it lengthens the lens, and makes the lens more telephoto.
So if I asked the layperson, “Why would you zoom in with your lens?” What answer will I get 10 times out of 10?
They’ll say it’s because they want to get “closer” to the subject….or they want to “crop down” on the shot.
Which is the wrong….…wrong,……Wrongy McWrong-wrong….wrong wrong………..wrong.
And just to illustrate how serious I am about this, I’ll state that there truly will not be a single other moment in this curriculum where I will use the term “wrong” and mean it with any real sincerity.
For every other concept we discuss, I’m going to try my best to demonstrate the pros and cons of doing something one way…as opposed to another.
There will be no “wrong.”
But I’m going to use that term here. If you’re using a telephoto lens to “crop in” on your subject….then you are doing it wrong.
That’s not what telephoto lenses are designed to do.
First of all, superficially speaking, it needs to be said that if you’re using it just to “crop in” on your subjects, you could probably just achieve the very same result by literally cropping the image later…. in post-processing, or when you go to print it.
Because at this point, in 2021, our camera sensors have more than enough resolution (read: megapixels) that you can probably get away with doing that in 9 out of 10 cases….which means there’s not much incentive to spend thousands of dollars on a lens that does that exact same thing.
Secondly, and FAR more importantly…. using your lens to “get closer to your subject” will not yield the same result as ACTUALLY getting closer to your subject.
Not even close.
In fact, it will radically alter the spatial relationships in the scene…..and totally RESTRUCTURE your image.
So just to illustrate how important it is to be in control of this dynamic, take a look at this comparison here:

These two shots were taken of an IDENTICAL scene.
The one on the left was shot with a wide angle lens from very near, and the one on the right was shot with a telephoto lens from very far.
And to give you an idea of the distances here, the two Life Savers canisters in this shot are about 5 feet apart from each other on that table top.
Which is believable for the first image, but many people have a hard time believing that they’re STILL 5 feet apart in that second shot.
But they are.
So here’s the first observation I need you to make here: is cropping in with your lens the same as actually getting close to your subject?
No.
Objectively no. Factually no.
Not even close.
Second, is this a whole thing just a teeny-tiny little SUBTLE issue? Like just some “negligible byproduct.”
Nope. Using a longer lens here has RADICALLY re-structured our shot.
So let’s look at the ways in which changing our lens here altered the STRUCTURE of the picture.
First, the ‘wider’ shot on the left has 3 different layers of space (a foreground, a middle ground, and a background), whereas the more telephoto shot on the right has compressed all 3 of those layers into just 1 layer of space.
In other words, the first shot has more depth, and the second shot appears very “flat.”
Next, the shot on the left has very clearly emphasized the canister of Life Savers in the foreground over the clock in the background.
While the shot on the right has emphasized the clock in the background over the Life Savers in the foreground.
In other words, we’ve swapped the SCALE of the shot. The wide angle lens has made the foreground Lifesavers the largest part of the scene, whereas the telephoto lens has made the background clock the largest part of the scene.
So I can’t stress this enough. This is not some “subtle byproduct.”
In fact, you could make the argument that the way you choose to manage these particular kinds of spatial dynamics is THE MOST IMPORTANT DECISION YOU EVER MAKE FOR ANY GIVEN PHOTOGRAPH.
And right now, most photographers are leaving all of this up to chance.
Because they don’t really understand any of this.
I’ve witnessed dozens of photography tutorials in which students are taught to just “zoom in” if you’re too far from your subject…..and those photographers now do so without any knowledge of how it will restructure their images.
And this is actually just as bad from the other side. On the "‘Wide Angle’ side of things, photographers are being taught to use ‘wider’ lenses to “get more of the room in the shot,” …..and so, again, they now do so without any understanding of how it will restructure their images.
But getting back to this case-study……you might look at this comparison and say that it’s kind of an apples to oranges comparison.
That there’s no anchor, or “control” that can be used to compare these two shots.
So let’s look at another case study that DOES have a controlled element.
Note that the man here is roughly the same scale in both shots. In other words, unlike the Lifesavers canisters above, he occupies the same position within the frame for both images:
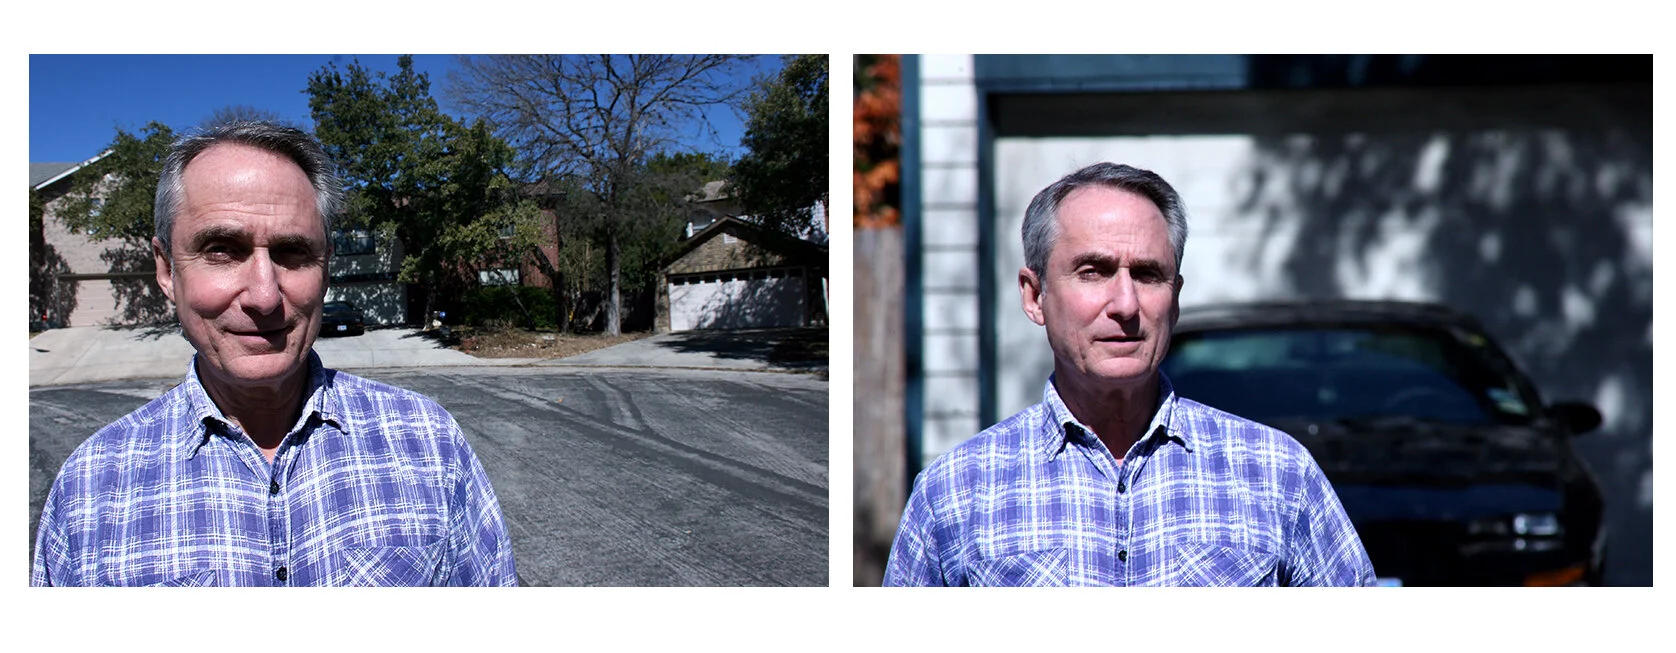
But now look at how much the BACKGROUND has changed.
For the shot on the left (the wide angle shot), the car in the background is about the size of the man’s mouth (in fact you probably wouldn’t have even noticed that car had I not mentioned it).
But in the second shot (the telephoto shot) the car has been rendered bigger than the man’s body.
Same car, same distance behind him.
But these shots have been “managed” differently…..by using different lenses.
So again, is this just some small byproduct….some kind of subtle, negligible effect?
Nope.
This is crucial.
And we CANNOT be leaving this to chance.
So then, if it isn’t about “cropping” the image, or “getting more of the room in the shot” ….then why WOULD you use one lens over another?
Well let’s begin with the virtues of a wide angle lens.
Wide lenses probably have dozens of different uses. But here are 4 big ones.
1) First, you use a wider lens when you want to emphasize the foreground over the background.
As we get into narrative photography in particular, we’ll want to have the ability to generate a strong “HIERARCHY of information” within our shot, which is to say that we will want it to be very clear to the viewer which part of the scene is more important.
Which part of the scene is the “subject?” And which part of the scene is the “qualifier,” ….the secondary information that tells us something ABOUT that subject.
Or another way to put it is that we want a CLEAR ORGANIZATION of the information in the shot. We want to control what part of the scene the viewer notices, and in what order they notice it.
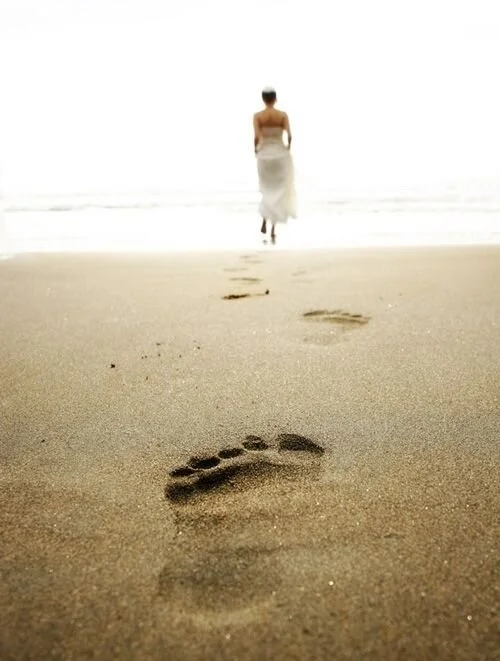
So here we’ve emphasized a relatively innocuous part of the scene (the footprint).
And had this been shot more from “human eye level,” and with a longer lens, absolutely no one would ever have noticed it.
But the structure of this shot ensures that it will likely be the first thing viewers notice…and moreover, the viewers will almost certainly form a relationship in their mind between the footprint in the foreground, and bride who made it in the background.
In other words, we’re taking two pieces of information, and ORGANIZING them in such a way that it almost MANDATES how the viewer will read the scene.
This is by far the most common reason we’re going to use Wide Angle lenses in here.
2) You use a wider lens when you want the image to feel more intimate, as though we (the viewers) are actually very close to the subject.
Take a look at this comparison between a lion cub being shot very near, with a wide angle lens, and then a lion being shot from far away, by “zooming in” on it:
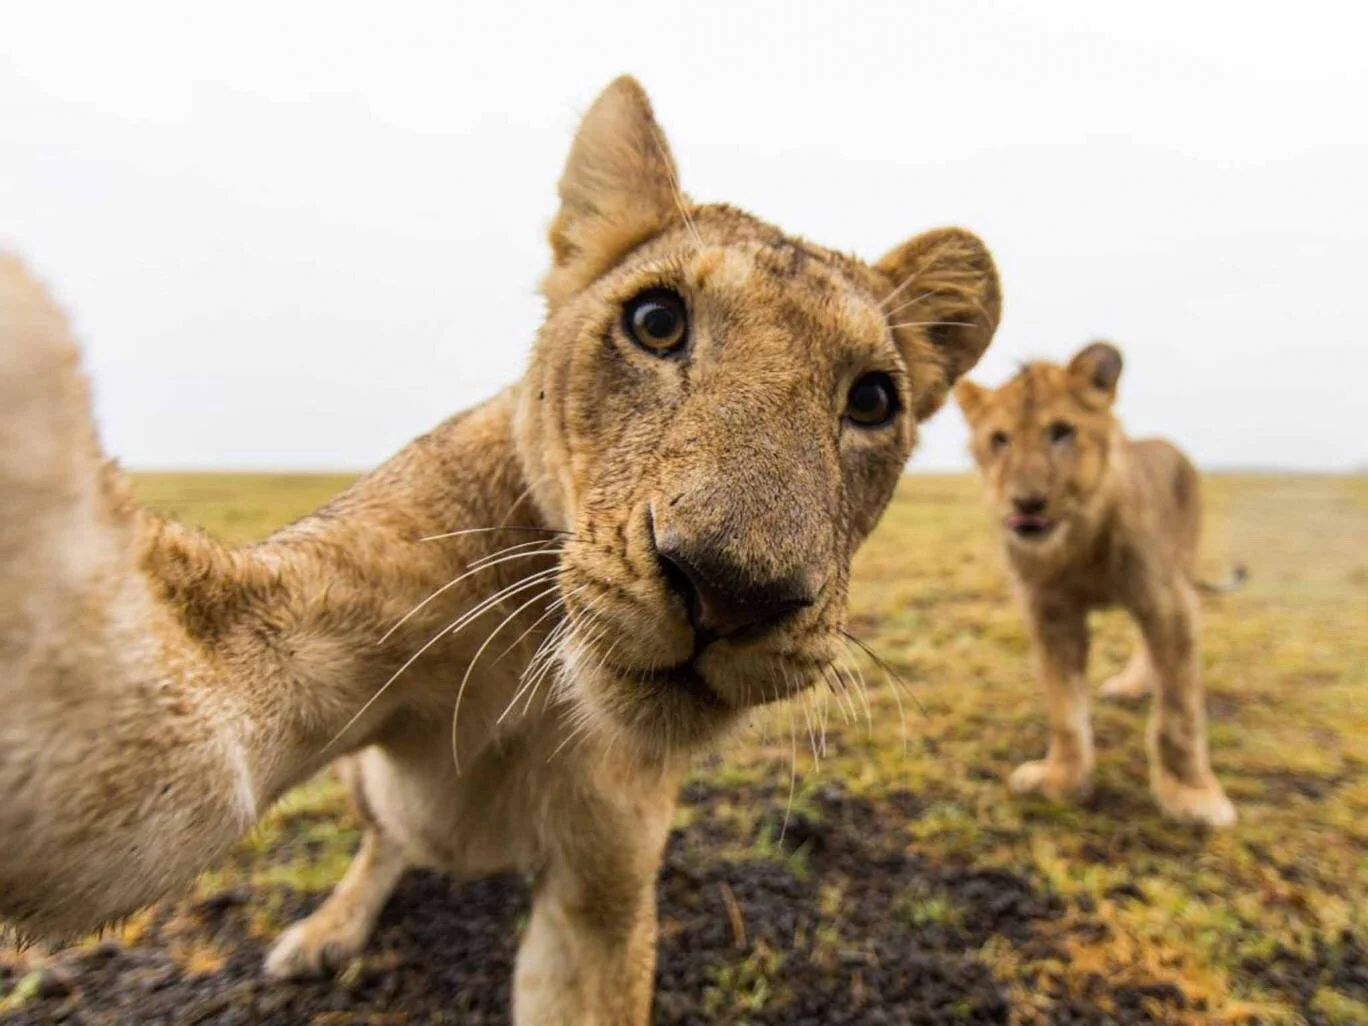
People tend to think that the way you make something look “near” is by making that thing bigger in the frame.
Hence why they think you can simply “crop in” from far away.
But that’s not how this works at all.
The perception of ‘nearness’ comes more from the descending scale within the shot….ie: from the way things get smaller as we go from the foreground into the background of the shot.
To see this phenomenon for yourself, hold up your own fist just a few inches in front of your own eyes. Now look at how much bigger your fist appears to you compared with the objects in the more distant part of your field of vision. Even if those objects are, in reality, much bigger than your own fist.
From your VERY NEAR point of view, your fist is likely the largest thing you can see right now.
And humans are very subconsciously in tune with that phenomenon.
In fact, we’ve encountered this phenomenon a million times throughout our lives, and now waaaaaaaay deep down it’s a very familiar idea to us.
So in order for a photograph to SIMULATE that sense of nearness, the photograph has to recreate that specific, ‘familiar’ dynamic.
In other words, if you look at the shot of the cubs, the nearest cub appears to be much bigger to us than the farther cub, even though that “farther cub” is probably only about 2 feet farther away.
And believe it or not, THAT’S the visual cue that best promotes the idea of “nearness” to the viewer.
Not JUST the size of the cub in our frame.
For comparison, try zooming in on the adult lion in the second shot until it fills the entire frame (heck, until just its face fills the entire frame)…..and he’s never actually going to feel NEAR to us.
So again, this is about a subject’s size RELATIVE to everything else in the scene.
And you can only achieve a reliable cue of “nearness”….or “intimacy” …..if you’re ACTUALLY close to a subject.
This can’t be “faked” by zooming in with your lens.
3) You use a wide angle lens to ELONGATE the scene.
Perhaps you want to make a room look bigger (real estate photographers do this all the time). Or to make a road look longer, and therefore symbolically more arduous.
In this case, we’ve stretched a bridge in order to make it look much longer than it really is:
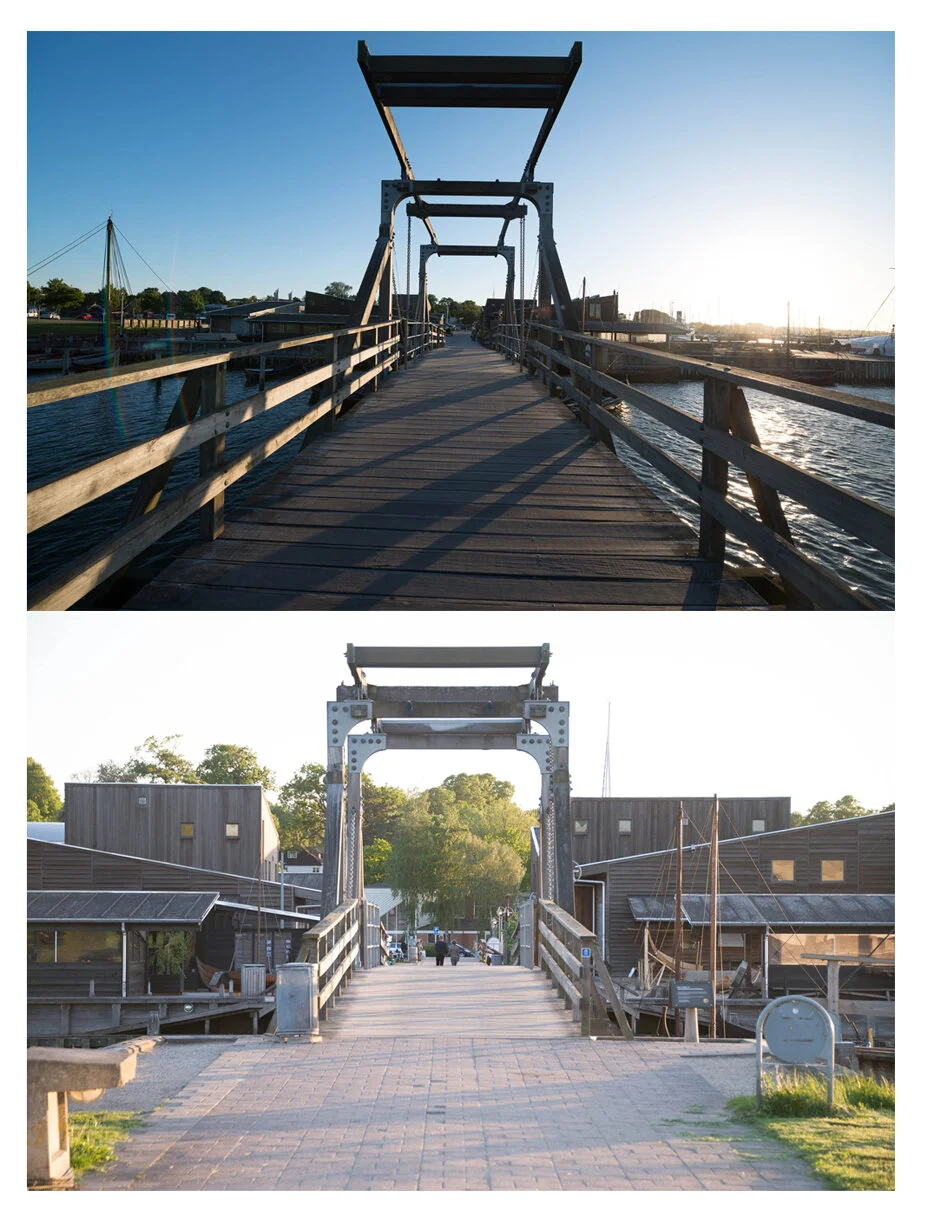
The top image was shot wide angle, and the bottom one telephoto.
And note how much shorter the bridge looks in the second photograph.
4) You use a wide angle lens if you want to alter the SHAPE of the subject.
Check out this comparison here:

Note how much more compressed the bike is in the second shot (the telephoto shot) and how much more “stretched” it appears in the first image (the wide angle shot).
In fact, this construct is something of a “trope” that’s often used by car companies in their advertising.
Shooting a car with a really wide angle lens can often make that car look more “aggressive,” like it’s on the “front foot.”
But as I said from the top, there are a million reasons you might want to use a wide angle lens.
The one I want you to avoid for now is the notion that it “gets more in the shot.”
I mean, in most cases you could also “get more in the shot” by simply backing up or changing your angle.
So for now, I want you to think more cleverly about how you can use a wide angle lens to change the STRUCTURE of the shot.
Ok, so what about telephoto lenses?
Why would you use one of those?
Well, again, there are several reasons, but the general theme here is that you tend to use longer lenses whenever you WANT THE COMPRESSION.
Here are a few specific reasons you might want that:
1) You use a telephoto lens when you want the background to appear bigger, and possibly more important than the foreground:
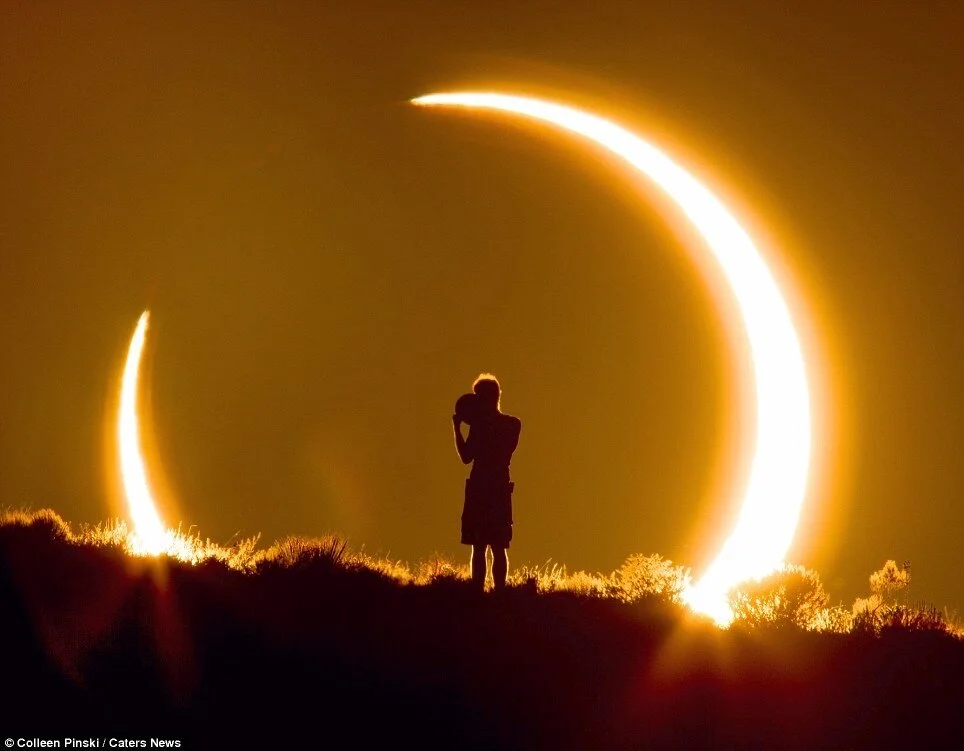
Here we have a classic “Solar Eclipse” shot. But note how the scale of the shot favors the distant sun over the nearer child.
The idea here is that we’ve flipped the subject/qualifier relationship, which is to say that the eclipse is now arguably the SUBJECT of the photograph, and the boy is there for scale, just to dramatize how awesome the eclipse is.
Here’s the very same thing. The wave (with the surfer riding it) is more the subject of this photograph, and the spectators in the foreground are the “qualifying information.”
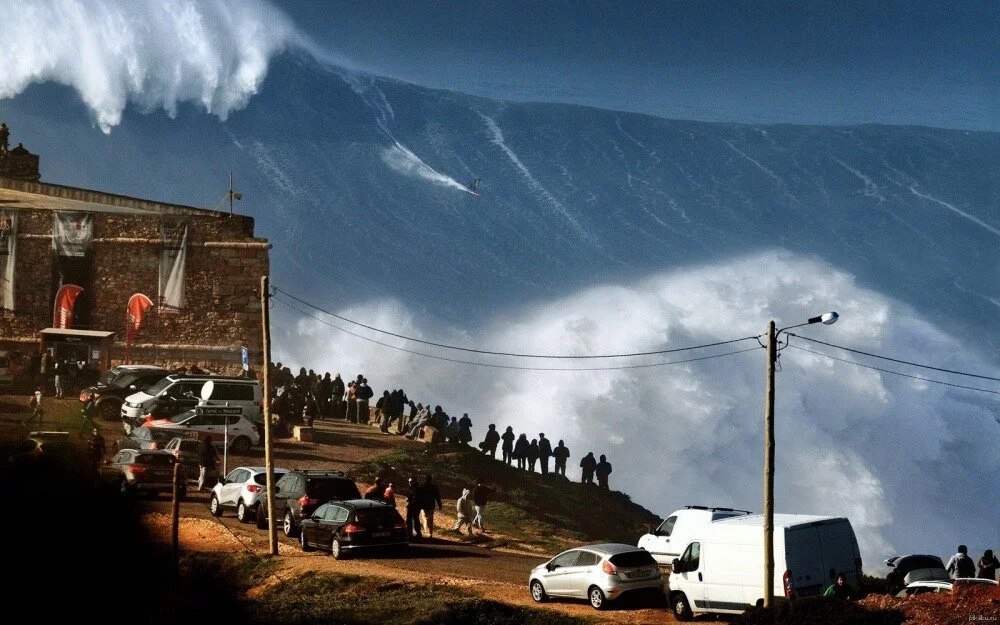
If you shoot this picture ANY OTHER WAY, then the people in the foreground are going to look 100 times bigger than the wave.
Shooting with an immensely telephoto, lens from far, away is the only way to achieve this structure.
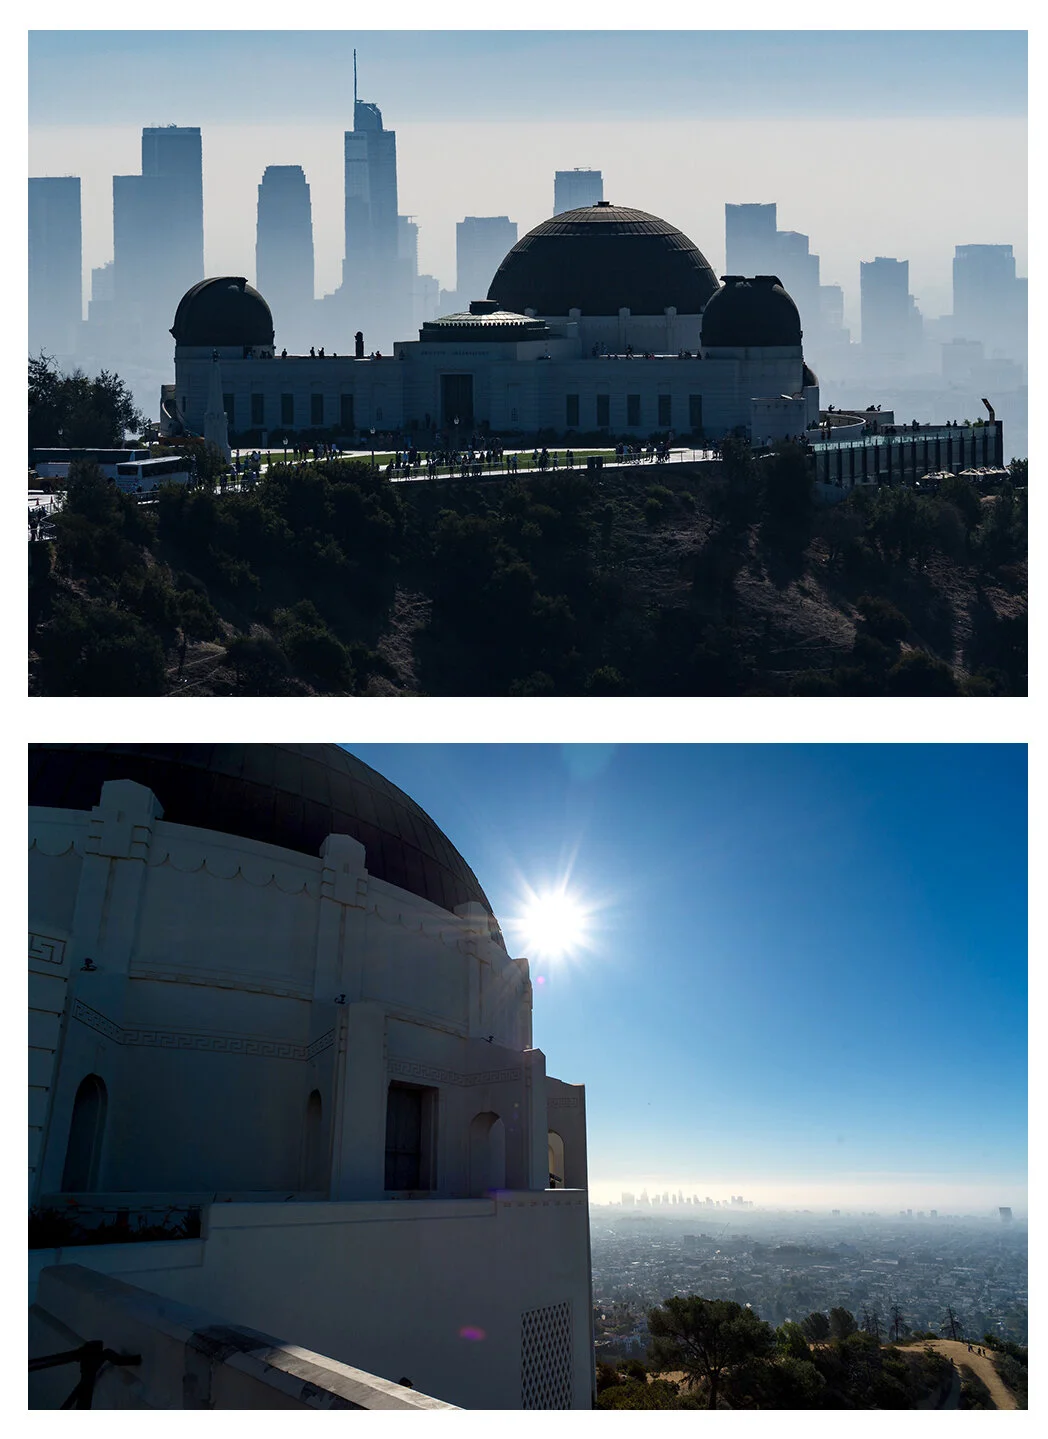
Here’s something a student of mine did recently with the Griffith Observatory in Los Angeles.
The first shot is a highly compressed telephoto shot, but note how in the second shot (taken more “Wide Angle”), the City of Los Angeles feels a million miles away, and doesn’t form much of a relationship with the observatory at all:
So again, what’s true for BOTH telephoto and wide angle lenses, is that you’re going to use them to ORGANIZE the information in the scene, or to create emphasis on one part of the scene over another, or to control the SUBJECT/QUALIFIER relationship.
2) You use a telephoto lens whenever you want to create a sense of claustrophobia or crowdedness:
Let me introduce you to the “New York Trope” in cinematography.
Every movie (or television show) that’s ever been set in NYC has used this construct:
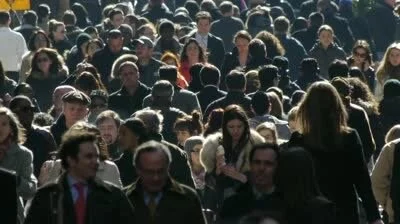
And once you’ve been made aware of this, you won’t be able to watch a single New York movie without noticing it now.
This shot is used to connote that “New York is a ratrace….it’s a busy, intimidating city that is likely to eat our protagonist alive!!
But here’s the thing. I lived in New York for 7 years. Unless you’re leaving a Knicks game, and a giant crowd has just spilled out of Madison Square Garden…..the sidewalks aren’t actually this crowded.
All of the people in this photograph are at least 10 feet apart from each other, and many of them much farther apart than that (maybe as much as 20 or 30 feet apart).
But this is 3 or 4 blocks worth of people, all compressed together, with a very long lens….which has sucked out all the space between the people.
Here it is again, one more time for good measure:
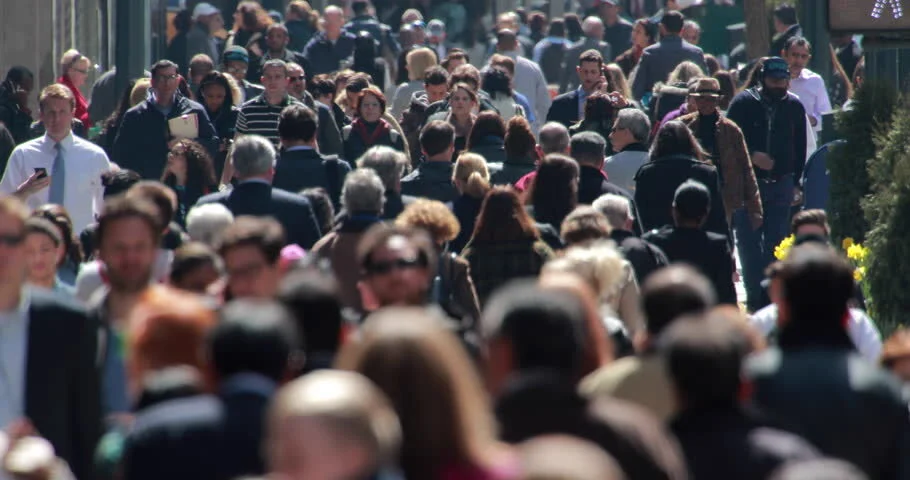
But get used to this one, you’ll be seeing it a lot.
But again, there are TONS of reasons you might want to use a telephoto lens.
Suppose you’re a real estate photographer and you’re trying to sell a condo that has a great view of the Capitol building right out the living room window. Well, if you use the typical wisdom of always shooting real estate with a wide angle lens so that you can “get more in the shot,” then the Capitol Building is going to get pushed really far into the background, to the point it won’t be noticeable at all (remember what happened to Los Angeles in the wide angle observatory shot above?).
So in that case you might want to use a telephoto lens which, yes, sacrifices getting the the entirety of the interior in the shot, but will make the Capitol Building look huge, like it’s just LOOMING over the condo.
I guarantee you’ll sell the condo faster that way.
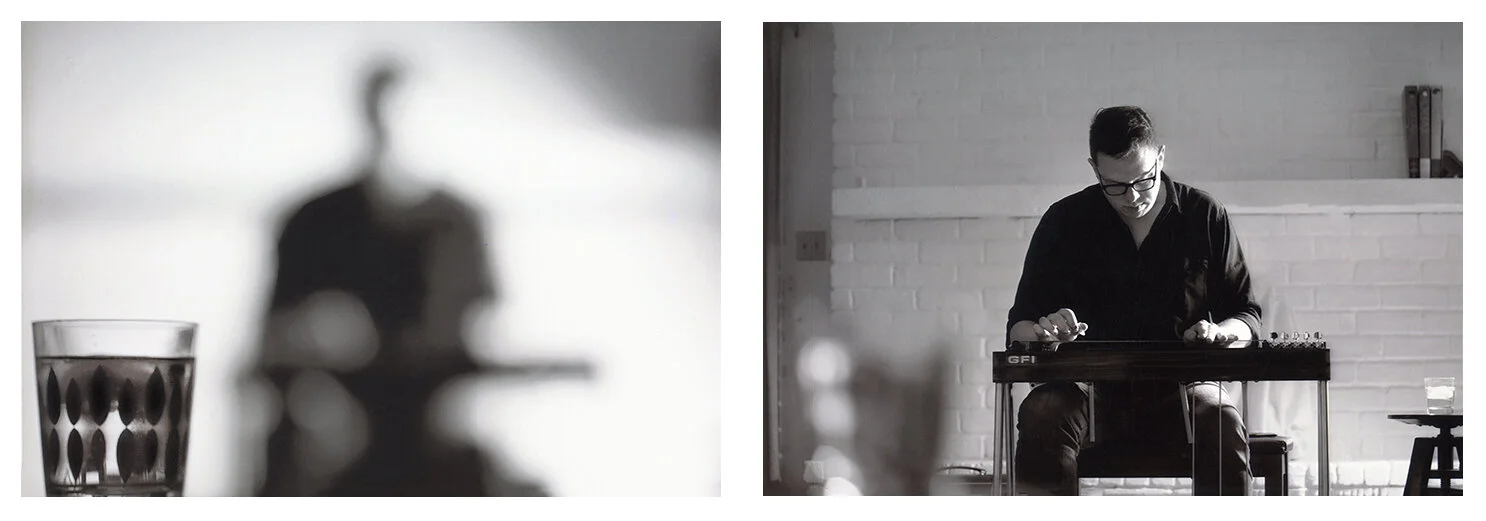
Or here’s another great reason……remember back to when we were discussing “Motion Blur,” and I said that those shots often need a ‘movement cue’ in one part of the scene, and then a “context cue” in another part of the scene….and that the viewer has to be able to connect those dots quickly and clearly in order of the shot to work?
Well lets see….what kind of lens might help bring two different parts of our scene together….so that the viewer DEFINITELY notices the relationship between them…. Hmmmmm.
You guessed it. A telephoto lens.
In fact, I want to pause right here and state that this is the very first moment in this curriculum where you’re getting a real tangible look at how you want to start COMBINING these techniques we’re learning.
In the case I just described, the telephoto compression better ENABLES the MOTION technique we wanted to use.
In other words, one differential UNLOCKS another.
TO be as clear as possible here, what I’m saying is that, if we COMBINE this idea of telephoto “compression,” with the technique we were discussing earlier of “referencing a ‘movement cue’ against a ‘context cue’” …..then we can use the telephoto compression to better enforce how the viewer should connect the dots in that scene.
Because by compressing the ‘context cue’ so that it appears NEARER to the ‘movement cue’….the viewer almost can’t help but connect those two parts of the scene in their mind.
By contrast, if the movement and context cues seem very far apart from each other, chances are the viewer won’t connect or notice them at all.
When we get to the most advanced stages of this curriculum, we’re going to find that using one differential ENABLES you to take advantage another. One often “unlocks” the other.
And in the long term, that’s how these techniques are going to work together…..that’s how they’re going to COMBINE.
So again, we’re learning these concepts one at a time…..for now.
But we don’t want to think of each of these techniques as a single “trick,” ….as in, we can use “one trick at a time.”
We’re learning these concepts one at a time, so that later we can weave them together into some TRULY SOPHISTICATED PHOTOGRAPHY.
Ok, so one more last thing I want to discuss here before I assign the homework exercises:
When I said we’d be discussing lenses today, I’m sure a lot of you were expecting a discussion on FOCUS as well as DEPTH of FIELD.
And it’s true, the other big thing your lens does is it controls the overall SHARPNESS of the image.
And we’ll get more into “Depth of Field at the beginning of the next lesson.
I wanted to discuss ‘Focal Length’ first, because I feel pretty strongly that a photographer needs to know how to manage the layers of space in their scene, before they THEN learn how to determine which of those layers of space should be sharper than the others.
But here’s a quick reminder of what ‘Depth of Field’ is:
The idea behind ‘Depth of Field’ is that you can control WHICH layers of space in your scene are sharp, and also HOW MANY layers of space are sharp.
In short, Depth of Field is about controlling the overall levels of sharpness throughout your photograph.
Which is totally different from this SCALE issue we’ve been discussing here today.
In other words, throughout this Wide-Angle/Telephoto/Lens Length discussion, we’ve been discussing which part of the image will be LARGER than another. Depth of Field is about controlling which part of the picture is SHARPER than another.
So here is an example of using Focal Length to alter the SCALE of the foreground and background…but without really playing with sharpness at all:

And here is an example of using Depth of Field to swap the sharpness of the foreground and background…but without really playing with the scale of the image at all:
See the difference?
Again, they’re not the same thing.
But they do have a couple of important things in common:
1) Both have to do with the layers of space in your shot (your “spatial differential”)
2) Both are controlled by your lens.
Furthermore, they can both be used to create an emphasis, or a “hierarchy of information.”
In other words, you can create spatial emphasis by making something in your frame BIGGER….or by making it SHARPER.
Ok, so finally, here’s the most important demonstration of today’s lesson. Once we understand each of these techniques indivdually, here’s a preview of how we’re eventually going to combine these ideas.
Take a look at these 4 images.
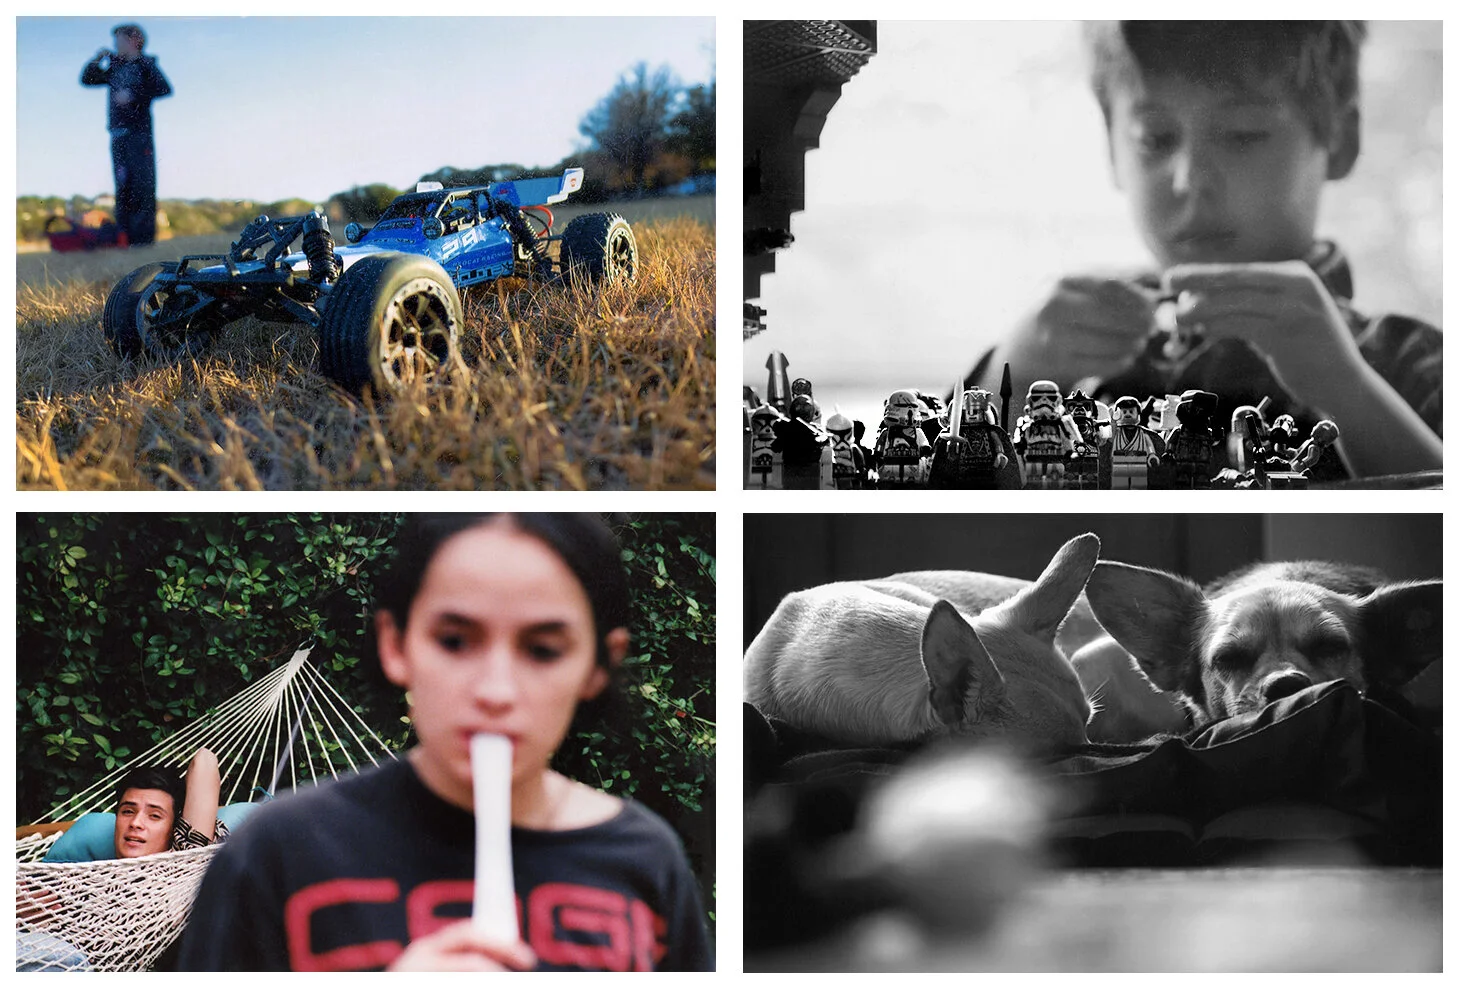
Here we’re mixing and matching these techniques into different spatial constructs.
The two images on the left were shot Wide Angle, which means the foreground is always bigger than the background….and the two images on the right were shot telephoto, which means the background is being bigger than the foreground.
However, the two images in the top row have put the focus on the foreground, and the two images in the bottom row have put the focus on the background.
So again, we’re mixing and matching every possible combination of sharpness and scale emphasis.
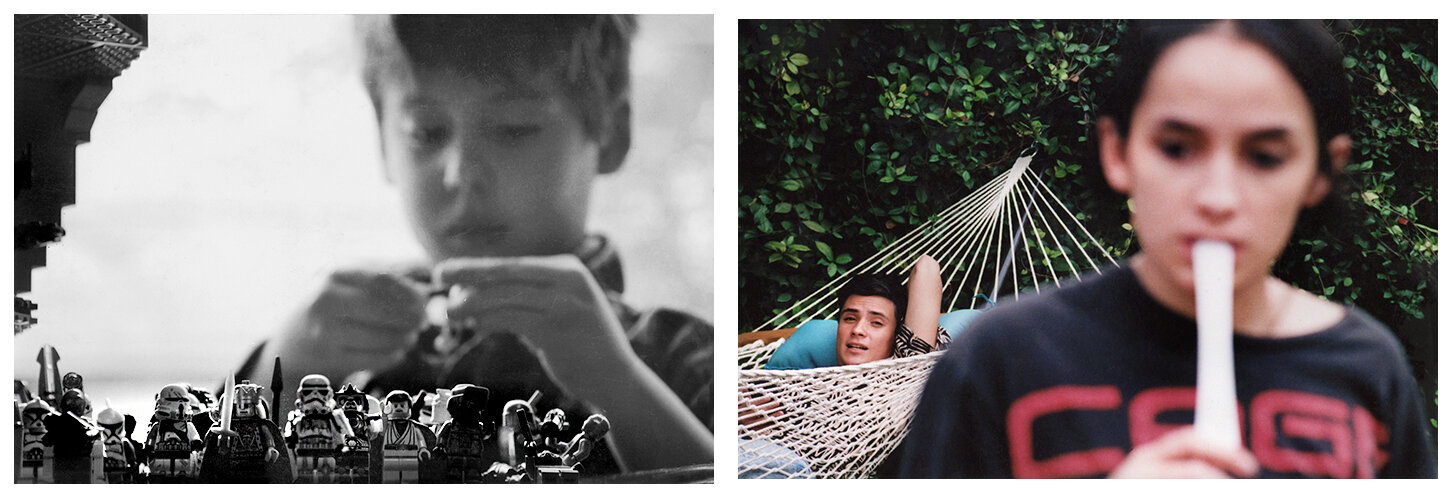
Ok, so these let’s take a closer look at these two images:
These two images have bestowed BOTH forms of emphasis on the same part of the frame.
In other words, these images represent a DOUBLE EMPHASIS on the same subject.
In the image on the left, both the scale AND the sharpness favor the foreground over the background. And in the image on the right, both the scale AND the sharpness favor the background over the foreground.
So this is COMPOUNDED EMPHASIS. And it absolutely reinforces to the viewer which part of the scene is more important. It leaves no doubt.
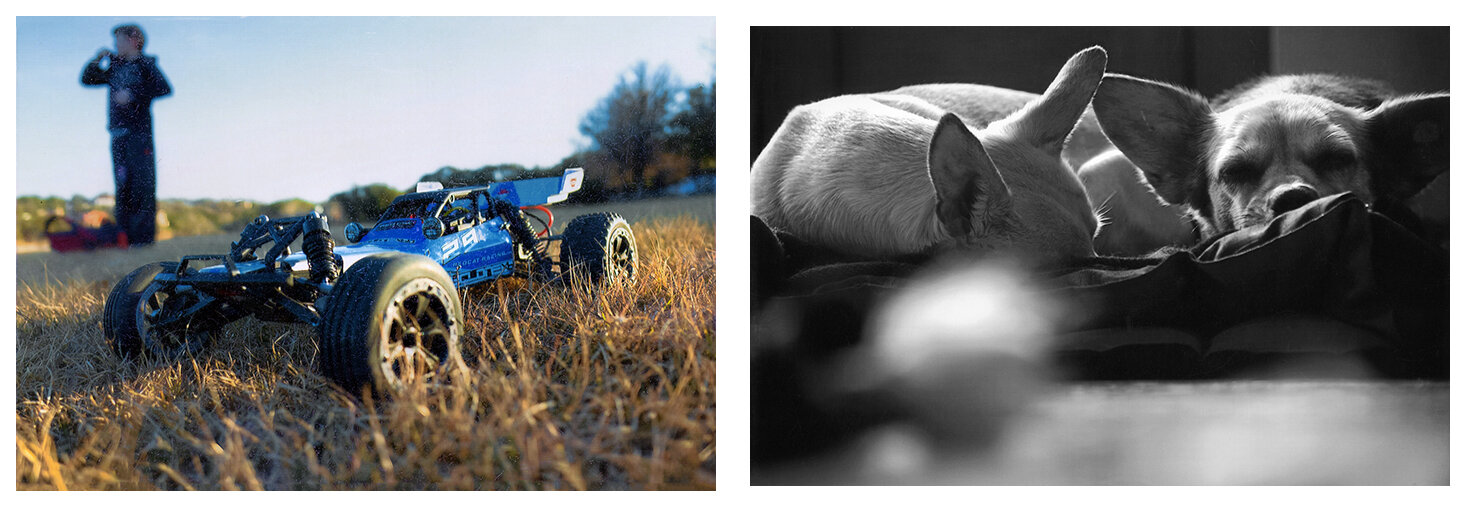
But now look at these:
These two images have split the emphasis.
The image on the left has background bigger, but the foreground sharper.
And the image on the right has made the foreground bigger, but the background sharper.
Therefore, these two images represent a BALANCED EMPHASIS.
The idea is that we have DISTRIBUTED different kinds of emphasis to different parts of the frame….which means the viewer is likely to read the foreground and background as being more equal in importance.
The thing is, creating a lot of emphasis in only one part of the scene is relatively easy. It’s often done by simply cropping everything else in the scene out of the frame so that we can only look at one subject.
A slightly more clever way of doing it is to make the subject very sharp and the entire rest of the scene very soft.
In other words, photographers are often afraid of having multiple facets to their scenes because they’re afraid it will look too busy or be too hard to read. So the cheap solution is to just crop down on one subject…or maybe to make everything but the subject look really blurry.
But here, distributing different forms of emphasis to different parts of the scene allows you to ensure the viewer notices MULTIPLE parts of the frame (and begins to connect the relationships between them), while also still maintaining an ORGANIZED sense of emphasis.
This is how we can begin to make our photography more complex.
We don’t need to be AFRAID of having multiple parts to our scene….we can use different forms of emphasis to organize how the viewer will read the shot.
And these constructs were done using ONLY spatial differentials. Can you imagine how complex our images are going to be when we begin combining differentials later in the curriculum?
My challenge to my most advanced students is to see if they can organize 3 or 4 different parts of a scene into a construct that’s still very easily readable.
And the thing is, once you’ve increased your standards to that degree, you’ll likely begin to look at images that merely ISOLATE a single subject (as a “solution to the problem of busyness”) as being pretty cheap and 1-dimensional. A leftover relic of 20th Century thinking, from a time before this medium had grown into a more sophisticated visual language.
But for now, I just need you to see how different these two images are:
The image on the left commands the viewer to notice the toy car FAR FAR more than they notice the kid in the background.
While the image on the right commands the viewer to notice both parts of the frame more equally.
But one quick other note here.
You may be looking at the image on the right and thinking, “Yeah, but in real life that boy IS bigger than those little figurines,”
But consider that, in the left image, we’ve made that little toy car bigger than the boy….which is definitely NOT the case in real life.
In other words, this has nothing to do with how big something is in reality.
If you know how to manage spatial differentials, you can render the scale in your scene any way you want.
Which then leads some students to say “Well then that’s a lie, you’re being misleading.”
But recall what we discussed earlier in today’s lesson regarding the “faithfulness” of photography.
There are a thousand invisible cognitive processes that affect how one person reads and perceives a scene as opposed to another, and we tend to take all of that for granted…..to the point that we just expect that a viewer will inherently understand what WE’VE noticed, or what we’re trying to express about our scene.
They won’t.
You have to spell out what you’re trying to express.
You’re effectively telling the viewer to “scan the scene” in a particular way so that they can connect the dots that you want them to connect.
In short, a lot of photographic communication is about EXTERNALIZING your own cognitive processes and then HARDWIRING THEM INTO THE IMAGE…. so that someone else might reach the same conclusion, or connect the same dots, that you did.
That’s largely what photographic communication is.
And this is where photography starts to become a lot more sophisticated.
Because if you can manipulate the structure of your photograph to this degree using ONLY your lens…..using ONLY a spatial differential…..then imagine what happens when — on top of this — we also begin adding lighting differentials and movement differentials, etc.
So we’re only a couple of weeks into this curriculum, but hopefully you’re already getting a hint as to where this is all going….and hopefully you’re getting a better glimpse into what we mean when we talk about “structuring your photograph.”
And moreover, hopefully you’re starting to see that this….THIS….is what lenses do.
They structure your images in different ways.
Because honest-to-god, there are veteran professional photographers out there, who, after 25 years of shooting, STILL think that longer lenses are for ‘cropping in,’ and that wider lenses are for ‘getting the whole room in the picture.’
But ASOP students know better.
Being able to manage and control the spatial relationships in your scene is arguably the most critical skill a photographer can develop.
———————————————————————————————
HOMEWORK
Let me first begin with a general note:
As we get a bit deeper into this course, you can start to see where this is going. At the moment, we're mostly just trying to get you to prioritize different things than you used to. So instead of just thinking about "which camera settings do I use?" I want you to think instead about what factors and dynamics will actually have the most impact on your image.
For instance, with the TIME exercises, it wasn't just about what shutter you used….it was actually more about the angle you were at, the distance you were at, and the type of movement you were shooting. It was also about referencing movement against context.
In other words, if you hadn't understood and managed those issues first, then you weren't going to have much luck in just choosing a "correct" shutter.
Likewise, this week I want you to think about how the layers of space in your scene will allow you to create emphasis in different ways, and then enable you to STRUCTURE the picture in different ways.
-----------------------------
-----------------------------
A summary of this week's theory:
Your lens is designed to organize the LAYERS OF SPACE in your shot.
One important thing your lens does is that it gives you the ability to either create a HIERARCHY of spatial relationships (one layer of space is more important than another), or it can create EQUALITY of information (meaning that two layers of space will be emphasized more equally).
Your lens can create those hierarchies or equalities in two different ways:
1) Your FOCAL LENGTH ("lens length") can change the scale/size of your foreground or background so that one layer of space appears much larger than another... or your lens length can be used so that both layers of space appear to be about the same size.
2) Your DEPTH-OF-FIELD can render one layer of space much sharper than another, or it can make two layers of space equally sharp.
In the end, we're going to COMBINE these strategies in ways that better control how the viewer reads the image. But for now I just want you to attempt to understand each function separately.
--------------------------------------------
--------------------------------------------
ASSIGNMENT 1 - Focal Length:
**This is the MORE IMPORTANT ASSIGNMENT this week**
Shoot several compositions in which you manipulate the foreground-background relationship by using your lens length.
In a nutshell, you're shooting the same subject twice, once standing very close and "zoomed out," and once standing farther away and "zoomed in."
But here is a more nuanced description of the assignment:
1) First attempt a shot standing VERY CLOSE to your foreground subject while using a WIDE ANGLE LENS.
This means using the shortest lens you have (if you have a lens that zooms, this simply means being "zoomed out," or twisting your lens until you are set to the lowest number on the lens - for a lot of your zoom lenses this will be around 18mm. But if you are at all confused about your own equipment please let me know),
2) And then attempt the same shot standing FARTHER away from your foreground subject but using a TELEPHOTO lens.
This means the longest lens you have (if you have a zoom lens, this simply means being "zoomed in," or twisting your lens until you are set to the highest number on the lens - often 55mm or 85mm on a lot of your zoom lenses).
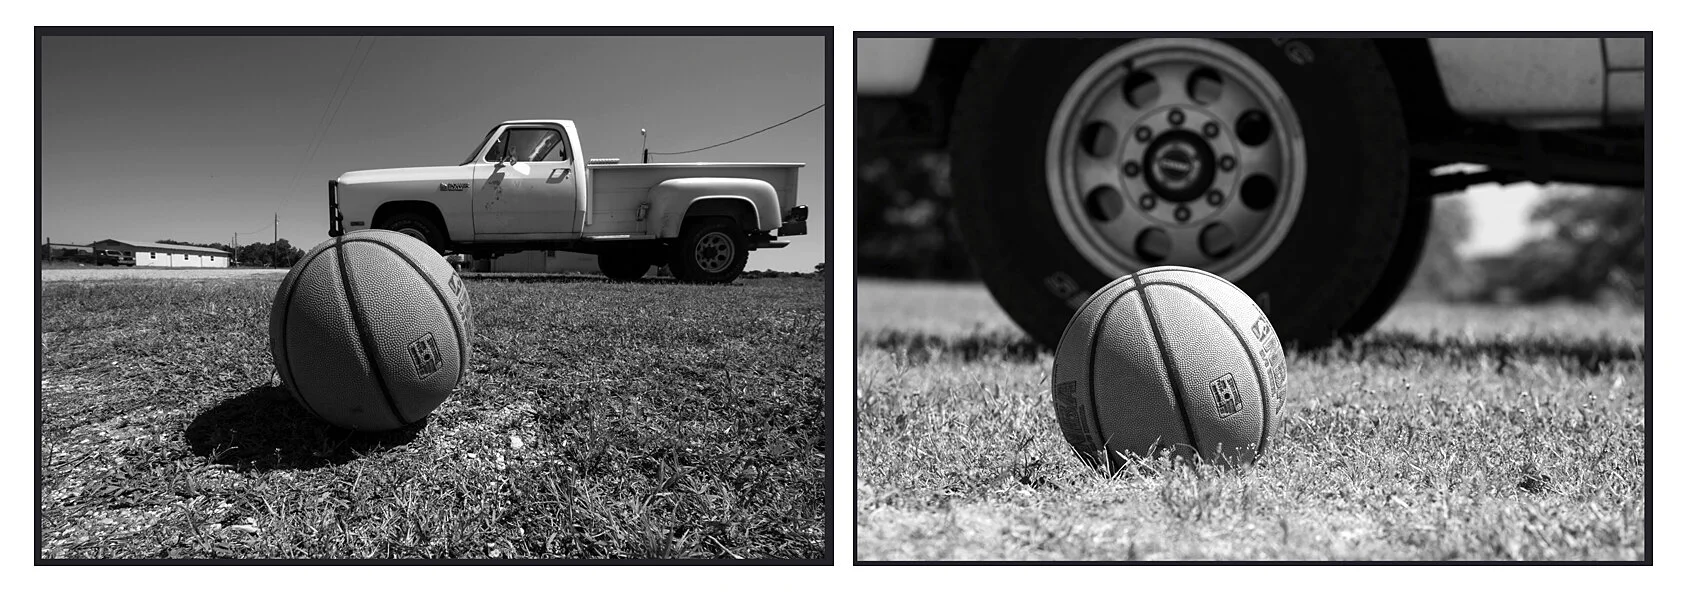
****VERY IMPORTANT**** Try very carefully to make sure the foreground subject is THE SAME SIZE in each of the two shots, like the Stevie Ray Vaughan Statue we looked at in class, or the basketball/truck example that I've attached to this email. We want the foreground subject to be the "CONTROL" for each comparison. So if your foreground subject is the same size in both shots, you know you've done this correctly.
Please do this exercise at least 7-10 times. Again, this is the more important of the two assignments this week.
----------------------
----------------------
ASSIGNMENT 2 - Depth-of-Field:
This assignment is a short exercise just to test your lens's focusing capabilities, and also to give us some evidence to discuss when we go over the "depth of field" material again next week. This exercise is really just a test of this concept. If you follow these instructions, it should only take you a few minutes to do.
First, a quick Depth of Field primer:
There are two factors that affect Depth of Field….they are:
1) Aperture: a wider aperture will give you less sharpness (a "narrow focus"), and a smaller aperture will give you more sharpness. The way to remember this is to think about someone with poor vision squinting in order to read something. They’er effectively NARROWING the “aperture” of their eyes.
2) Distance: focusing very near will give you a narrow range of sharpness, and focusing very far away will give you a greater range of sharpness. You can remember this by holding your finginer a few inches in front of your eyes and focusing on it. Look at how narrow your range of focus becomes….compared to focusing on something across the room.
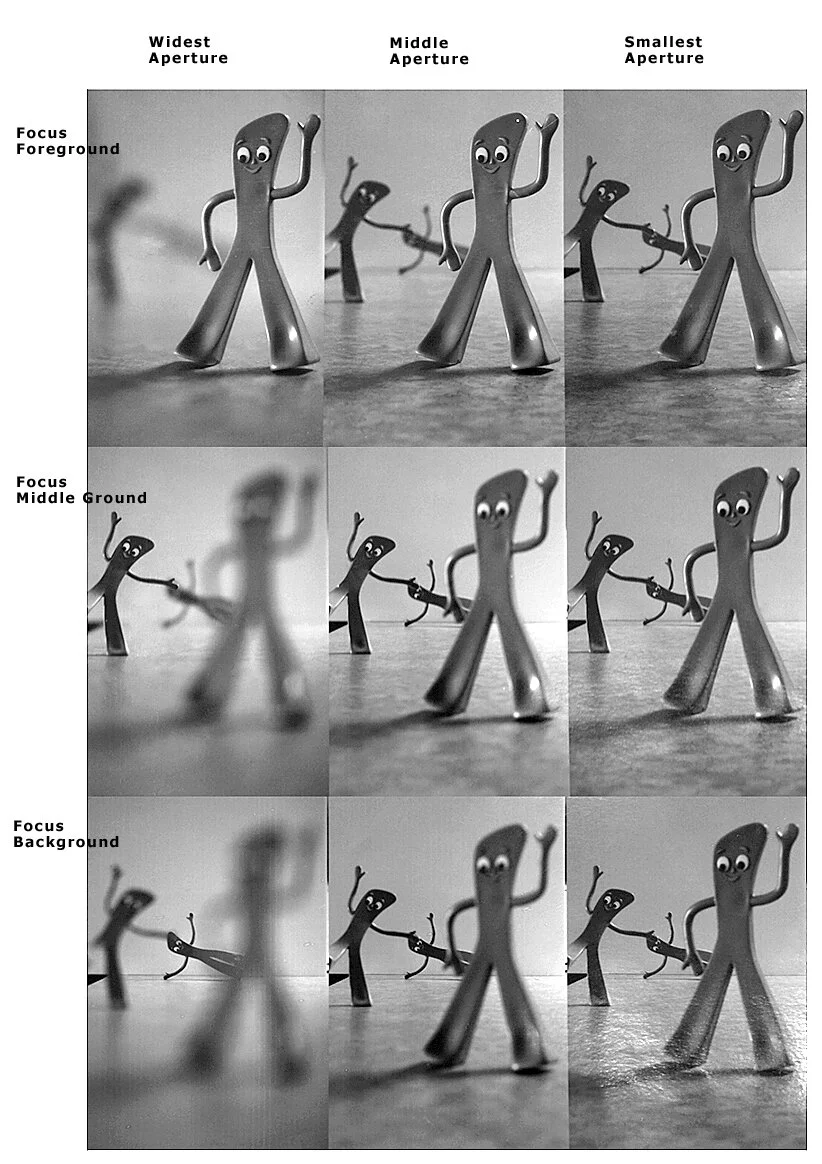
Ok, so I want you to test these two factors this week in the following manner:
1) Line up three objects in a row (each about 2 feet apart from each other, but staggered so we can see all three of them),
2) Then, place the camera so that it is facing the three objects, and is essentially the “fourth object in the line,”
3) Focus first on the nearest object.
**NOTE: For now, please just focus manually. This simply means turning the VERY front end of your lens - not the zoom ring, but the focusing ring on your lens. Turn that ring until the front object looks to be in focus (if you don't know how to use your manual focus, please contact me).
4) Now shoot the picture three times: once with the widest aperture on your lens, then with the middle aperture on your lens, and then with the smallest aperture on your lens (for many of you this might be f4, f8, f22, but this will vary a bit from lens to lens).
Also remember that each shot needs to be an "equivalent" exposure, so you should be changing your shutter speeds accordingly, which means you may need to increase your ISO for practicality (so that your shutters aren't several seconds long). Or if you simply shoot in bright, outdoor conditions you shouldn't have any problems with exposure.
5) Next, re-focus on the second of the three objects, and then shoot the same three settings (widest aperture, middle aperture, smallest aperture).
6) Finally, focus on the farthest object, and again shoot those same three settings.
SO IN SHORT: you are focusing on each of the three objects, and then shooting your widest, smallest, and middle apertures.
Here’s what the assignment should look like in theory: