Once again, Class 2 is divided into two parts, and so I’ll continue to break those two parts into separate pages, which means you’ll find a link to the second half of this lesson at the bottom of this page:
Part 1 is going to be an introduction to LIGHT (ie: how to use your meter in order to capture the exposure you want)
Part 2 is going to be an introduction to TIME dynamics (ie: how the passage of time can effect your decision making as a photographer).
Part 1: Light
I normally begin this class asking for any and all observations you had about your experience reading your meter throughout this past week (recall that the homework assignment was mostly just to get comfortable balancing your meter).
The particular observation I’m fishing for is that, once you “balanced” your meter, it didn’t really sit perfectly still, did it? It tended to bounce around erratically, never fully wanting to settle.
So why was that?
Well most students tend to guess that it’s because the light in the scene was changing. Or maybe something in the scene was moving.
But in reality, the most likely cause for the meter to jump around so erratically like that is that YOU were moving. In other words, you weren’t holding the camera PERFECTLY steady. If you were even breathing, then you were moving up and down a little bit, if only by a few millimeters. And that tiny change in framing was enough to confuse the camera…..to make the meter start second-guessing itself.
That’s how sensitive your meter is to any change in framing.
And this is because the engineers who designed your camera chose to link your camera’s exposure responses to HOW YOU’VE FRAMED YOUR IMAGE….instead of linking your camera’s exposure responses to the actual LIGHT that is in your scene.
In fact, they’ve programmed your camera to respond more to how you’ve framed your image than to anything else. Which means that, even if the actual light in your scene isn’t changing, your camera attempts to alter your exposure every time you re-frame your shot.
So our first order of business here is that we need to learn to do the exact opposite…we need to start associating our exposure with the light in the scene, not with the way we’ve composed the image.
So again, the purpose of this section of class is to disassociate exposure from framing entirely.
The first reason we need to do this is because the two have absolutely nothing to do with each other. In other words, how much light is in your scene, is very factually unrelated to how you’ve framed your picture. We’ll prove that later on.
The only reason your camera’s been programmed to associate the two at all is because the engineers who programmed your camera can’t really know or even guess what subject you’re shooting at any given moment, and they certainly don’t always know what particular result you want. So their only option was to program the camera to keep “guessing” differently every time you re-point the camera, so the meter keeps updating its “recommendations” as you keep re-framing your image.
And most photographers are actually taught to just accept this system of “guesses” and “re-guesses” and to try to OVERRIDE the camera whenever they re-frame their images (by using a lot of additional camera “features”).
But as I hinted in our last lesson, not only is that method very tedious and inexact, but it also traps photographers within a very limited set of options, and puts a very defined ceiling on how sophisticated their images can be.
So I can’t stress this enough, we’re not going to adapt to this flimsy methodology….we’re going to ignore that methodology altogether. Instead of learning to fight with our camera’s response system, or to “correct” the camera by using additional “features,” we’re simply going to BYPASS its response system altogether, and just take the exposure ourselves….more directly.
We’ll find that this method is actually a lot faster, and a lot simpler. And most importantly, it won’t limit us later in this curriculum when we’re trying to create more complex images.
So that’s what this section of class is about - learning to BYPASS the camera’s programming, so that we can achieve a proper exposure OURSELVES.
Ok, so in order to do that, let’s begin with an old experiment I used to have my students conduct at this specific juncture of class”
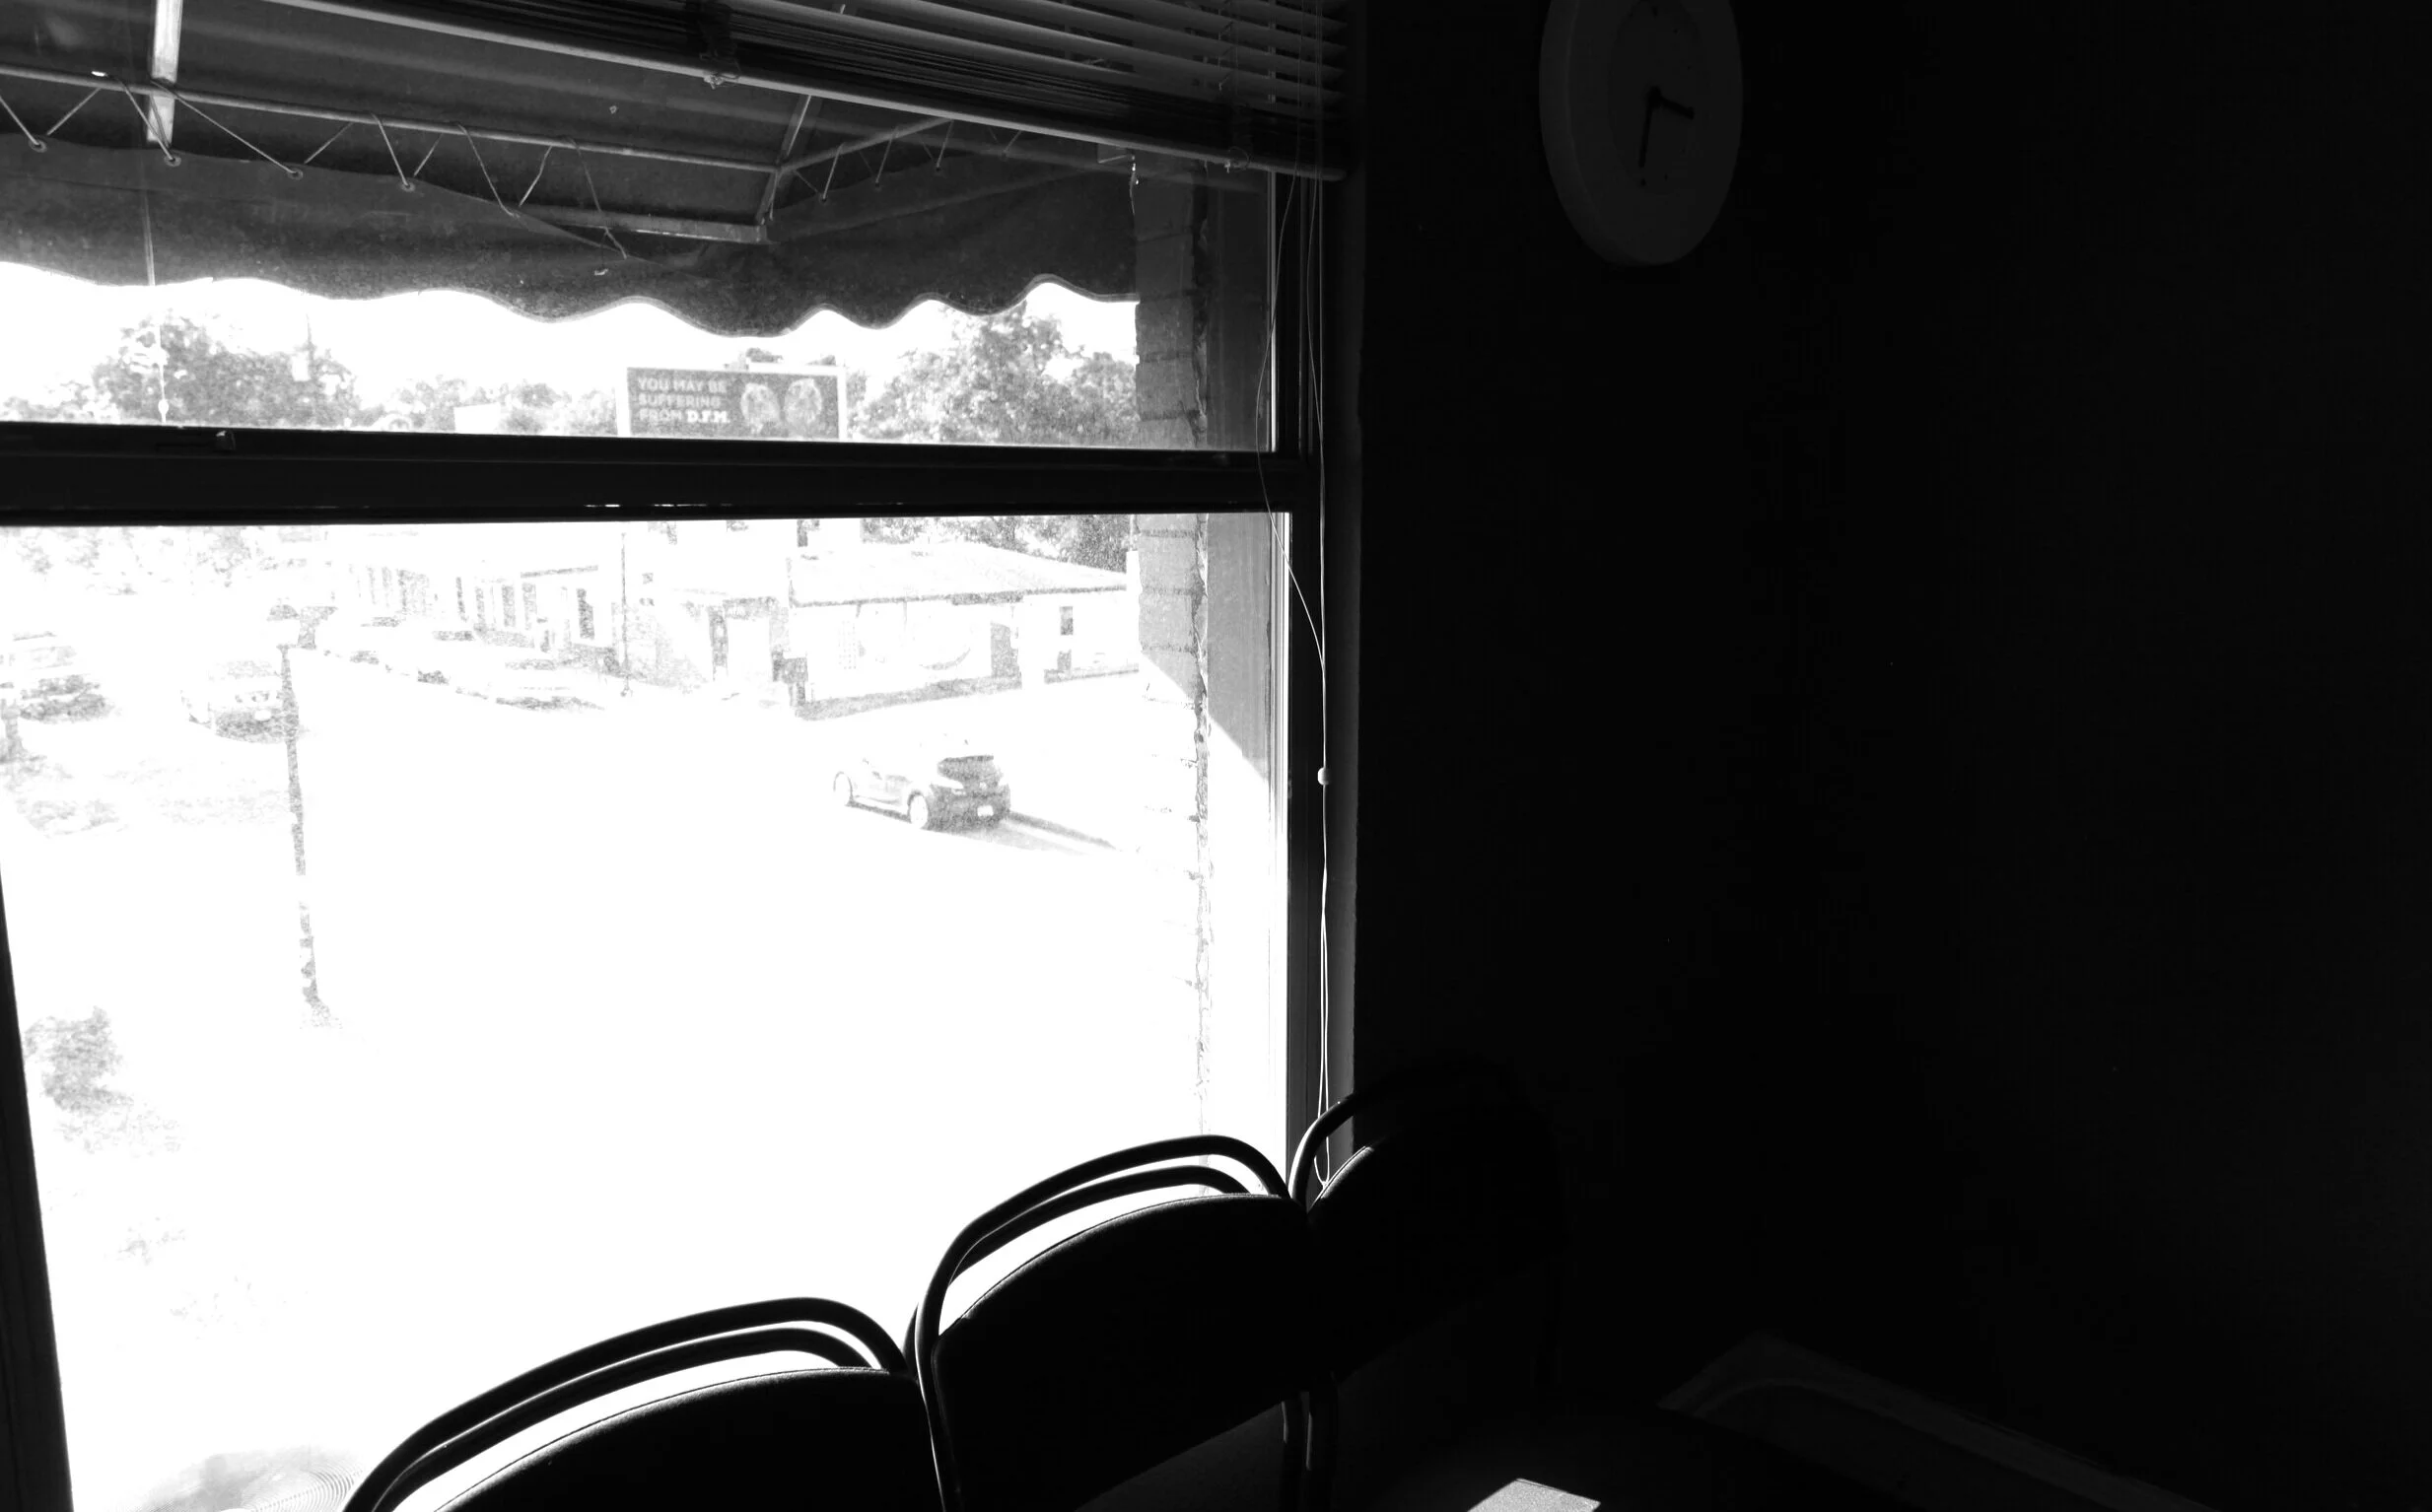
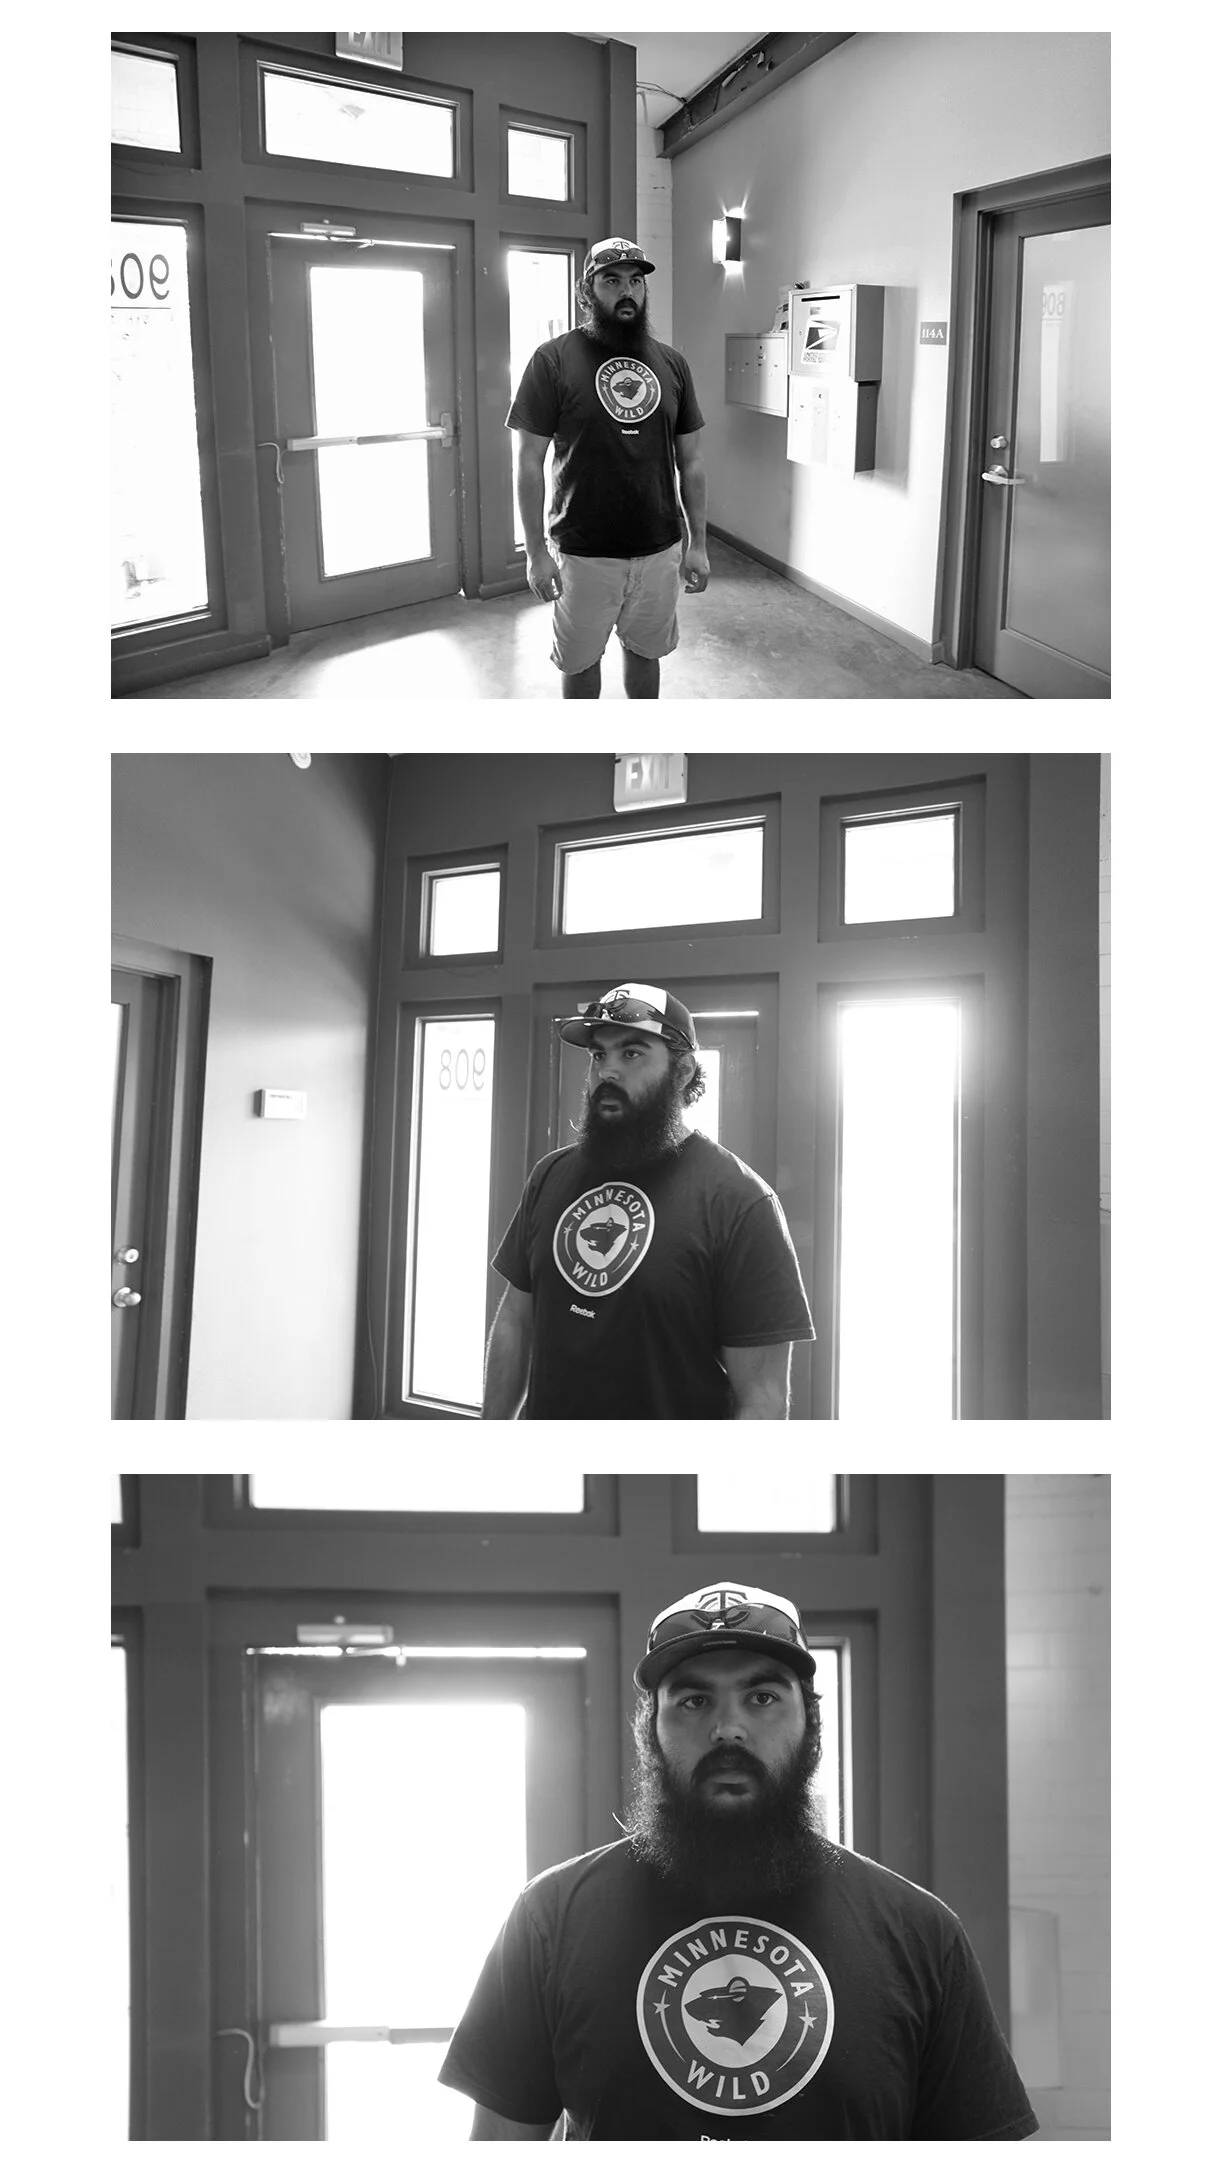
The very first classroom I ever taught in had a large window in it, and as students would pile into class for this second session, I would instruct each student as they entered to point their cameras toward that window….and then “balance” their meter….and then snap the picture, exactly how their meter wanted them to.
I was testing two things really. First, I was testing whether or not the students were becoming comfortable with the metering process. And second, I was testing how their cameras would respond to a scene that had such a large difference in light (because, due to the window, the shot had a lot of interior light and a lot of exterior light).
And in the end, there were only 3 results the students would ever get from that.
The first potential result, was that their camera would prioritize the OUTSIDE exposure, and in doing so sacrificed the inside light entirely.
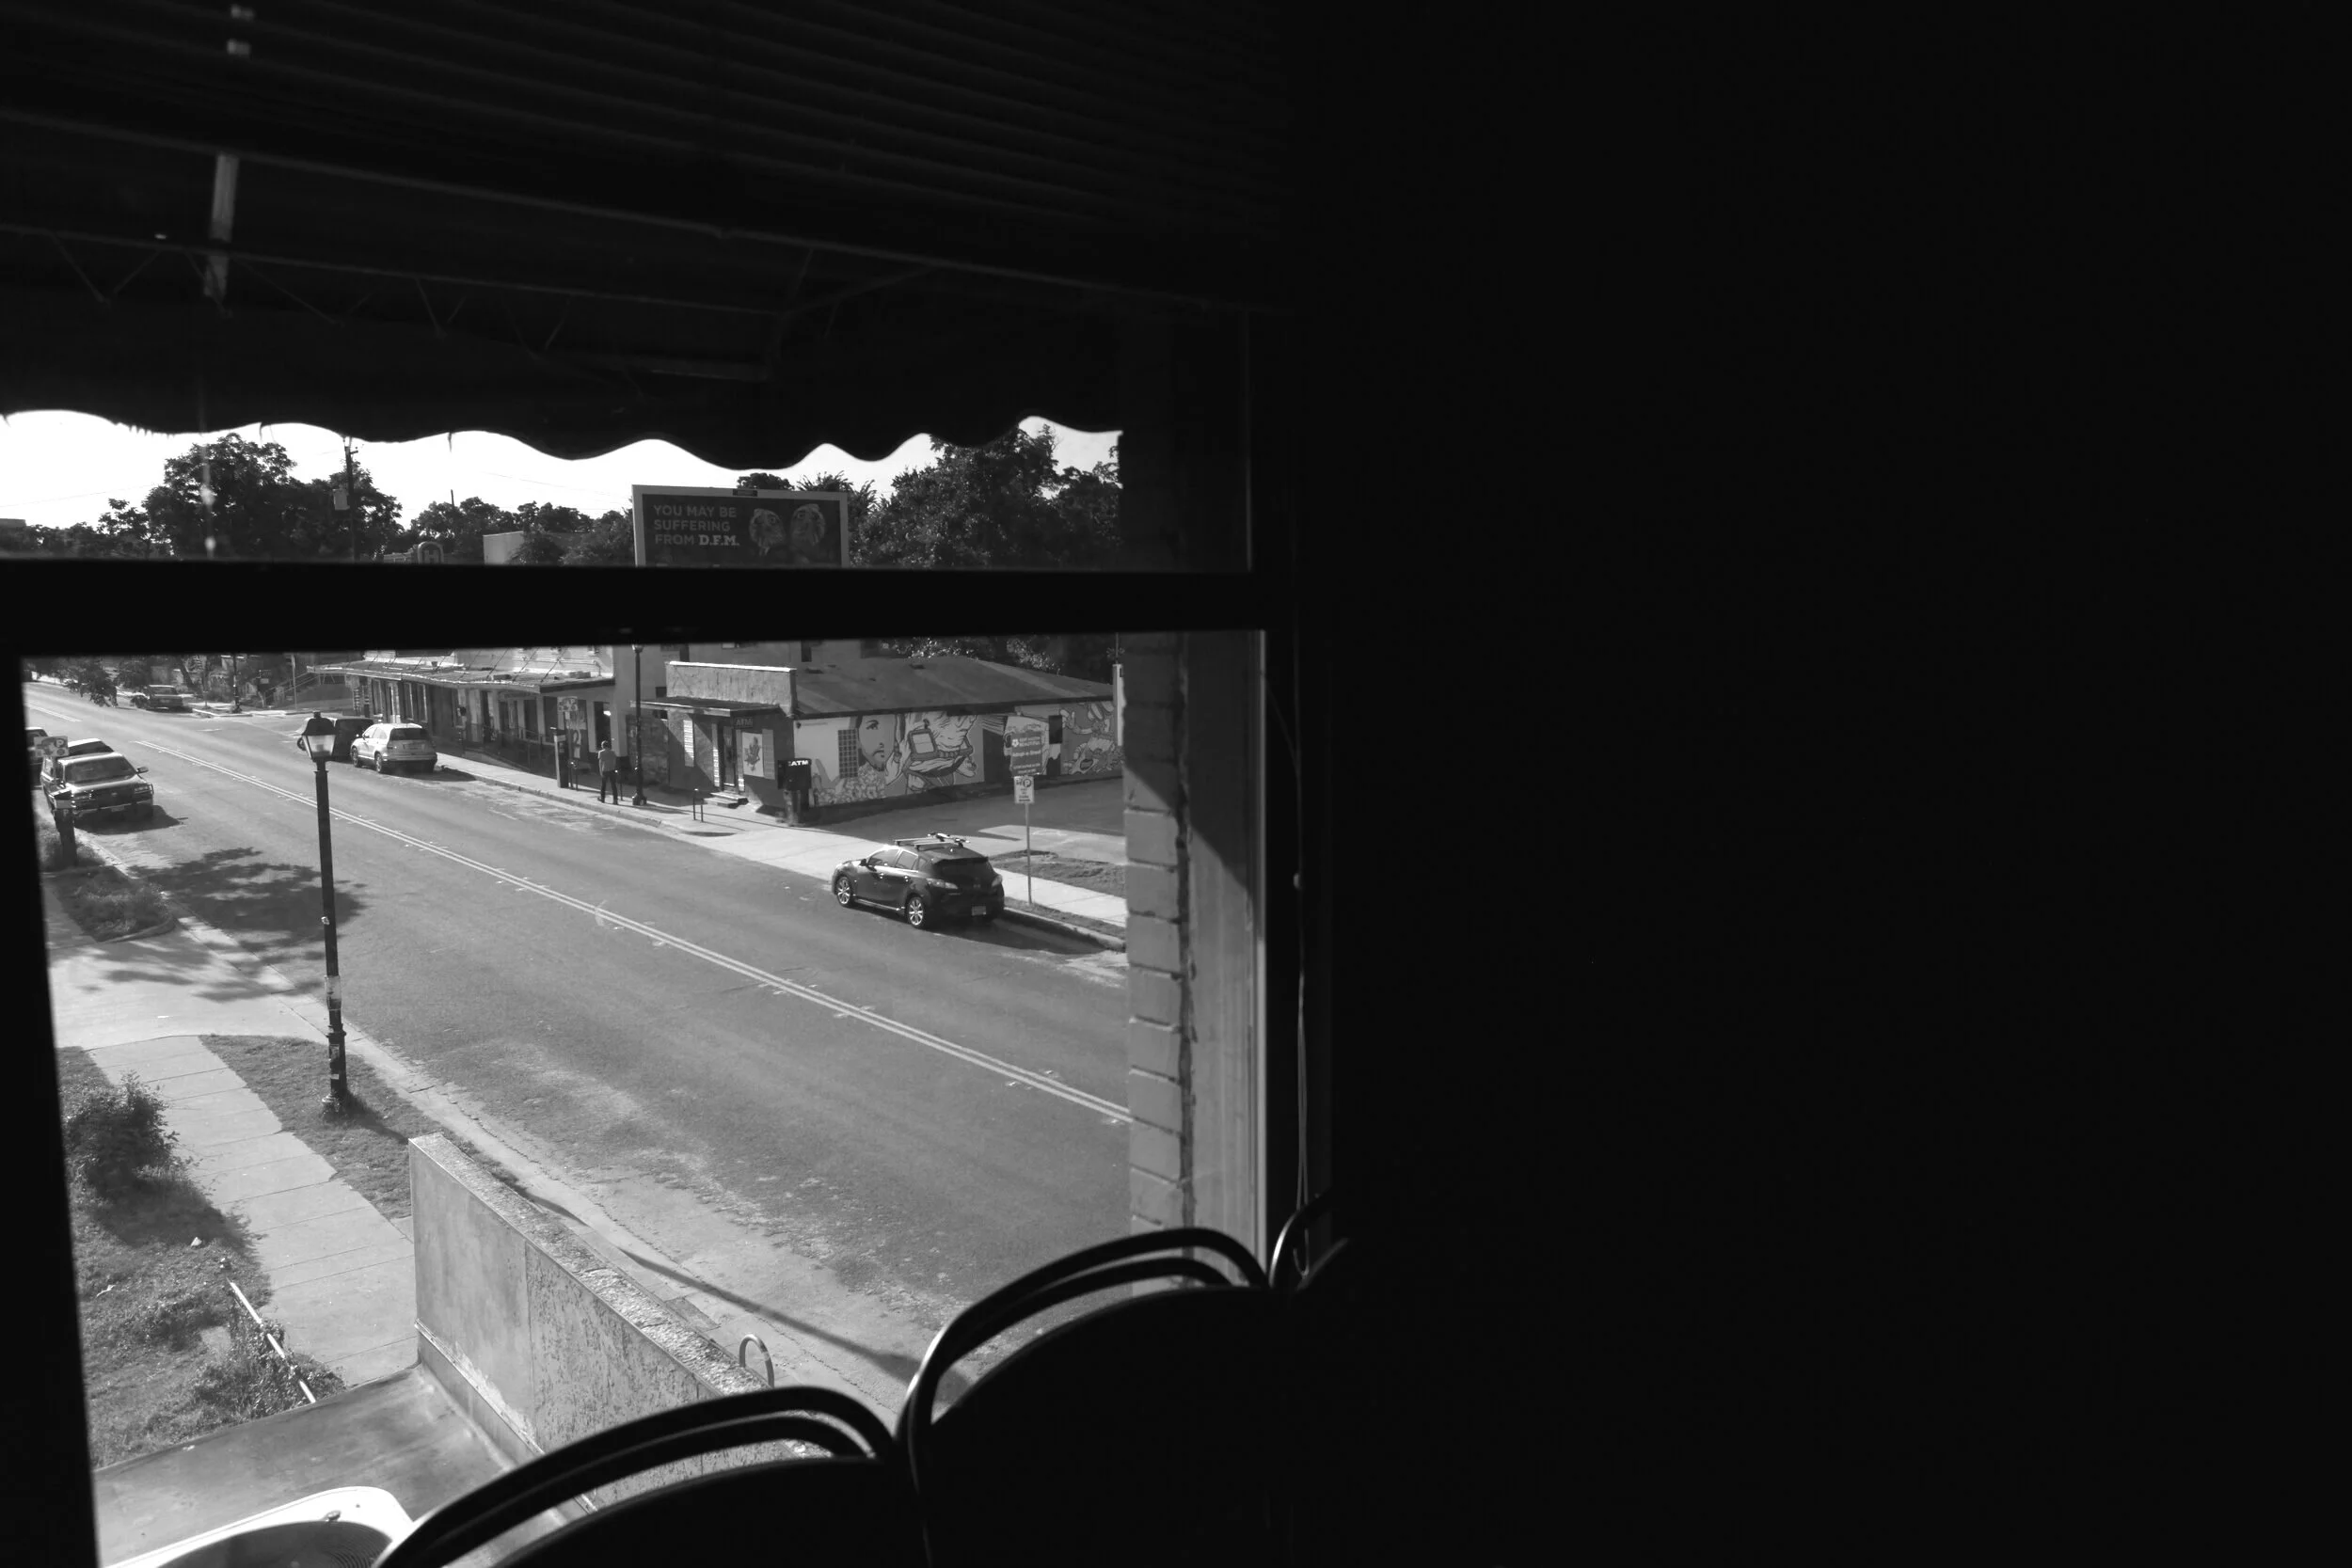
So in this result we can see the outside world very clearly, but we’ve lost the inside part of the scene entirely.
I’d say about 40% of my students would get that result.
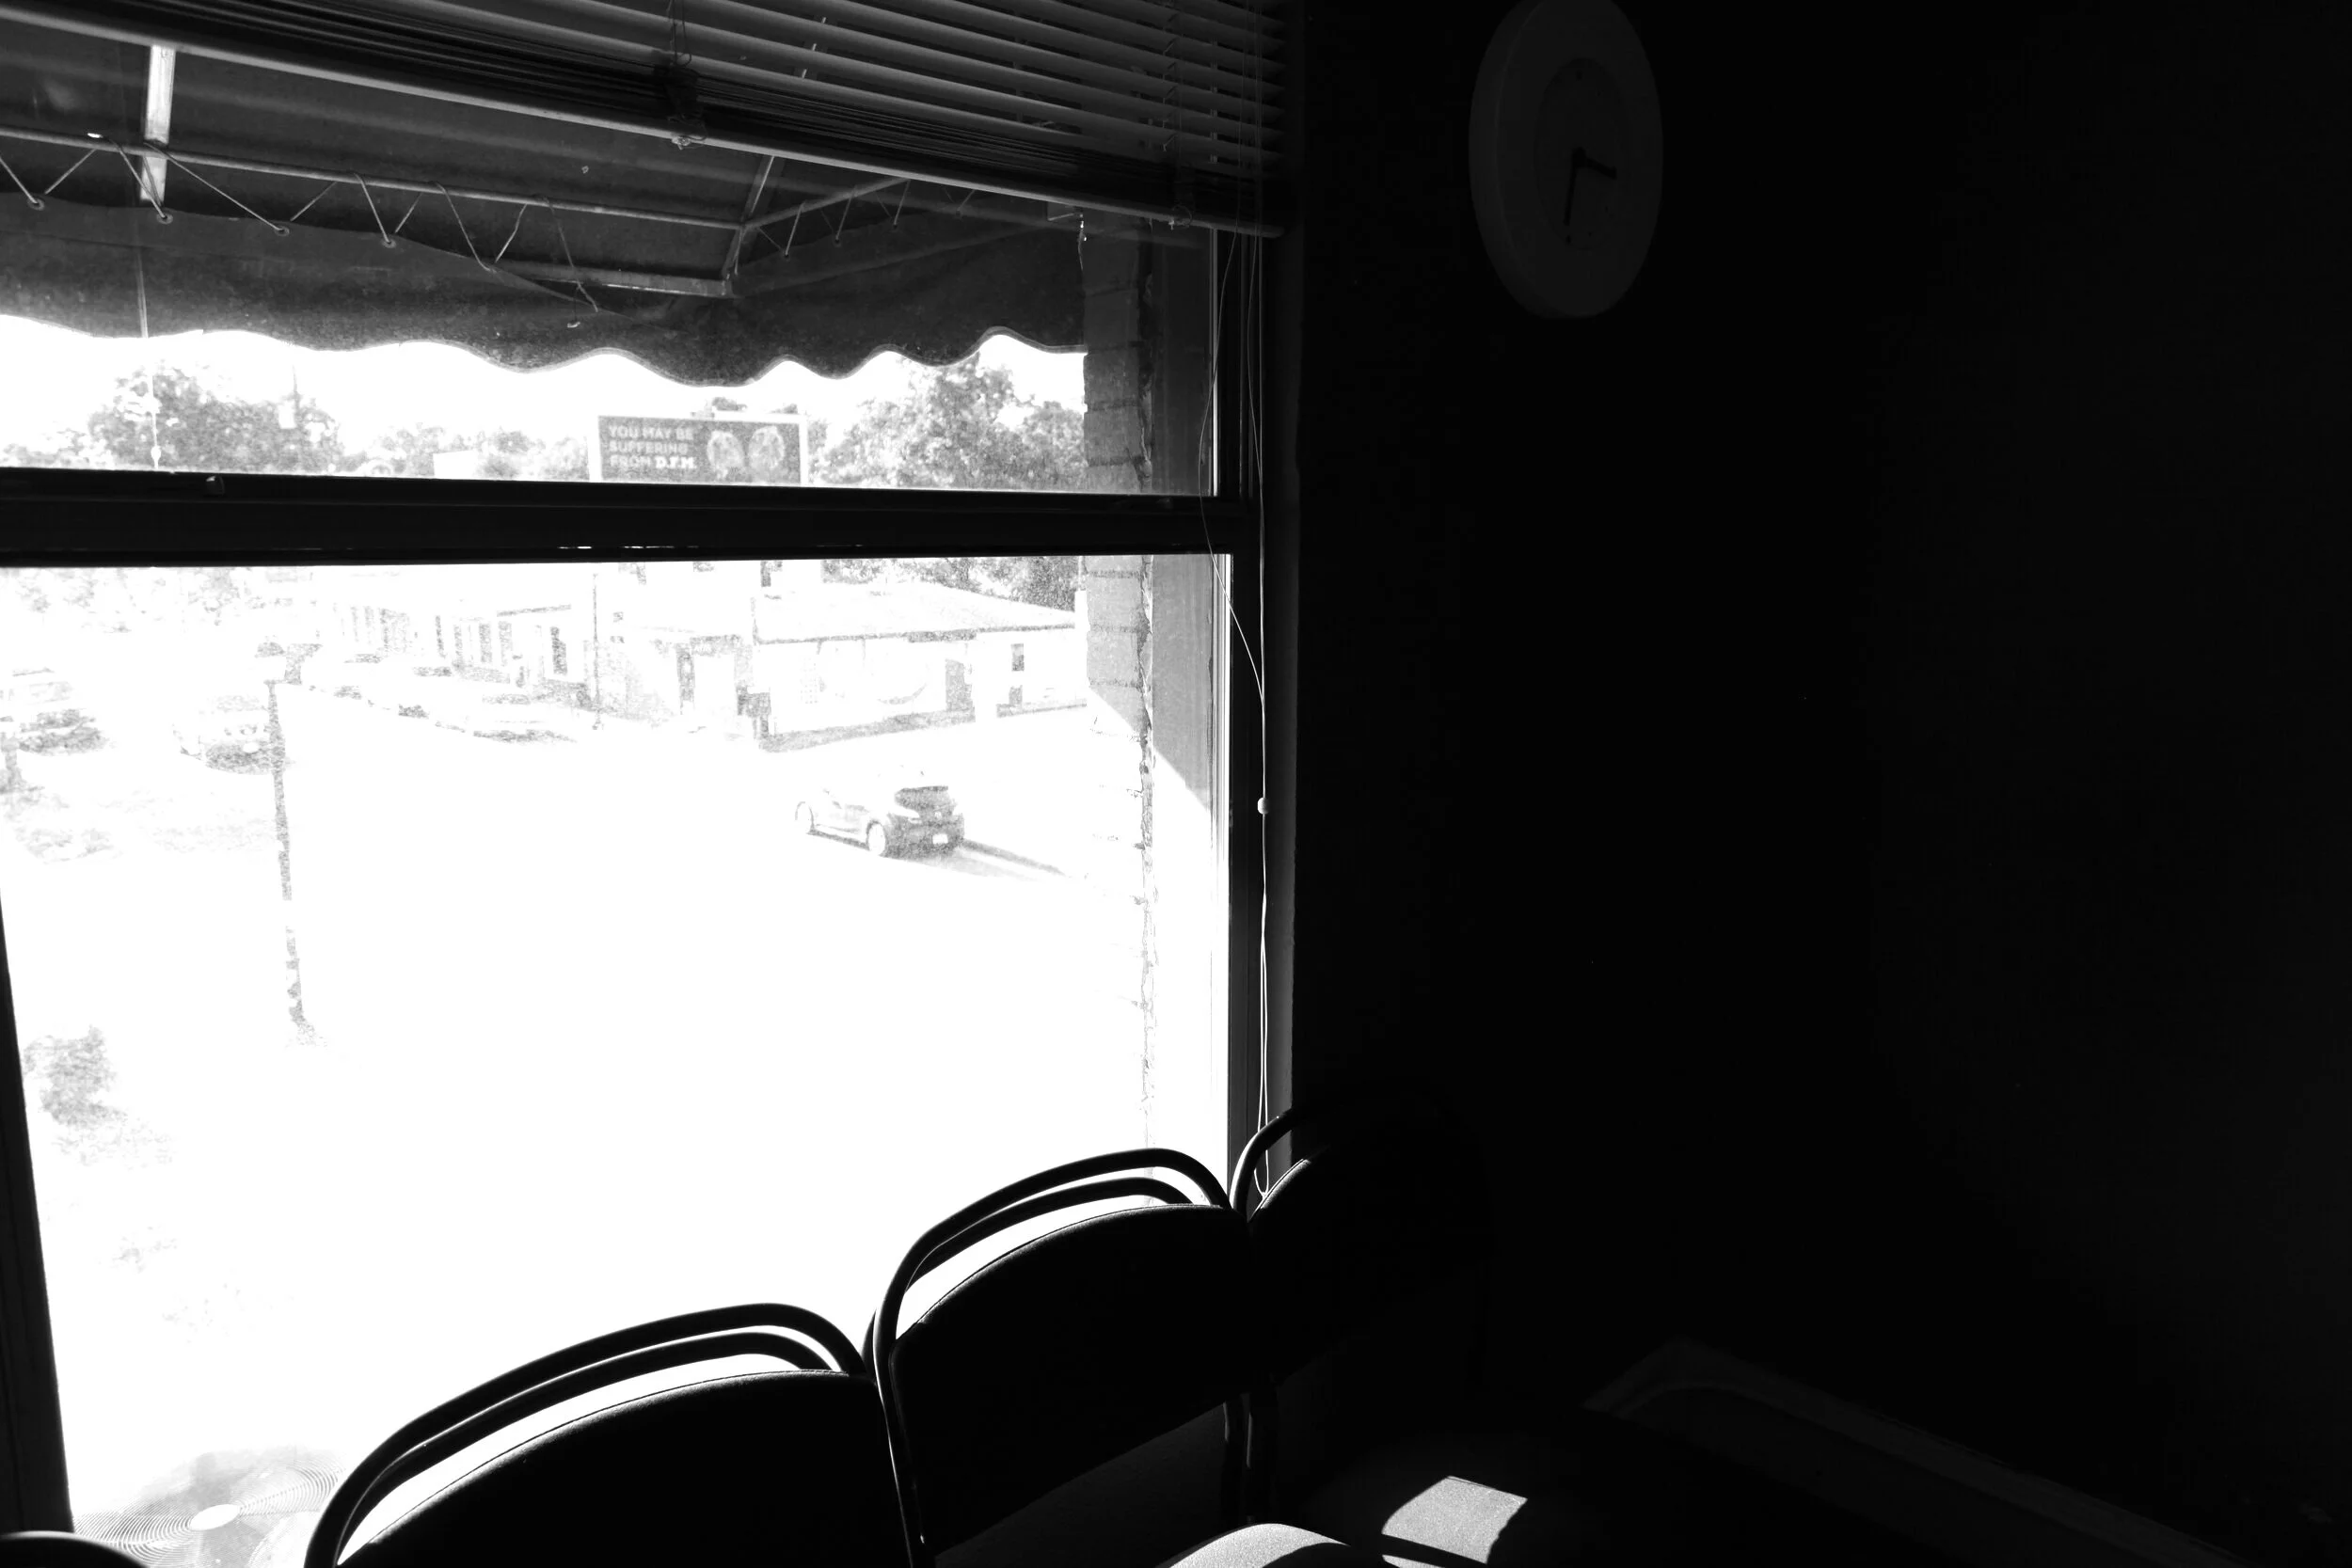
Next, some cameras would prioritize the INSIDE exposure, and in doing so sacrificed the outside light entirely:
So in this result we can see the interior of the scene very clearly, but we’ve lost the outside world entirely.
And this here was by far the rarest result. Only about 10% of students would get this exposure, and in some classes, no one at all.
And then we have the most common result.
For about 50% of my students, their cameras would get really “wish washy” and indecisive, and so the camera would actually average the two settings together:
….which badly damaged BOTH parts of the scene.
And those were the only three results the students would ever get.
So why did we do that experiment?
Well one of the reasons we did it was to introduce the idea of swapping your exposure.
The notion that there isn’t just ONE WAY to expose a given scene.
But the more important reason we did this experiment was to prove that just putting your camera in manual mode, and then “metering the scene yourself,” doesn’t necessarily mean you’re controlling your picture just yet.
In other words, all those students were set to “M” mode…right?
And all of them did the metering with their own fingers….correct?
But did any one of them actually control which of those 3 results they got?
Nope.
Modern cameras are so layered with paternalistic programming, even when you’re set to “manual mode,” the camera is still making tons of decisions for you.
Or perhaps the better way to put it is this: when you set your camera to “Automatic,” the camera is still using the very same metering system to determine how to expose the scene. So if you put the camera on “manual,” and then simply do what the meter tells you to do, then you’ll arrive upon the same exposure as your automatic functions.
So my point in all of this is that, even though their camera’s were technically set to “Manual,” those students were still getting “automatic” results, because their camera’s programming was still dictating what settings they should use.
Ok, so then how do we control our exposure ourselves?
Well, in order to do that, there’s actually going to be two things you need to know about how your camera has been designed.
First, you have to understand the meter itself - ie: what it’s been designed to do.
And then second, you’ll have to understand how your camera has been programmed to INTERPRET that meter for you.
So first….THE METER:
One thing we never discussed last week when we were explaining how to read your meter was….what exactly does the meter even do?
In other words, when you get the meter “balanced” (when it reads “0”) what is that even telling you?
Is it telling you that you’ve arrived upon the CORRECT exposure?
Nope.
Is it telling you that you’ve arrived upon an ACCURATE exposure?
Nope.
Is it telling you that you’ve arrived upon the exposure that you WANT?
Nope. [How could it? It would have to be able to read your mind]
So then what is it telling you?
When the meter reads “0,” it’s telling you that you’ve arrived upon the exact camera settings that will expose whatever you’re pointing it at as “Middle Gray.”
So what is Middle Gray?
Well, it’s exactly what it sounds like.
if you imagine a grayscale that begins with black on one end, and ends with white on the other end:

MIddle gray is the exact midpoint of that grayscale.
It is exactly halfway between total black and total white.
But instead of imagining an abstract gray scale, the more practical way of understanding it is to imagine that on one end of the exposure spectrum we have TOTALLY SILHOUETTED, and on the other end of the exposure spectrum we have TOTALLY BLOWN OUT.
And that means that “middle gray” is an exposure that’s exactly half way between totally silhouetted and totally blown out.
That’s probably the most practical way to understand this. In fact, thinking of it in those terms will also better enable you to visualize why this concept applies just as much to color photos as it does to B&W photos.
So once again, what we’re getting at here is that when your meter reads “0",” it’s telling you that “THESE are the camera settings that will render your subject as ‘middle gray,” or that these are the camera settings that will render your subject exactly halfway between being totally blown out and totally silhouetted.
And this is true no matter what you point your camera at. Be it a white wall, or a black curtain.
If you use the camera settings that the meter recommends, then that surface will EXPOSE AS MIDDLE GRAY in your image…regardless of how that surface looks to you in reality.
See for yourself. Here is a comparison between a white stucco wall, and a piece of black fabric. Both were shot doing exactly what the meter wanted:
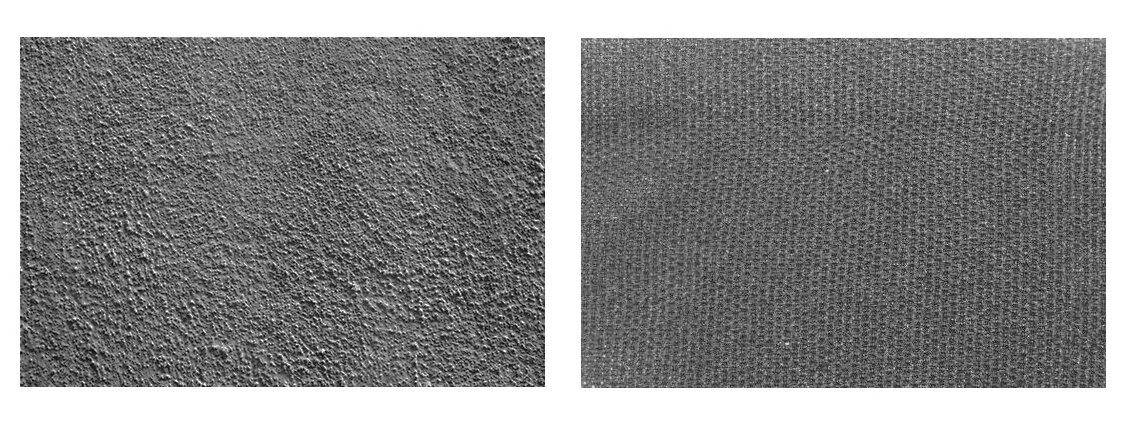
Note that they came out the exact the same shade of gray.
In fact, if you want to prove this to yourself, all you have to do is isolate one surface in your frame, balance your meter, and then watch that surface become middle gray in your image. [tip: it will be easier to see if you use the “B&W” mode on your camera].
So one of the first ideas you have to wrap your head around here is that your meter is less of an “instruction of what you should do,” and more like a “tuning fork.”
The way a tuning fork works is that it’s tuned to exactly one specific musical note….not as an “instruction for how to sing,” but more as a point of reference.
Your light meter is the same.
It‘s calibrated to “one specific note” (or more literally, one shade of gray).
And it gives you that same shade of gray every single time, so long as you do exactly what the meter recommends.
But to be even more accurate, what this really means is that your meter is tuned to one specific AMOUNT OF LIGHT.
Your camera always tries to capture the same amount of light every time, no matter what surface you point it at.
Specifically, it tries to capture the exact amount of light that will render your subject HALF WAY BETWEEN BLACK AND WHITE (or half way between totally silhouetted and totally blown out).
So in summary, your meter is calibrated to the exact midpoint between those two results.
At the end of the day, what this really means is that, if you always do what the meter says, in theory, you’d always be capturing the same amount of light for every photograph you take.
But wait, if you meter ALWAYS captures the same amount of light, then why does it keep recommending different settings for each shot you take? In other words, for one picture, your meter tells you to use 5.6 and 500, and then for the next picture, it tells you to use 5.6 and 15.
But your meter was “balanced” for BOTH shots.
So how could you be getting the same amount of light when you’re using wildly different camera settings?
Well, it’s because the light you were POINTING AT was different each time.
In other words, this analogy might help: Think about your own “human vision.” Your own eyes actually do this very same thing.
For instance, when you step out of some very bright daylight into a darkened room, your pupils widen don’t they? And then when you step back out into daylight, your pupils shrink.
What’s happening is that the diaphragm inside your eye is actually ADJUSTING to the amount of light that’s in front of it - it’s adjusting to a brighter environment as opposed to a darker environment - so that the amount of light that enters your retina is always the SAME.
Ok, so if you can wrap your head around that, then you just have to imagine that your meter has been designed to mimic that very same process.
If you point your camera at bright sunlight, your meter will recommend that you shrink the aperture (or quicken the shutter), and if you point your camera at a dark and shadowy area, your meter will recommend that you open your aperture wider (or lengthen your shutter).
And it’s doing so in order to maintain the SAME amount of light coming into your camera.
In short, your meter keeps adjusting to the light you point it at so as to maintain the same INTAKE of light into your camera.
Ok, so if that’s the way your meter’s been designed, you’re probably wondering….why?
Why did they design your camera to make everything look middle gray?
Well, we’ll answer that question in a little bit. But in order to get us there, for the moment, let’s first just accept that this is what our meter does.
And instead let’s ask, “Ok, so what are the CONSEQUENCES of having a meter that’s been designed that way?”
The first consequence is that, if you expose for something in your scene that IS middle gray, then you should get an “accurate” exposure, right?
In other words, if someone in your scene is wearing a perfectly “middle gray” sweater, and you took your light reading from that sweater, then when you take the picture using those camera settings, the sweater should be rendered middle gray in the photograph…..which is in fact how it looks in real life.
So it should be “accurate.”
And further, anything in that same scene that is darker than that sweater (like maybe some black curtains in the background) - ie: anything that reflects LESS light than that sweater - will underexpose (or darken) at those particular camera settings, right?
And similarly, anything in that scene that is lighter than that sweater (like maybe a white wall in the background), - ie: anything that reflects MORE light than that sweater - will overexpose (or brighten) at those same camera settings, right?
So in theory, shouldn’t metering someone’s gray sweater in your scene get you an all around “accurate” exposure?
Well, that’s the theory. In fact you can actually buy something called a “gray card,” which is a card that’s been calibrated to be exactly middle gray. It allows you to hold it up in the middle of your scene and take a meter reading off of it (just in case no one in your scene happens to be wearing a middle gray sweater : )
But before you get too excited by that, we’re going to find out later in this curriculum that the “gray card” method is a bit superficial and flimsy.
But for now, I kind of just want to gloss over that. The reason I went through the trouble of describing that “gray card” method is because I wanted to set up a slightly different hypothetical:
What would happen if you expose for something in your scene that very clearly ISN’T middle gray?
In other words, what if we expose for the “black curtains” in our scene (something much darker than middle gray?
Or conversely, what if we expose for the “white wall” in our scene (something much lighter than middle gray)?
Well let’s think it through.
Let’s start with the first scenario. What happens if we expose for the “black curtains?”
In other words, what happens if we walk right up to the black curtains, take an isolated meter reading from only that one spot in our scene, and then we step back to where we were originally composing the shot from in the first place, and then took the entire picture using the camera settings we read from those curtains?
What if we meter the DARKEST part of our scene when taking our picture?
Well we’d end up with a very bright, or “overexposed” image.
Why?
Well to understand that, let’s go through the progression of facts that we already know to be true…which should lead us to that conclusion.
Fact #1: We know that if you expose for the black curtains, those curtains will definitely become “middle gray” in your image. And how do we know that? Because ANYTHING you expose for will always be rendered as middle gray in your image. That’s how your meter was designed, remember?
Fact #2: If the black curtains become gray in your image, it means they’ve become BRIGHTER than they are in reality, or that they’ve been “pushed HIGHER UP on the grayscale” from where they were in real life.
So what do you think happens to everything else in the picture? You guessed it, EVERYTHING gets much brighter than it was in reality, EVERYTHING gets pushed higher up the grayscale.
Which is why we know you’ll end up with a brighter, or “overexposed” image.
Thus, you will always end up with a brighter image, any time you meter off of the DARKEST part of the scene.
But just to make sure that entire train of thought sinks in, let’s do the whole thing in reverse.
What happens if we expose for the “white wall” instead of the black curtains in your scene?
Meaning, what would happen if we walk right up to the white wall in our scene, and take an isolated meter reading from only that one spot, and then we stepped back to where were originally composing the shot in the first place, and then take the entire picture using the camera settings we read from those curtains?
In other words, what happens when we expose for the BRIGHTEST thing in our scene?
We’d end up with a very dark, or “underexposed” image.
Why?
Well again, let’s go through the progression of facts that we already know to be true…which should lead us to that conclusion.
Fact #1: We know that if you expose for the white wall, that wall will definitely become “middle gray” in your image. And how do we know that? Because ANYTHING you expose for will always be rendered as middle gray in your image.
Fact #2: If the white wall becomes gray in your image, it means it’s been rendered DARKER than it is in reality, or that it’s been “pushed DOWN the grayscale” from where it was in real life. So what do you think happens to everything else in the picture? You guessed it, EVERYTHING gets much darker than it was in reality, EVERYTHING gets pushed down the grayscale.
Thus, you will always end up with a darker image, any time you meter off of the BRIGHTEST part of the scene.
Ok, so if that makes any sense to you at all, then finally….can you see this is EXACTLY what happened in that window experiment?
For the 40% of the students who got this result:

Their cameras looked at the scene and thought “I’ll bet they want to expose for the outside light, not the inside light.”
And so the camera exposed for the outside light.
And that took the BRIGHTEST part of the scene and rendered it “middle gray,” ….which means it pushed a really bright area way DOWN THE GRAYSCALE.
And so what happened to the darker part of the scene (the interior)? It got pushed way down the grayscale as well, all the way down to pure black.
But then next, for the 10% of the students who got this result:

THEIR cameras said “I’ll bet they want to expose for the inside light, not the outside light.”
And so the camera exposed for the inside light, which took the DARKEST part of the scene and rendered it “middle gray,” ….which means it pushed a really dark part of the scene way UP the grayscale.
So what happened to the brightest part of the scene (the exterior)? It got pushed way up the grayscale as well…all the way up to pure white.
And finally, remember that the most common result was this:
In THIS case, the camera saw what settings would make the interior middle gray, and it also saw what settings would make the exterior middle gray… but because the camera didn’t know which one you wanted, it tried to “play it safe” by going for something halfway between the two. So it averaged out the two settings.
Which sacrificed BOTH parts of the picture.
So in summary, your camera has been programmed to either commit to the brightest area, or commit to the darkest area, or give you an average.
It doesn’t understand the context you’re shooting. It doesn’t even know the subject matter.
It’s just programmed to look at the light and take a guess.
And again, I feel like I need to keep mentioning this: most photographers have been trained to accept these “guesses” and then to try to work with them, or to override them…they’ve been trained to work from WITHIN that system.
We’re going to work from OUTSIDE that system.
But here’s the thing, this concept of “Middle Gray” is half the explanation of what happened to those students in that window experiment.
And to summarize that half: the cameras was trying to make something in the scene middle gray, and it had to make a guess as to which part of the scene it should commit to.
And those students had no input into that guess. The camera’s PROGRAMMING was determining which part of the scene to exposure for.
So even though the students were turning the dials on their cameras themselves…and even though they were “reading” their meters themselves…those students might as well have just put their cameras on AUTO, and they would have got the same result. Because the automatic system takes its cues (its suggested camera settings) from the very same meter that those students were reading.
Which means those students were just going through the tedium of physically moving their apertures and shutters only to end up where the automatic system would have put them anyway.
Ok, so “Middle Gray” is the first part of this, but the other half of what we have to tackle here is that “programming” part.
If the camera is trying to make one part of the scene “middle gray,” then how is it determining which part?
Well now we arrive at something called “metering mode.”
By default, all modern cameras arrive from the factory pre-set to something called “Evaluative Metering,” or “Matrix Metering,” depending on your brand of camera.
In this mode of metering, the camera takes light readings from all around your frame:
….meaning that it’s reading all of those different points in your composition, which in turn means that it’s simultaneously taking readings from the lightest areas and the darkest areas of your scene.
And then it feeds all of that data into the camera’s onboard computer….at which point your camera makes a guess as to what exposure you might want, based on the preferences and priorities that were programmed into it by the engineers at Canon or Nikon.
So for instance, in that first outcome…

….the camera was ONLY ever reading the exterior light, and it was ignoring the interior light.
And it didn’t even ask you….it made that decision on its own.
And looking at the results we got over the years, on aggregate, one key takeaway from this window experiment is that Canon/Sony/Nikon tend to program their cameras to prioritize the brighter light in the scene.
Recall that only about 10% of my students’ cameras committed to the interior exposure (the darkest part of the scene), while 90% of their cameras either committed to the brighter light or averaged the two together.
This tells us that camera companies are hesitant to program their cameras to commit to the darker areas. They might be assuming you’re less interested in the shadows of your scene than the highlights.
But that means they’re giving your camera a set of priorities - a set of biases - that YOU didn’t choose.
Ok, but if this is such a sloppy, unreliable, and paternalistic system, then why do all cameras come set to this mode from the factory?
Well, remember that the overwhelming majority of cameras (even high end cameras) are purchased by hobbyists and amateurs, or photographers who know little to nothing about photography.
Most of them are shooting on some form of automatic. Which means they need the camera to do all the guess work for them. Therefore the makers of these cameras are trying to get the onboard computer to EVALUATE every part of the scene in order to make the best “educated guess” a programmed camera can make.
But hopefully it’s obvious that the moment you’re shooting in “Manual” this kind of metering system is less than worthless to us. It can ONLY get in our way.
In other words, there will never come an occasion where a manual photographer thinks to themselves, “You know what, I don’t even WANT to know which part of the scene my camera is reading…let’s just pull the trigger and find out!!”
Ok, but the if we’re not using “evaluative metering,” then what are we using?
Well, keep in mind there is no “perfect” metering mode, but the one that best sidesteps your camera’s meddlesome programming is called “SPOT metering,”
Spot metering takes a light reading from ONLY the middle 3% of your frame at the very dead center of your viewfinder:

Whatever you’re pointing that SPOT at, that’s all the camera is reading.
Which means the camera isn’t choosing which parts of the frame to read….and which parts of the frame to ignore.
In other words, there’s no “programming” involved.
So if you have spot metering, we’re going to set it to that and then throw away the key.
In the rare event that your camera doesn’t have spot metering (I find about 1 in 10 of your cameras won’t), your best alternative is something called “center weighted” or “partial” metering, which takes a light reading from the center 25-35% of your viewfinder:
This form of metering is light years better than “evaluative,” simply because it won’t pick and choose which parts of your scene to meter and which parts to ignore (again, there’s no “programming”) - you always know it’s reading that middle 25%.
But be warned, it isn’t quite as precise as “spot” metering, because it’s still reading a much larger percentage of your frame, which means that if you have any mixture of light in that part of your composition, you can still get a very confused or uncertain light reading.
So again, not as bad as “evaluative,” but not as precise as “spot.”
And by the way, if you find yourself in that 10% of people who don’t have spot metering, just hang tight, it’s only a TEMPORARY inconvenience. When we get into more advanced methodology later on in this course, it won’t much matter whether you’re using spot metering or center-weighted metering. I promise.
The key is to make sure you’re using a form of metering where the camera isn’t making any overriding decisions for you. So in these early stages, it’s just a little more convenient if you have spot metering.
Ok, so putting all of this together - only when your camera is set to the smallest, most precise metering mode you have (and one that doesn’t allow the camera to make any programmed, command decisions for you), can we finally begin controlling our exposure ourselves.
But what does it even mean to “control your exposure yourself?” What are we even trying to do, here?
Well, we have a long way to go before all of the ins and outs and possibilities are totally clear to you. But for today, in this early stage, I’m happy if you simply understand how to control which part of your scene is middle gray.
So, for instance, from here forward, if you’re looking at a window like the one in the experiment above, you should now understand that the way you make the interior “middle gray” is to point your spot meter at the interior wall, and then get your meter balanced to find out your settings…… then recompose the shot however you prefer…... and when you pull the trigger (at those settings) the interior wall should be middle gray.
And vice-versa. The way you make the exterior of the scene “middle gray” is to point your spot meter at the window (at the brighter exterior light), and then get your meter balanced to discover your settings….. and then recompose the shot however you prefer..…. and when you pull the trigger (at those settings) the exterior of the scene should be rendered middle gray.
But…one MASSIVELY IMPORTANT note to make here:
When you do that, when you point your meter at one part of the scene, AND THEN you RECOMPOSE the shot to your liking……do you think your meter will still be “balanced?”
Probably not.
Because depending on how you’re now framing the shot, your “spot” meter is likely pointed at a different part of the scene than it was when you were taking your light reading.
So will your meter necessarily be balanced at the moment you’re TAKING your picture?
No.
Let’s go all the way back the very beginning of today’s class, to that very first insight I brought to your attention: remember that your meter is SO SENSITIVE, that if you move your framing even a tiny bit, the meter’s indicator flies all over the place.
Ok, so given that…..what do you think the odds are that once you’ve taken your meter reading from the part of the scene you want to expose for….and then, AS A SEPARATE ACT, you go ahead and COMPOSE the shot the way you want to…..what do you think the odds are that your meter will be balanced at that moment?
The odds are nearly ZERO.
The meter will most likely NOT be balanced at the actual moment you’re taking the picture.
That’s one of the hardest things for students to get through their heads at first.
When they go to compose their shot, they see the meter is way off, and they think that maybe they need to re-balance it before they take the shot.
This is why it is so vital that you separate COMPOSITION from EXPOSURE….because the two have nothing to do with each other.
The engineers designing automatic cameras might need to link those two concepts together in order for the camera to take a better “guess,” but as manual photographers, we absolutely need to DISENTANGLE them.
To make sure you understand why this is sooooo important, take a look at this scene here:
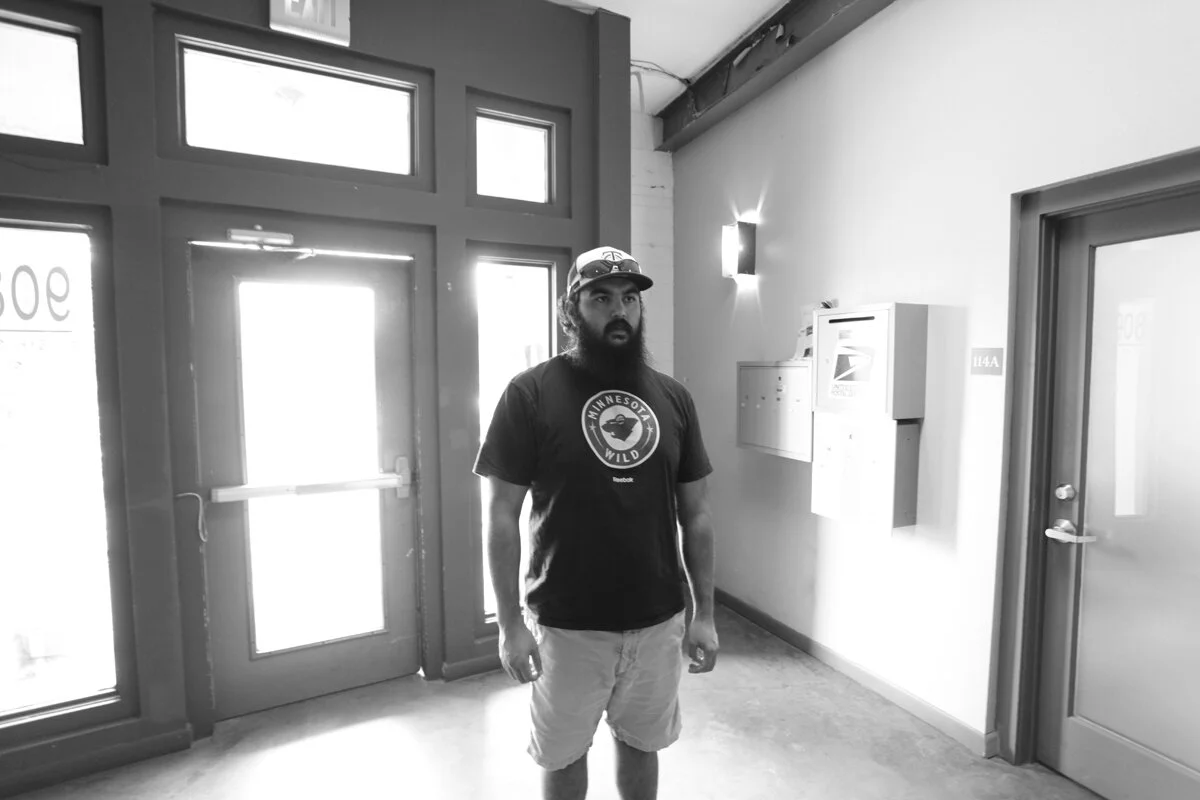
This is exactly the kind of scenario that photo tutorials will describe as a “nightmare,” or at least describe as “very difficult.” For two reasons.
First, there is a huge light differential in the shot. And second, our subject is backlit, which means there is a lot of light coming directly toward our lens.
But this is only a “nightmare” for automatic photographers. Or people who don’t really know how photography works.
If you’re a manual photographer, no scene is any more difficult than another.
I mean that.
If you’re a manual photographer, you simply decide which light you want to expose for and then start snapping away.
So in this case we decide we want to expose more for the interior light, as opposed to the exterior light from outside the window.
So we’ll meter the INTERIOR light (probably the man’s face) to find out the interior exposure settings, and then we’ll KEEP THEM THERE.
Now watch how we can keep changing our framing, our distance, and even our angle…and we can just keep snapping away to our heart’s content…..and we’ll keep getting the same exposure every time:
Whether we frame him near, far, left or right….it doesn’t matter. We still keep getting the same exposure.
What a nightmare, right? ( /sarcasm)
And the reason we keep getting the same exposure is because the LIGHT in the scene isn’t changing.
The interior of this scene has the exact same amount of light that it had 2 minutes ago, and the exterior of the scene has the exact same amount of light that it had 2 minutes ago.
And if the LIGHT isn’t changing, then why would we need to change our exposure settings?
So does it now make more sense what I mean when I say EXPOSURE and FRAMING have absolutely nothing to do with each other whatsoever.
We need to be linking our camera settings to how much light there is….and not to how we’ve framed the image.
But again, your camera’s AUTOMATIC programming isn’t smart enough to do that. It has no other choice but to tether your exposure to your framing. Your camera’s programming has nothing to go on other than what you happen to be pointing it at RIGHT NOW.
And so as you keep re-pointing your camera, it keeps re-evaluating.
So let’s see what happens when you do the exact same experiment, but this time shooting in an automatic mode. In this case, I’ll use the very famous “aperture priority mode,” which is the mode most “pros” swear by.
Note that the first shot comes out ok, which is to say that the metering system gave us a decent enough “guess.”

But watch what happens when we re-frame the shot just a little bit:
Here the camera guessed wrong, and missed the exposure entirely.
Just because we re-framed our shot a tiny little bit.
And this will happen A LOT in automatic photography (so maybe you can now see why people are told to AVOID these kinds of scenes).
But again, the reason this happens is that your camera’s exposure responses are based on your FRAMING, not based on the light in your scene. And that’s why it’s changing the exposure settings even though the light in the scene isn’t actually changing.
And the craziest part of all this is that most “pros” will tell you, ”Yeah, we know the camera will guess wrong a lot, that’s why you have to learn about all these fancy "override” functions….so that you can keep “correcting” the camera.”
Which is completely insane. Totally inefficient, and totally over complicated.
In other words, rather than just walk into any given scene and spend about 4 seconds determining your exposure (and be done with it - so you can move on to worrying about other issues like composition, time, depth of field, etc)…… Rather than that, these pros would have you constantly fighting with your camera….for every single frame you take….for the rest of your life.
The reason it’s so important to learn how to do this directly (and not through your camera’s programming) is so that you can figure out your exposure in a matter of seconds, and then not have to worry about it for the next 40 pictures you take…. Because that’s what allows you to take more complex shots.
In other words, if you don’t have to spend any brain power on fighting your camera - if you can just anchor your exposure settings and forget about it - then you can commit your brain power to incorporating other dynamics into your shot. But if you have to expend most of your brain power fighting with your camera’s programming, you have nothing left in the tank to be able to add other dynamics into your thinking….and you end up with really 1-dimensional images.
We want to get to where we can COMBINE a clever exposure with a clever use of spatial relationships with a clever use of movement with a clever composition, etc.
So at this point I’d like to take the time to remind you of a couple of things I said on the first day of class last week.
First, remember I had said that the more you use your fancy “advanced override features,” the more it actually limits the complexity of your shots.
Well all around the world right now photographers are learning about their “aperture priority mode” and then how to use it in conjunction with “exposure lock” and “exposure compensation,” and very ironically, those photographers think they’re becoming experts….because those kinds of functions just SOUND so esoteric and so technically legitimate.
But the truth is, learning photography through those kinds of functions is condemning them to very limited, very mediocre set of results. And it’s the main reason so many pros take the simplistic, formulaic images we looked at last week.
The second thing I wanted to remind you of from last week is is that I had said “manual photography will be faster and simpler than automatic photography.”
Hopefully this demonstration gives you a better handle on why those two things are going to turn out to be true, it should be a bit easier now to visualize how manual photography is going to take us places that automatic photography can never go (although I’m not NEARLY finished building my argument here - this is only the beginning).
By bypassing all of the cameras response systems and just taking the exposure ourselves, we’ll make our shooting a lot more efficient, which will in turn allow us to take more complex shots later on.
But finally, before we move on to the second half of today’s lesson (which concerns the use of TIME in photography), one more hint at how today’s theory will pay off later in this curriculum.
And this is a big one.
Let’s go back to a question we asked a little while ago, but never really answered:
Why did they calibrate your camera to middle gray?”
I mean, at a glance, it seems kind of strange to design a camera that makes everything always look the same, no matter what those things look like in real life.
Well, it turns out it isn’t strange at all. In fact it’s really kind of brilliant.
So why did they calibrate your camera’s meter to middle gray?
Well let’s first ask that question in a slightly different way, and see if this helps.
What they REALLY did is calibrate your meter so that it always takes the SAME amount of light every single time.
In other words, they calibrated your camera to a “constant.” Whatever you point your meter at, it will always give you the SAME result.
And now think about it, why would we ever need a “constant?” Why do we ever need a “control?”
Because you can’t ever measure anything unless it’s measured against a constant, or an unchanging value.
For instance, you can’t weigh something unless you weigh it against a standard, unchanging unit of measurement. Like a “pound.”
So if someone says, “that table over there weighs 50 pounds,” or “that sofa weighs 80 pounds,”those statements would be completely meaningless if we didn’t know what a ‘pound’ is. Moreover, the definition of a ‘pound’ needs to be completely permanent and unchanging.
The same thing is true if you want to measure the length of things in terms of “inches.”
You can’t weigh or measure something, unless it’s weighed or measured against some kind of UNCHANGING STANDARD.
And that’s what middle gray REALLY is.
It’s a control. It’s an unchanging standard,
So that you can measure and compare the differences in your light.
So to put this in perspective, let’s say you go out practicing this week, and you decide to shoot a portrait of your friend.
And all that’s in your frame is your friend, and in the background, the sky behind your friend:
Well, let’s first meter the light on your friend’s face.
Remember, all that means is that we point our spot meter at our friend’s face ONLY, and not at all at the sky.
And when we do, after “fiddling with our dials” for a few seconds, the meter finally balances at F5.6 and 60:
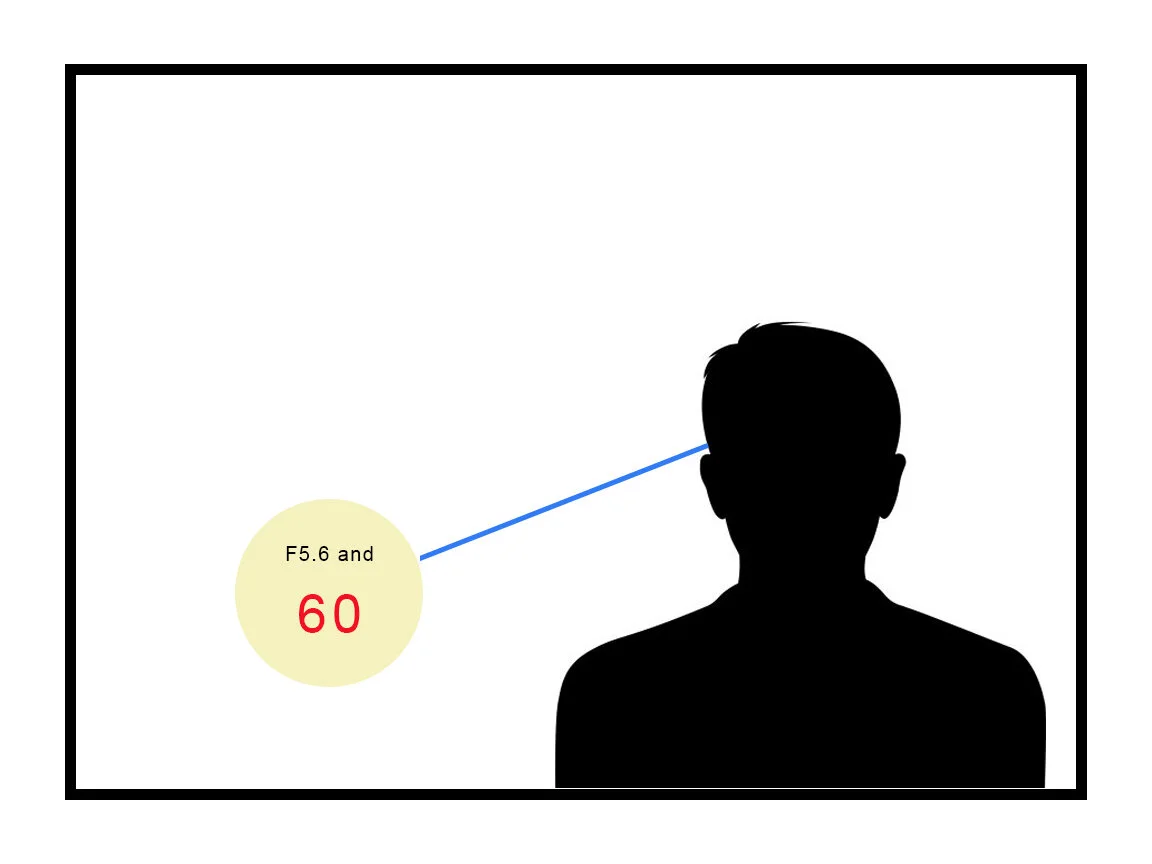
So the face reads 5.6 and 60.
Ok, so what do those settings - all by themselves - tell us?
Not much.
Just that the face will be middle gray, IF WE TOOK THE PICTURE AT THESE SETTINGS.
In other words, the face would be exactly half way between blown out and silhouetted.
But is the meter telling us that this is what we SHOULD do?
No. Not at all. The meter never tells you how you should take your picture, the meter just gives you a neutral reference point….that’s all it ever does.
But right now that reference point (5.6 and 60) is pretty meaningless, because we have nothing to REFERENCE IT AGAINST. We have nothing to compare it to.
So let’s get another reference point, shall we?
Let’s meter the only other part of the scene….. the sky behind our friend.
When we point the meter at the sky, the sky is likely BRIGHTER than the face, so the meter isn’t happy with the current camera settings (5.6 and 60).
So now you “fiddle with your dials” again until the meter is balanced, and this time you land on F5.6 and 250:
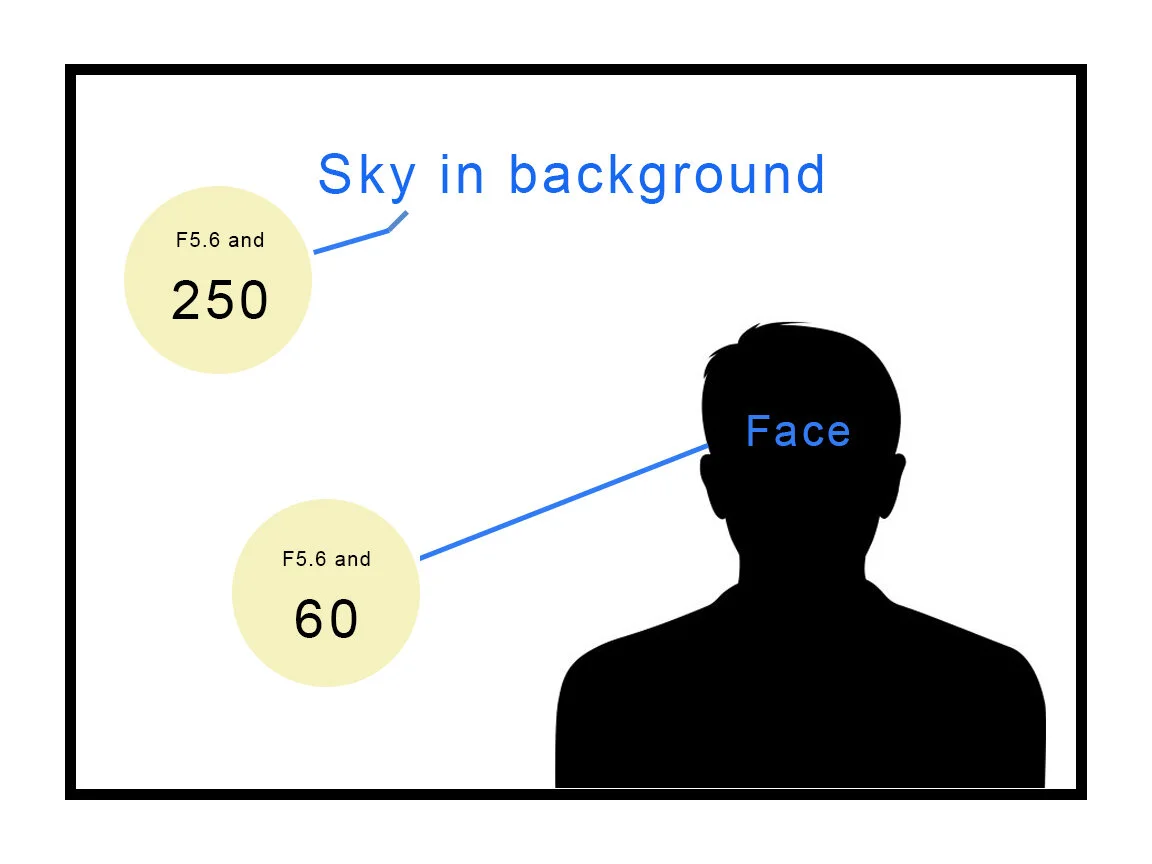
So the sky is metering at 5.6 and 250.
And what do THOSE settings - all by themselves - tell us?
Just that the sky will be middle gray, IF WE TOOK THE PICTURE AT THESE SETTINGS.
In other words, if we use 5.6 and 250, the sky would turn out exactly half way between blown out and silhouetted.
But is the meter telling us that this is what we SHOULD do?
No. Not at all.
The meter never tells us what to do. It just gives us reference points. In this case 5.6 and 250.
But now, we finally have TWO reference points.
We have a reading from the face, and we have a reading from the sky.
So we can now reference them against each other.
We can now “weigh” them against each other.
The face measured 60, and the sky measured 250.
So how DIFFERENT are those readings?
Well keep in mind that light is always measured in “stops?”
So now think back to our shutter scale from last week:
1 2 4 8 15 30 60 125 250 500 1000 20000
Can you see that 60 and 250 are TWO STOPS apart on the shutter scale?
So the meter has told us that we’re dealing with 2 stops of contrast.
We have a 2 stop “lighting differential.”
And I can’t stress this enough: THAT’S ALL THE METER EVER DOES.
It never tells you HOW to take a picture.
And certainly it isn’t trying to give you a “starting point” (which is one of the more superficial misinterpretations you’ll see a lot in online tutorials).
The meter simply tells you what kind of situation you’re dealing with. And then YOU decide what to do with that information.
And later in this course we’re going to learn that you can do very different things to a scene with 7 stops of contrast than you can to a scene with 2 stops of contrast. Because different amounts of contrast give you different possibilities.
But we’ll explore that idea more thoroughly at a later date.
For now I just want you to know that THIS is what your meter really does.
So to summarize EVERYTHING we’ve discussed in the first half of today’s lesson, the main takeaways are as follows:
1) We need to separate framing and exposure. From now on we’ll associate our exposure settings with the LIGHT we’re trying to capture, not with the way we’ve framed our composition.
2) You need to know that your camera’s meter is calibrated to “Middle Gray.” Which means anything you point it at, your meter will render that thing middle gray. For right now I just want you to explore that. Just go ahead and take a few pictures of different surfaces to confirm it in your own mind, and to get used to the idea.
3) Finally, why was your camera calibrated to middle gray? So that we can measure and compare DIFFERENT AMOUNTS OF LIGHT in your scene. Remember, we don’t really know what we’re going to DO with that information just yet, I just want you to know that that’s what your meter really does.
Now on to Part II of this lesson, an introduction to TIME in photography
.