As always, Class 4 will be broken into two parts.
First, we’ll unveil all of the spatial “culprits” that undermined your Lens Assignments,
And then the second half of the lesson will finally introduce a non-technical topic, as we’ll explore different “modes of authorship,” or different “creative voices” in photography.
Part 1: Spatial Culprits
Recall that there were two different homework assignments this past week, and both involved how lenses can affect DIFFERENT LAYERS OF SPACE within your scene.
Let’s begin with the Depth of Field assignment:
First, a reminder of the definition of Depth of Field:
‘Depth-of-field’ is the amount sharpness that exists from foreground to background in your shot.
Or, to put it very simply….is your entire image relatively sharp, from foreground to background?
Or is there only one sharp layer of space in the entire image:
That’s more or less what DoF is.
Second, remember that there are two factors that affect (or control) your Depth of Field:
1) Aperture: a wider aperture will give you less sharpness (a "narrow focus"), and a smaller aperture will give you more sharpness. The way to remember this is to think about someone with poor vision squinting in order to read something (the way someone might squint in order to pass an eye exam). When people do that, they’re effectively NARROWING the “aperture” of their eyes.
2) Distance: focusing very near will give you a narrow range of sharpness, and focusing very far away will give you a greater range of sharpness. You can remember this by holding your finger a few inches in front of your eyes and focusing on it. Look at how narrow your range of focus becomes….compared to when you focus on something across the room.
So those are the two factors that affect how much sharpness there will be from foreground to background in your picture.
Finally, recall that the actual homework assignment here specifically involved lining up three objects in a row…. and then mixing and matching focusing on the foreground, middle ground, and background…..and at wider and smaller apertures. We were testing both of these factors at the same time.
Ok, so when students attempt this assignment, they tend to come back with pretty disparate results, meaning that a full classroom of students might all follow the same instructions, and yet still come back with wildly different outcomes.
For instance, some students will achieve very emphatic, very noticeable results….like these here:
….meaning that when they change focus from one object to the next, it has a radical impact on the picture.
And think “Ok cool, I definitely see it; I can see how much the image is changing from shot to shot.”
But some students will achieve slightly more MODERATE results….like these:
….meaning the picture will change a LITTLE bit, and they’ll think, “Ok, I GUESS I can see it. I guess the shots look a different.”
And then some students will come back to class…..and slam pictures like these down on the table:
…..and they’ll say “I swear to God I did EXACTLY what you told me to do, and all of my pictures look exactly the same!!!”
Ok, so what gives? Why are students getting such different results here?
Well there are two reasons. Corresponding to the two factors that we just mentioned above.
Factor #1 was your equipment (what EXACT lens you were using, and whether it had really wide apertures on it or not).
Factor #2 was your distance from the nearest object. Whether you set up the shot from 1ft away, or 3ft away, or 6ft away.
So let’s tackle each of these factors one at a time.
First, the lens you used.
Some of you were using “Zoom lenses” and some of you were using “Prime lenses.”
So what’s the difference?
Well, a “Zoom lens” is a lens that can CHANGE FOCAL LENGTHS.
For instance, it can go from wide angle to telephoto, just by twisting the lens.
In fact, 70% of my students are using the standard 18-55mm “Kit” lens that comes free with the camera, whenever you buy a consumer-grade camera.
A “Prime Lens” is a lens that cannot change length…it is always the same, fixed length.
For instance, it might be 28mm - and that’s all (in which case it would be ‘wide angle’). Or it might be 85m - and that’s all (in which case it would be ‘telephoto’).
But it doesn’t “zoom,” or change length.
Its length is fixed permanently.
So before we continue, I want to interject a a quick note about the pros and cons of “primes” vs “zooms,” because it’s one of the most common questions I get from students.
First….There are 3 advantages to prime lenses.
1) They often give you access to much wider apertures than zoom lenses.
For instance, the “Kit” lenses that a lot of you are using often have 5.6 as the widest aperture. And if you look at the aperture spectrum:
1.4 2 2.8 4 5.6 8 11 16 22 32
You can see that 5.6 is sort of in the middle of that spectrum, which means that it isn’t THAT wide.
And even if you spend A LOT more money on your zoom lens, the best you can do is a lens that opens up to 2.8.
But no zoom lens ever gets any wider than 2.8. Therefore the only way to have access to the two widest apertures (1.4 and 2) is to purchase a prime lens.
2) The second advantage to prime lenses is that they’re often “faster” lenses (which is a particular slang you’ll hear pro photographers use a lot).
What that essentially means is that you can get a lot more light into the lens….which in turn means you can shoot with faster shutter speeds.
In other words, right now, if you’re using a relatively cheap, amateur zoom lens, it means that if the lighting conditions aren’t absolutely perfect (read: bright daylight), then any time you’re either shooting indoors or even very late in the afternoon, you’re probably finding that you need to stretch your shutter out pretty long to get an adequate exposure.
Like if you’re shooting in your living room, you may have to use a shutter as long as 2…..or crank up your ISO and risk a lot of noise in the image.
But if you were using a prime lens, you’d have a “faster lens,” because, again, it lets more light into your camera….which in turn allows you to use faster shutter speeds in the same lighting conditions.
To elaborate, there are actually two different reasons “Primes” are faster.
One is that, as just mentioned, they tend to have wider apertures. For instance, if your lens gets gets as wide as 1.4, then it has TWO more apertures than the most expensive zoom lenses on the market…..and probably FOUR more apertures than a cheaper zoom lens that probably only goes as wide as 5.6.
But the other reason “Primes” are faster is that they’re engineered with purer optics….meaning that don’t have nearly as many compromises in the way they’re engineered as zoom lenses.
See, zoom lenses are more difficult to engineer for a lot of reasons. They have more moving parts, and they also have to be designed to work at different lengths….they have to work at18mm AS WELL AS at 55mm. Whereas when you tell an engineer that the lens ONLY needs to work at 50mm, then they can OPTIMIZE the design of the lens to perform at that particular length (and it will have fewer moving parts). Which means not only can they squeeze more apertures into it, but they can also design the raw optics to be able to let more light into the camera.
So long story short, if a lens has 2-4 more apertures, AND that lens is better designed OPTICALLY…it might let in as many as 6 stops more light than a cheap zoom lens.
And 6 stops is a profound difference. It’s game-changing.
Think about it. If you’re using a cheap zoom lens indoors, and the best shutter speed you can manage is in the neighborhood of 2, then someone using the best possible prime lens might be able to walk up beside you and take the exact same picture at 125…without even touching their ISO.
So you can see that can make a HUGE difference when it comes to controlling your image (or not compromising your image).
3) Finally, the last advantage to prime lenses is that they also tend to produce slightly sharper images than zoom lenses. And this is for the same reasons as just stated. Because the optical engineering of ZOOM lenses tends to be more compromised, not only do they let less light in, but the light is often a little softer or less clear.
But I’ll make a quick note here and say that I’m not really a “sharpness snob.” I personally think sharpness is the most overblown issue in photography. And just to prove it, I often test students by showing them different images shot with different lenses (a “taste test” if you will) to see if they can see the difference between one shot with a zoom lens and one shot with a prime lens. And unless the picture has been printed more than 25 inches, almost nobody can see the difference.
So yes, it is true that prime lenses ARE slightly sharper, but I don’t think it’s the big concern photographers make it out to be. The other two issues I just discussed are far more substantial to your photography.
So in summary, Prime lenses:
1) have more apertures (which gives you more control over your DoF),
2) are less compromised in low light conditions,
3) and tend to produce slightly sharper images.
So what’s the downside?
They’re not as versatile.
Because they’re confined to being only one LENGTH, it means if you want to take different KINDS of pictures, you probably have to change lenses much more frequently.
Whereas the pros and cons of zoom lenses are the exact opposite.
They’re more versatile, insofar as you can often shoot both wide angle and telephoto without having to change lenses, which in turn means you can handle different kinds of tasks using the same lens….but they severely limit your control over DoF, they heavily compromise your low-light shooting, and they produce slightly softer images.
Right now, I don’t want to put any judgment on which option is “better,” for today I really just want you to understand the cost/benefit of using either type of lens.
The point with regard to our current discussion here is that about 25% of my students were using a prime lens on this assignment, and about 75% of them were using a zoom lens.
And that made a difference here.
The students who were using a prime lens, might have been able to get a result like this:
….wherein they were able to ISOLATE one subject in their scene, while making the rest of the scene entirely unrecognizable.
Whereas a student using a zoom lens might have found that this was the best that they could do:

….wherein they were about to soften the background, but not OBLITERATE it. They couldn’t entirely isolate one subject.
So your equipment separated you on this assignment. That was the first issue.
And here I want to bring you back to something I said in the very first lesson, which was that your lenses will divide you…. not your cameras.
Think about it. The first two assignments we had in this course were CAMERA-RELATED assignments.
The first thing I asked you to do was to “balance your meter” in order to make a subject expose as MIDDLE GRAY in your image.
And every one of you was capable of doing that, no matter what kind of camera you had, right?.
Next, we played with shutter speeds. For instance, I asked you to attempt a “pan shot” using a shutter speed of 8.
And again, every one of you was capable of doing that…..regardless of what camera you had.
Hopefully it’s becoming clear what I meant when I said, despite all the distracting “bells and whistles,” cameras can’t really affect your photographic abilities. Because all cameras do pretty much the same things physically.
But that isn’t true of lenses.
On this assignment, your lens largely determined what kinds of results you could or couldn’t get.
So that was one factor here. The specific equipment you own.
And I should repeat that this will be the only time in this course that your equipment will substantially affect your ability to achieve the results you wanted.
But the other factor on this assignment was even more significant.
The other factor was your distance.
Let’s say you all had the same equipment.
Let’s say you all were using the basic “kit” lens that came with your camera (and the widest aperture you could get to was 5.6).
Ok, let’s do a quick experiment.
First, using that lens, let’s focus on something as near as we possibly can focus….using 5.6.
How near is the NEAREST you can focus? Well it depends on your lens. But somewhere on the exterior body of your lens is should list a “minimum focusing distance,” usually somewhere around 1 foot.
In this case, the “MFD” of this kit lens I’m using here is about 10 inches. So that’s where we’ll start:

So we’re focused at 10 inches away, and using the widest aperture this lens has (5.6), which means we’re MAXING OUT the capabilities of this lens.
We’re both as CLOSE as we can get, and our aperture is as WIDE OPEN as it can get.
And the result is not bad.
I doubt too many students would be all that disappointed in the result.
But hardly any students set up their shot from this close.
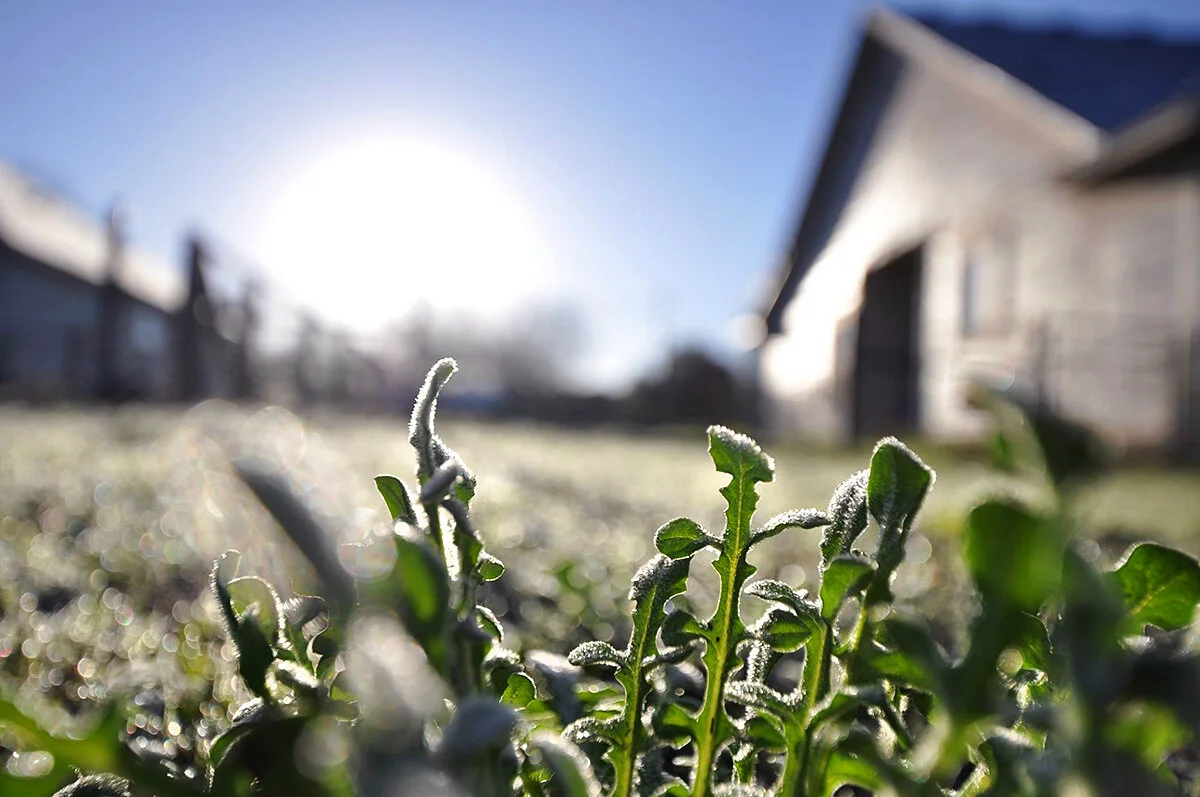
So let’s try the same thing, but now we’ll set up so that we’re THREE feet away from our foreground subject, which is probably a more common occurrence on this assignment:
So now we’re 3 feet away, which most people would say is still “relatively close.” And yet, you can see how much it’s already diminished the effect here.
The subject is not as “isolated,” …..and the background is not as soft.
But still a decent result, at least
But now, let’s get just a little farther away - but still just 5 feet from the foreground subject:
….and you can see the effect is barely there at all now, particularly when you compare it to the very first shot above.
And again, that’s just 5 feet away.
Which some people would say is still relatively close.
Think about if you were a photojournalist shooting complete strangers. A lot of you might be apprehensive about being within 5 feet of complete strangers while shooting. But know you know that, as far as your lens is concerned, 5 feet is actually pretty far.
Finally, once you get to about 8 feet, you should know that, for most of your lenses, the entire scene is going to appear pretty equally sharp.
So here’s the deal, even students using the exact same lens on this assignment would have gotten a remarkably different result, if they set up a even slightly different distances. That’s the moral of this story.
So, once again….distance is HUGE here.
But now let’s put BOTH of these factors together, to make sure we can entirely diagnose the exact results you achieved on this assignment.
To put all of this together, let’s first control for equipment.
Let’s say two students were each using the same zoom lens that had a widest aperture of 5.6
But one of them set up shop from 6 feet away:
And the other set up their shot from only about 1 foot away:
So you can see that the exact same lens yielded TOTALLY different results.
But now let’s control for distance.
If this student was 1 foot away, using their zoom lens:
….then here’s another student also shooting from 1 foot away….but using a prime lens that has a widest aperture of 1.4:
So again, hopefully you can see that it was BOTH of these factors that determined your results.
And distance was actually the more dominant factor by far.
Alright, so that’s how DoF works: it’s all about Aperture and distance.
With distance being more dominant.
Ok, so if that’s how DoF works, then what do we DO with this information? How do we put it into a plan of action, or a shooting protocol?
Well let’s tap the brakes on that a bit….so far, this has all just been an introduction.
Later in this curriculum, we’ll get into some more refined strategies for using DoF.
But here’s the strategy I want you to start with:
For now, you want to think about all of this in terms of having two sets of possibilities.
1) When you’re very NEAR to your foreground subject (less than 4 feet) ….then as you changing your aperture will radically change your DoF.
In other words, when you’ve aligned your shot in that way, you should EXPECT that a wider aperture will create a lot of blur, and that a smaller aperture creates a lot of sharpness across your image.
So whenever you’re very near….you have options.
You should EXPECT that changing your aperture will NOTICEABLY change your DoF.
2) But if you’re relatively far from your nearest subject (let’s say, at least 8 to 10 feet away), then you should EXPECT that changing your aperture will hardly make any difference at all in your shot.
In other words, at that distance, your picture will look pretty similar at ANY aperture you choose.
That’s what you should EXPECT.
Now, is that the FULL truth?
Not quite.
But for now, it will be helpful for you to develop that ASSOCIATION.
In other words, if you think to yourself “I can control my DoF to whatever degree I want when I’m very near to things…..and I have hardly any control over my DoF at all when I’m far from things,” ….then later in this curriculum you’re going to be in very good shape.
We can add some nuance to this later. But for now, that’s the model I need you to have in your head.
Assignment 2: Focal Length
Remember that this second assignment was about altering the SCALE of the foreground and background, rather than the sharpness of the foreground and background.
So we were looking to compare shooting WIDE ANGLE from very close, as opposed to shooting TELEPHOTO from very far. And we should have gotten a lot of results like these:
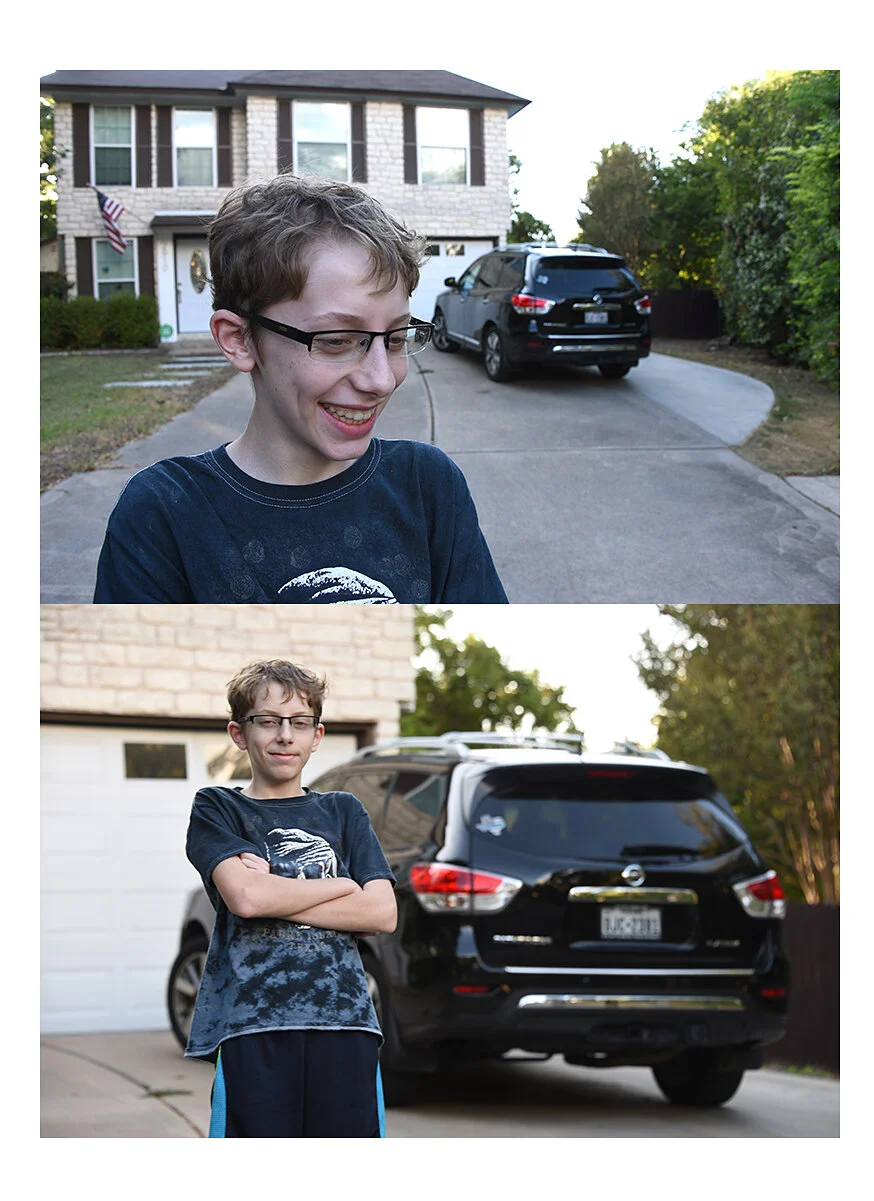
And you can see that in every case, the Wide Angle lens has made the foreground bigger than the background, has given the image a lot more depth (ie: it gives the images a “Z-Axis”), and it has retained much more of the context in the background.
Whereas the telephoto shot has compressed the scene, has made the background bigger than the foreground, has made the image appear more flat and 2-dimensional (ie: it has eliminated the “Z axis”), and it has diminished the amount of background context that we can see in the shot.
In short, the Wide Angle shots are more intimate, have more depth, have more background environment visible to the viewer, and emphasize the foreground over the background in terms of importance.
Telephoto shots feel less intimate, feel more flat and 2-dimensional, have less environment/context in the shot, and make the background as prominent — or more prominent — than the foreground.
Ok, but what were the culprits on these assignments?
Well, I first want to preface this discussion by stating that the issues I’m about to discuss apply EQUALLY to both homework assignments this week.
In other words, let’s talk about SPATIAL CULPRITS in general. Whether you’re attempting to alter the scale OR the sharpness of your shot, it’s mostly the same culprits.
First, let’s begin with the fact that, as was the case with the Time assignments last week, we needed to actually HAVE the differential in the first place.
Remember that, when we discussed the Time exercises, we discovered that if there wasn’t anything actually changing relationship with your frame, then you couldn’t really execute any major time strategies.
We have to have the differential in our shot before we can even try these things….we can’t just push buttons on our cameras.
So for this week’s exercises, the differential we need is that things in your scene need to occupy different layers of space…. or that things in your scene need to exist at different distances from your lens.
So as a thought experiment….let’s say I was shooting just a brick wall….straight on. In other words, you’re standing directing in front of it, and the wall is perfectly perpendicular to the angle you’re shooting.

Well, there’s only one layer of space there…..so can we make one of the bricks in that wall sharper than the others?
Nope.
Can we make one brick seem bigger than the other bricks?
Nope.
So I’m going to introduce some new vocabulary here….the way I want you to understand this is that, because all of the bricks are equidistant to us…every brick in our shot will ‘share the same fate.'
I’m going to use that expression a lot as we move forward in this curriculum.
What I mean by that is that, if there is no differential…..in other words, it two parts of our scene can’t be DIFFERENTIATED…..because they are effectively the same (either they’re on the same plane of space, or lit the same way, or moving the same way, etc….then those two parts of the scene will be rendered the same way by your camera settings.
So for instance, when dealing with LIGHT…..two things in your scene that are lit the same will “share the same fate” because if your camera settings overexpose one of them, then those same settings will also overexpose the other. And if your camera settings underexpose one of them, those settings will also underexpose the other.
And in the case of the brick wall, if your lens settings would render one brick sharp…then ALL of the bricks would be sharp. If your lens settings would render one brick blurry, then ALL of the bricks will be blurry.
See what I mean when I say ‘they will share the same fate?’
That’s what happens whenever you don’t have a differential to work with.
Ok, now that that’s been established, you might say this is all fairly obvious when you’re talking about a scene as simple as a “brick wall.”
But now let’s consider a slightly less obvious scenario.
Let’s say you’re shooting a group of people, like 8 or 9 people….and they were all lined up in a straight line facing you.
Almost like you’re shooting a soccer team.
From that angle….can you make one person sharper than the others……or one person bigger than the others?
Of course not, because there’s no spatial differential. As far as your lens settings are concerned, everything will share the same fate.
But now let’s say you shoot the same shot, BUT FROM A DIFFERENT ANGLE.
You move yourself so that you’re no longer shooting perpendicular to the line of people, but are instead standing at one end of the “line of people,” so that one person is about a foot away from you…..the next person is 3 feet away…..the next person 5 feet away….and so forth.
Can you use your lens now?
Oh yeah.
And in tons of different ways.
So I want you to recall our “Swingset” example from last week’s Time exercises.
The idea was that changing your angle UNLOCKED your ability to exploit the differential.
Well, we’re going to find that that’s actually true of ALL differentials and techniques.
So I can’t stress enough how much your angle (or your alignment) is going to matter for every technique we ever discuss.
In fact, it usually has more impact than your actual camera settings.
But then, in another echo of last week’s Time discussion….the other big culprit here is going to be distance.
What happens a lot for either of these two assignments this week, is that a student will actually HAVE a spatial differential in their shot, meaning that have at least two subjects that are NOT on the same plane of space……but then, if they’re too far away from the nearest subject, then everything MIGHT AS WELL BE on the same plane of space.
This is because the farther away your lens gets from the layers of space in your scene, the harder it becomes for your lens to distinguish them.
To elaborate on this idea, and to give you the most thorough understanding of how this works as I possibly can, let’s go ahead and take a look at a diagram I’ve made.
Let’s image that in front of your lens, you have infinite space….from the tip of your lens all the way to the horizon.
Well we want to divide that space into three distinct layers…. three different “Zones.”
You could think of these three “zones” as being the “foreground, middle ground, and background,” but I’d prefer you know them as Zone 1….. Zone 2…..and Zone 3.
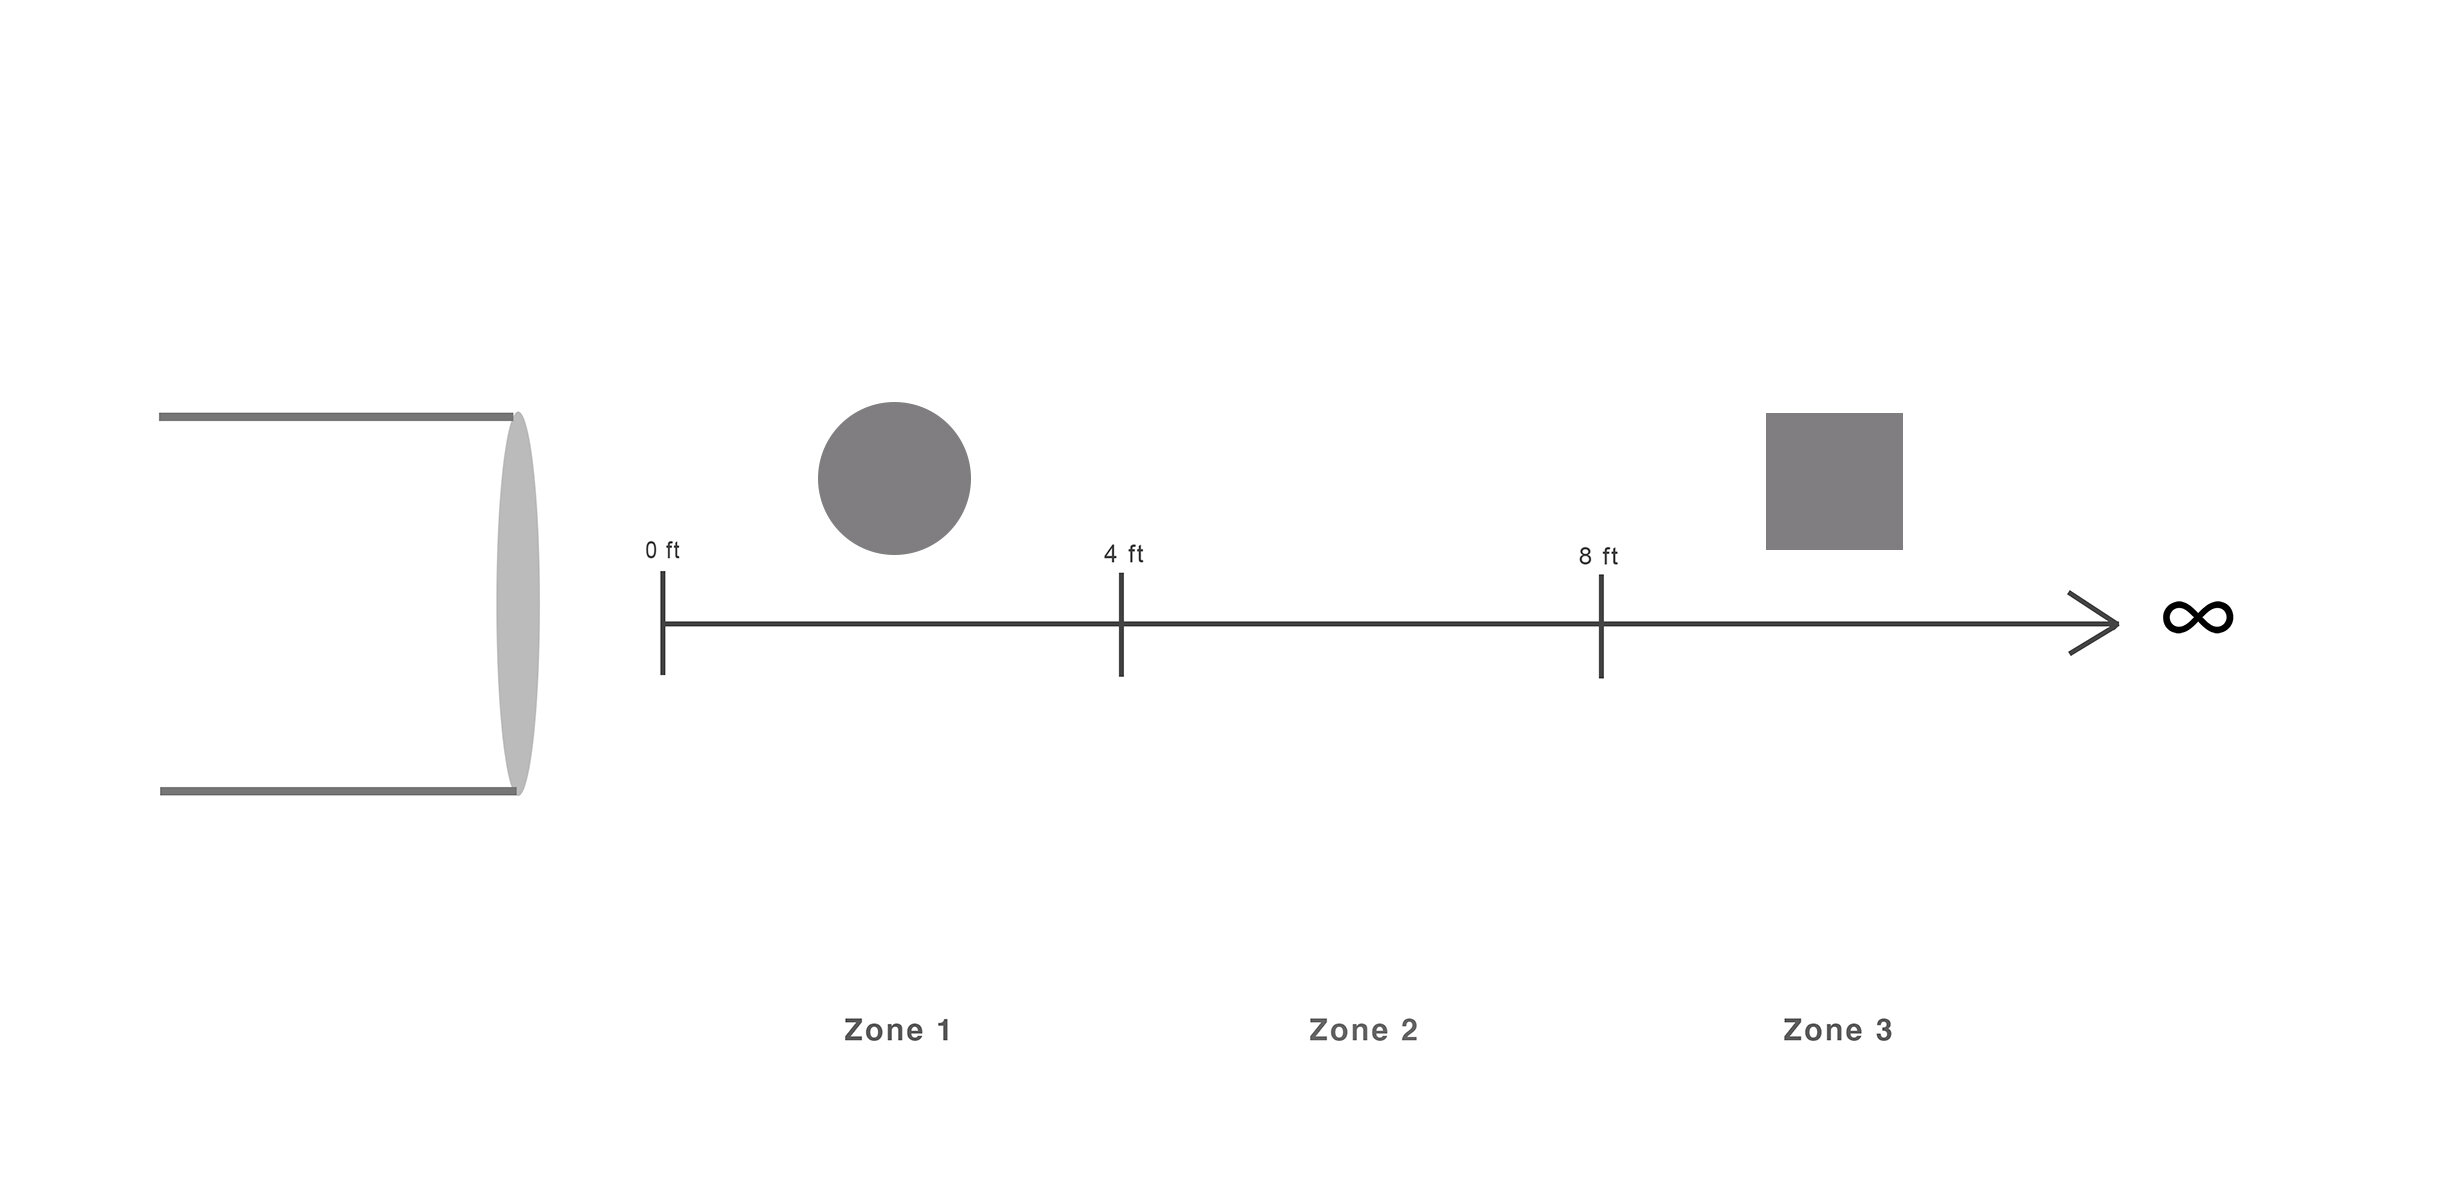
And here they are:

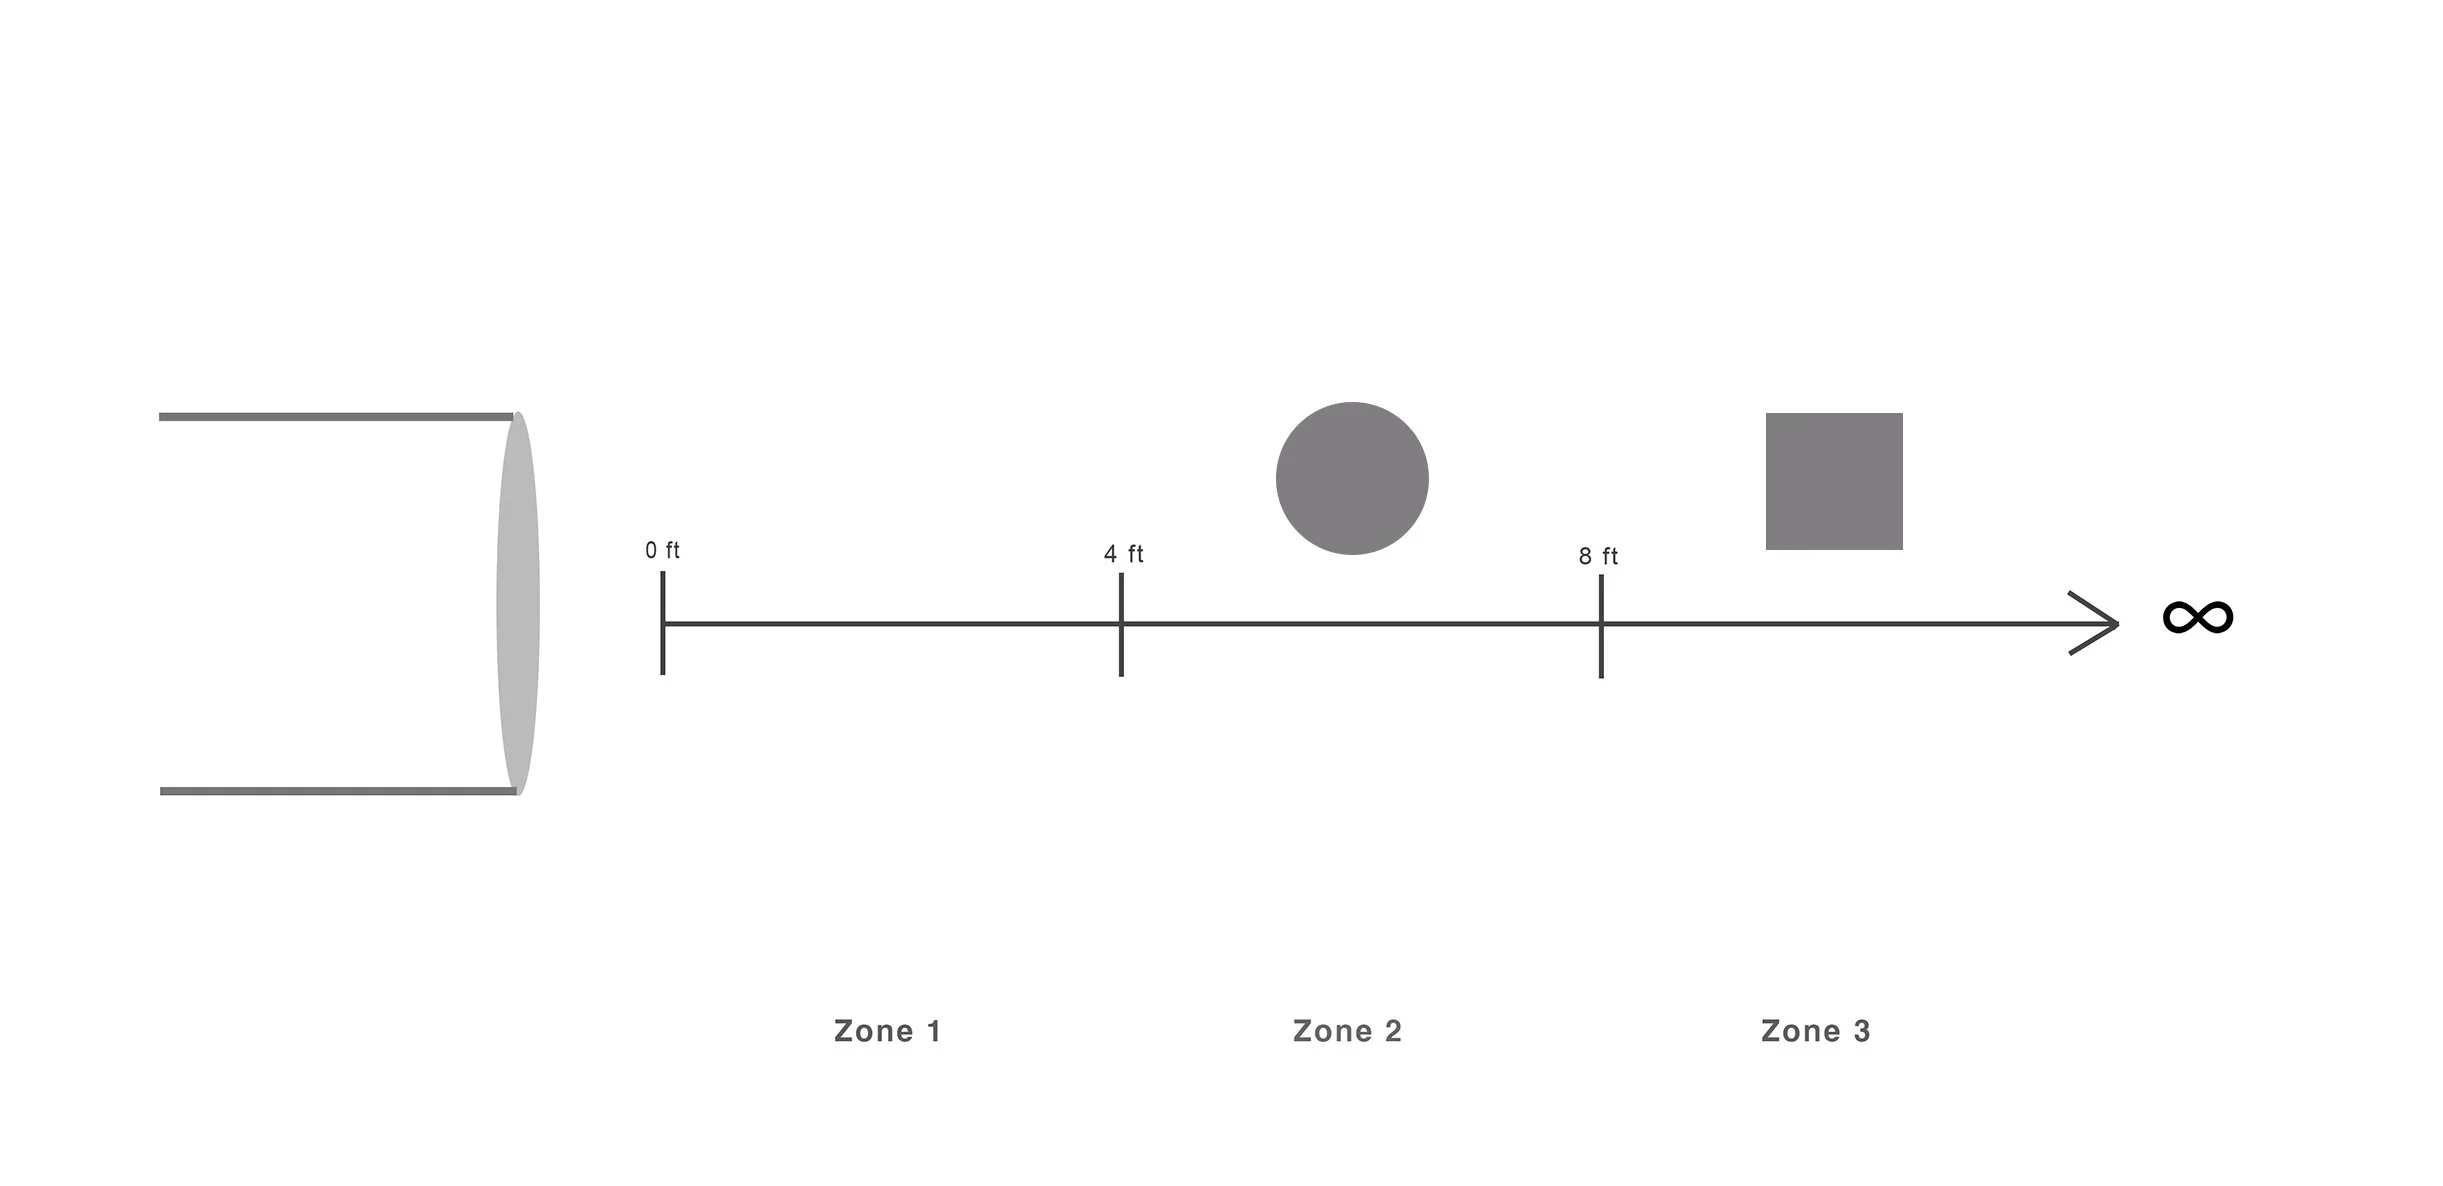
“Zone 1” is the first 4 feet in front of your lens. Think of it like an “arm’s reach” in front of your lens.
“Zone 2” is the next 4 feet after that (from about 4ft to 8ft in front of you)
“Zone 3” is everything from 8 ft all the way to infinity.
Wait, hold on a second. From 8 feet to infinity?
You mean to say that 11 feet……and 11 trillion feet….is all the same to us?
Yes. That’s what I’m saying.
Do you know who agrees with me?
Your lens.
To illustrate, if your lens has a manual focusing ring on it (that you can twist in order to focus the lens manually), it often comes outfitted with specific numbers on it, which indicate what distance you’re focused on.
So it might have a marking for 2ft….to indicate that you’re focused 2ft away.
And it might have a marker for 3ft, and for 5ft, and then for 7ft.
And you know what most lenses say after 7ft?
They give you the symbol for infinity.
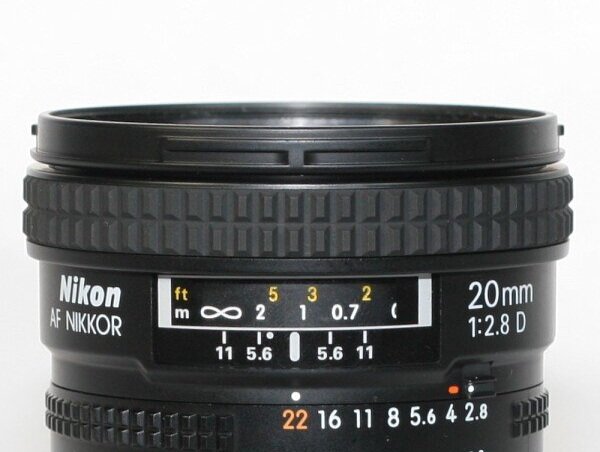
In other words, the lens is saying that it CAN distinguish between focusing on 3ft as opposed to 5ft…. but it CAN’T distinguish between focusing on 23ft as opposed to 25ft.
At that distance, it’s all sort of the same as far as your lens is concerned.
It can’t DIFFERENTIATE those two distances.
And believe it or not, that starts happening a lot nearer to your lens than you might imagine.
It can vary a bit depending on the type of lens, but for most of your lenses, it starts happening around 8 ft.
After 8 ft, your lens has a really hard time distinguishing one plane of space from another.
So back to this [very important] diagram.
What this diagram is at it’s heart, is I’ve taken the last distance at which your lens can easily distinguish laters of space (about 8 ft), to give us the border between Zone 2 and Zone 3…….and then I’ve divided that in half (4ft) to get the border between Zone 1 and Zone 2.
Alright, so what does all of this mean?
This diagram better predicts…..and better explains…..nearly every result you got this week for EITHER homework assignment.
Students who aligned their shots so that something in their scene occupied Zone 1….and something else in their scene occupied Zone 3:
….got really noticeable results.
In other words, students who aligned something very near to the lens, and something else very far from the lens….then those students got pretty radical results this week, no matter what equipment they were using.
And for either assignment.
Think about it, if you had something within two feet of your lens, and something else was way off in the distance, more than 10 feet away, then you were going to get very noticeable results this week because your lens had an easy time distinguishing those layers of space.
So whether you wanted to swap focus, or swap apertures, or alter your lens length…you would have gotten noticeable results with any of those maneuvers.
But not everyone aligned their shots that way.
Some students aligned their shots with ADJACENT zones of space. Meaning they had something occupying Zone 1 and Zone 2.
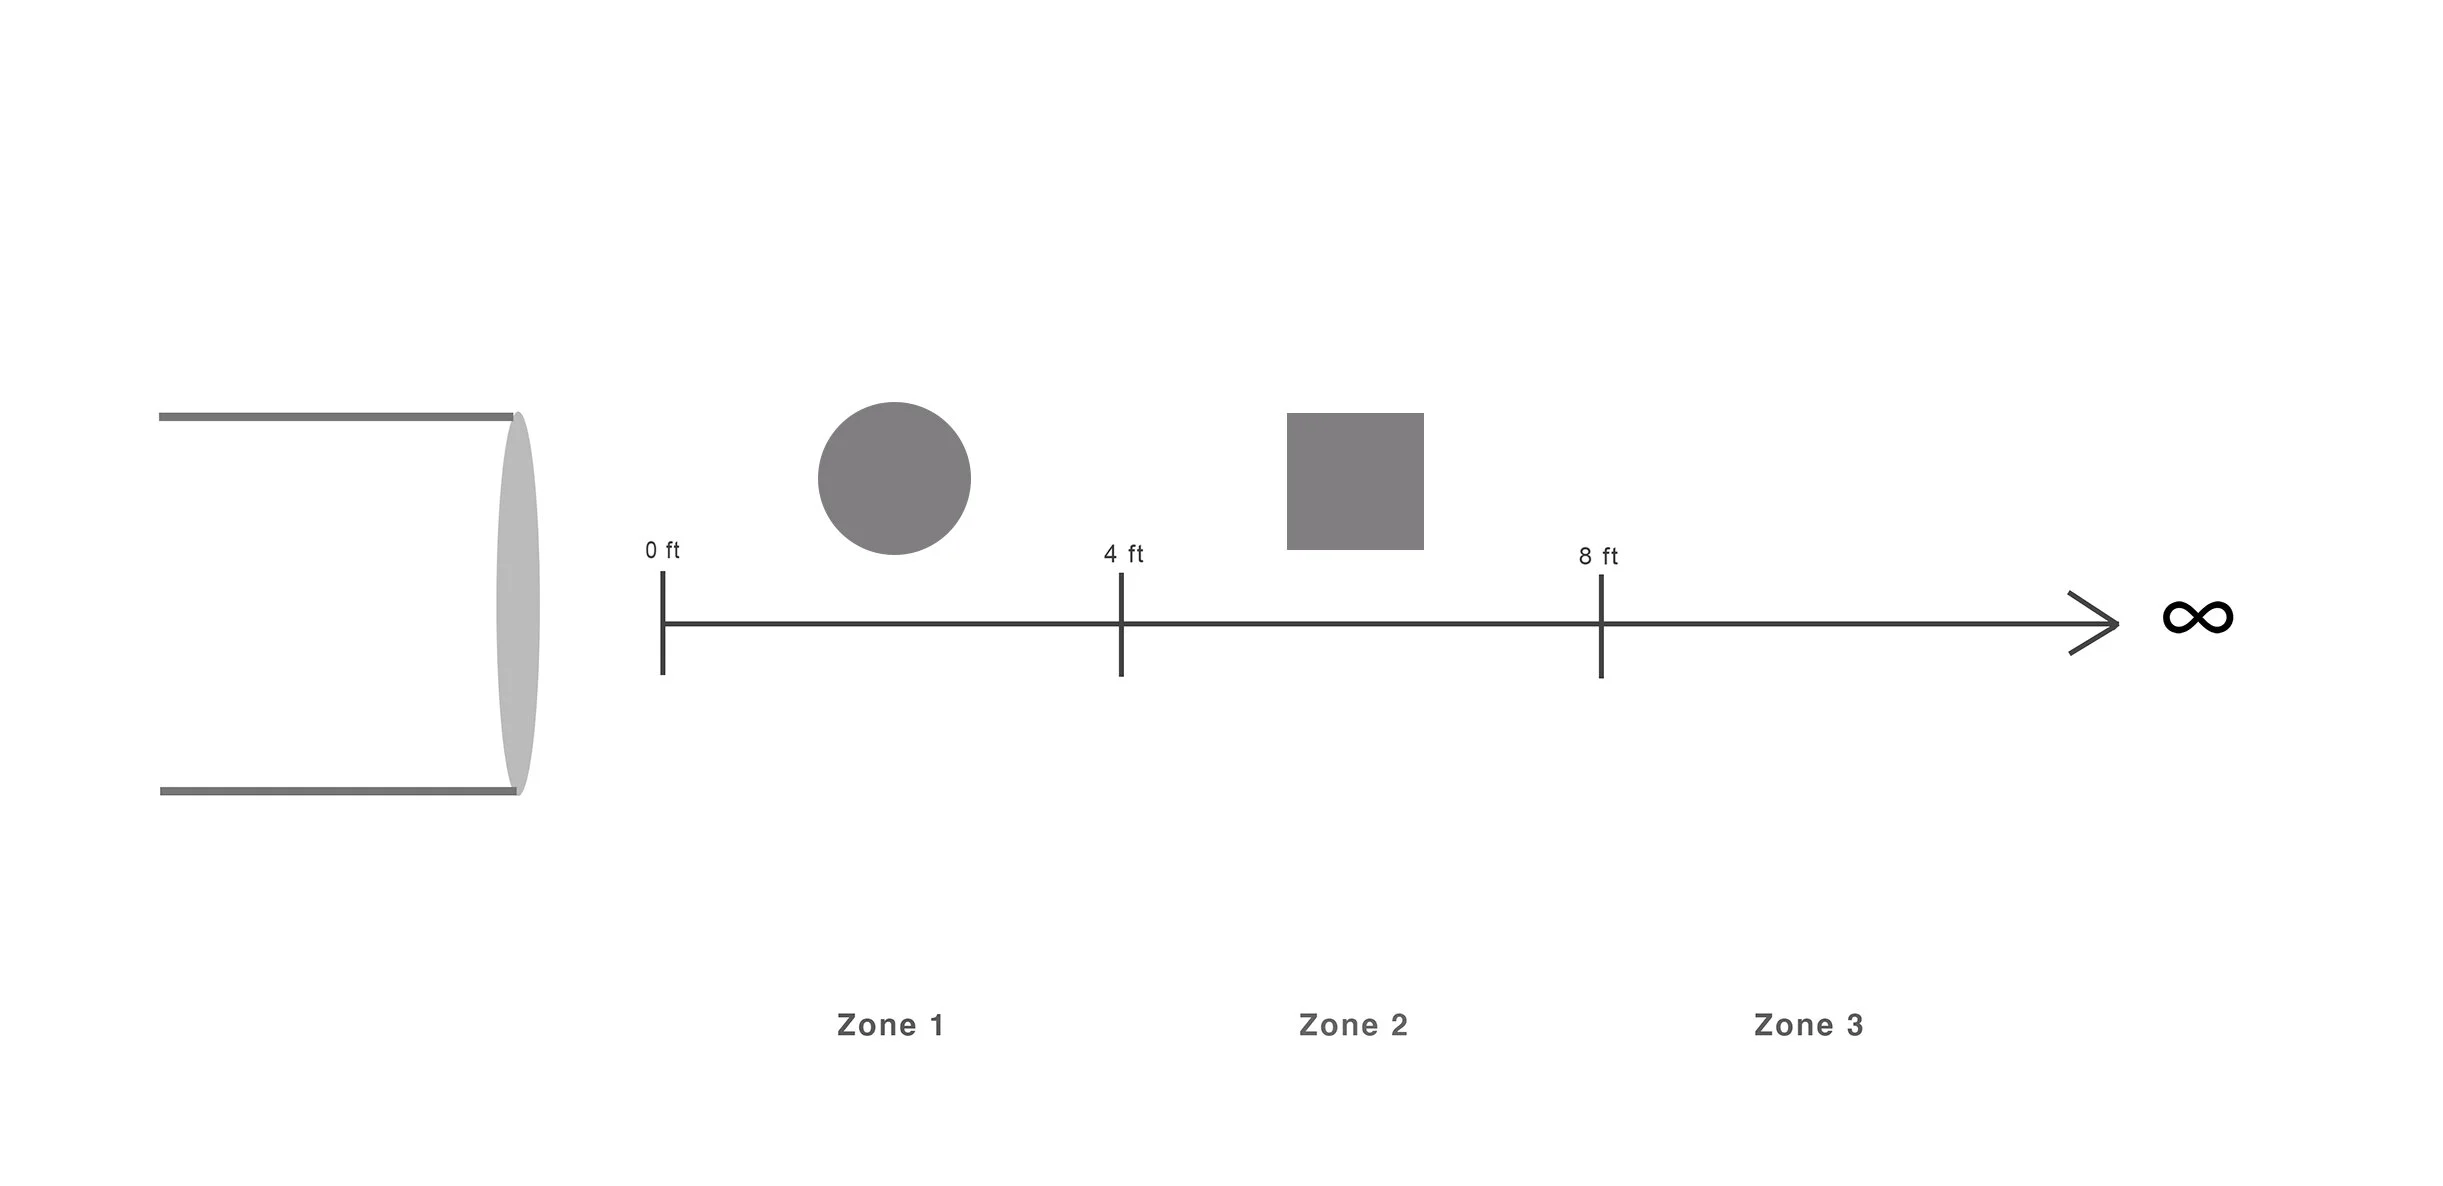
In other words, something was very near (which we needed), but the other part of the scene was ALSO relatively near as well.
Or maybe they filled Zone 2 and Zone 3:
And in this case something was very far (which we needed), but the other part of the scene was ALSO relatively far as well.
In other words, in either of these two scenarios, we had one piece of the puzzle, but not the other. We needed something to be very near AND something else to be very far. And in these two cases, we only had one of the two.
And students who aligned their scenes in this way got a result, yes….but only a modest result.
A subtle result.
But the absolute worst thing you could have done this week is either: having aligned two subjects in the SAME zone:
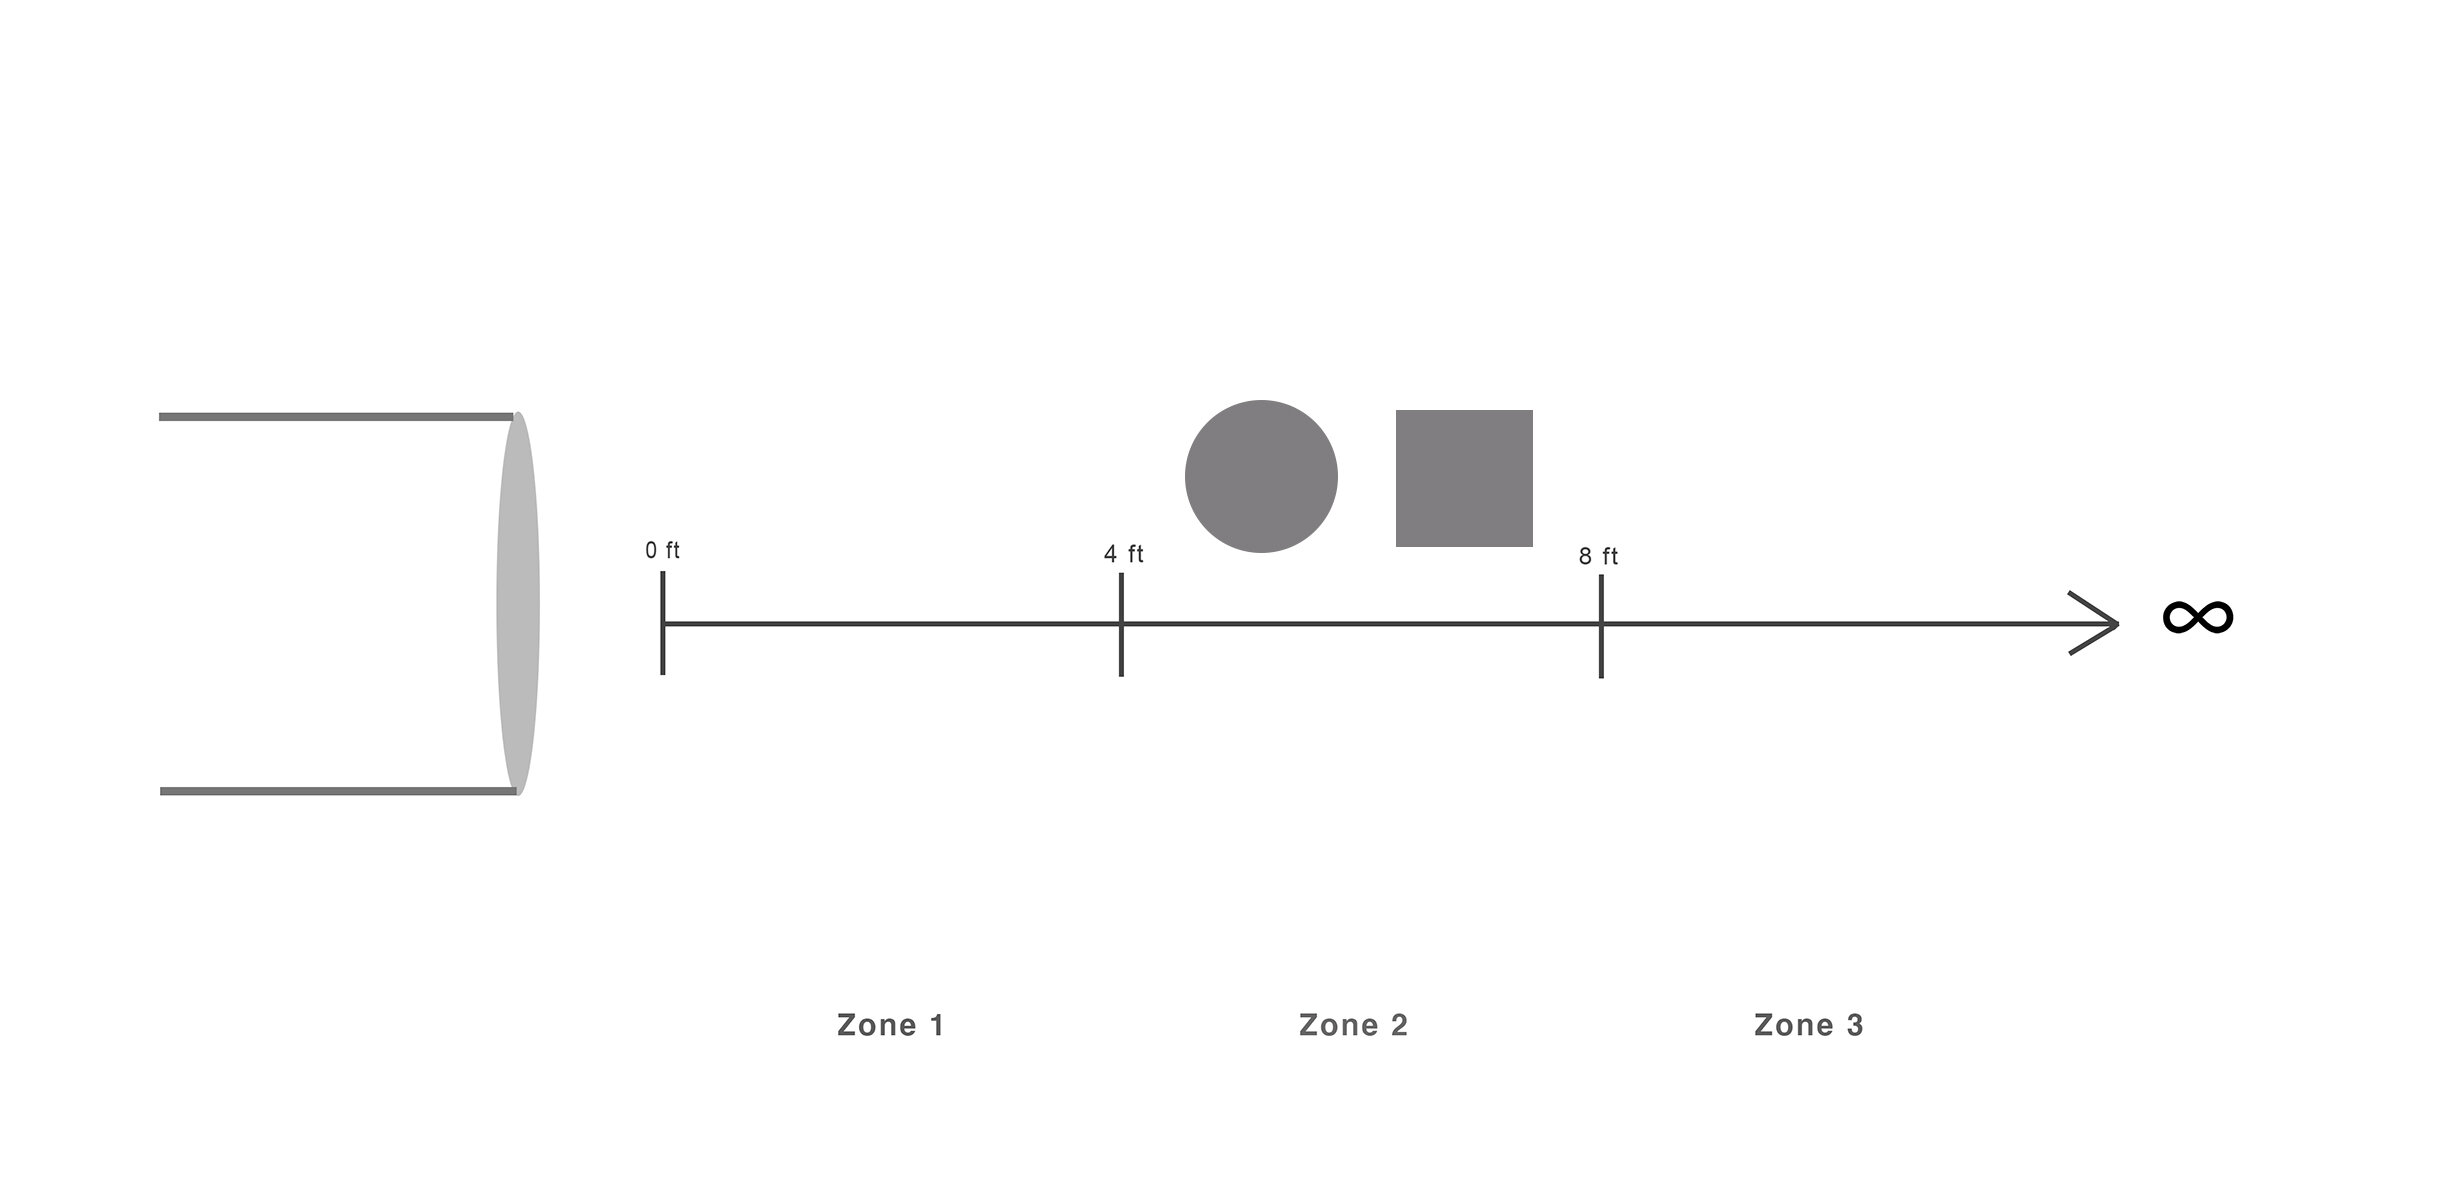
….like the “soccer team” alignment we mentioned earlier. In which case there is no real spatial differential at all.
Or if you had put everything waaaay off in Zone 3, so that the very nearest part of the scene was like 20 ft away:
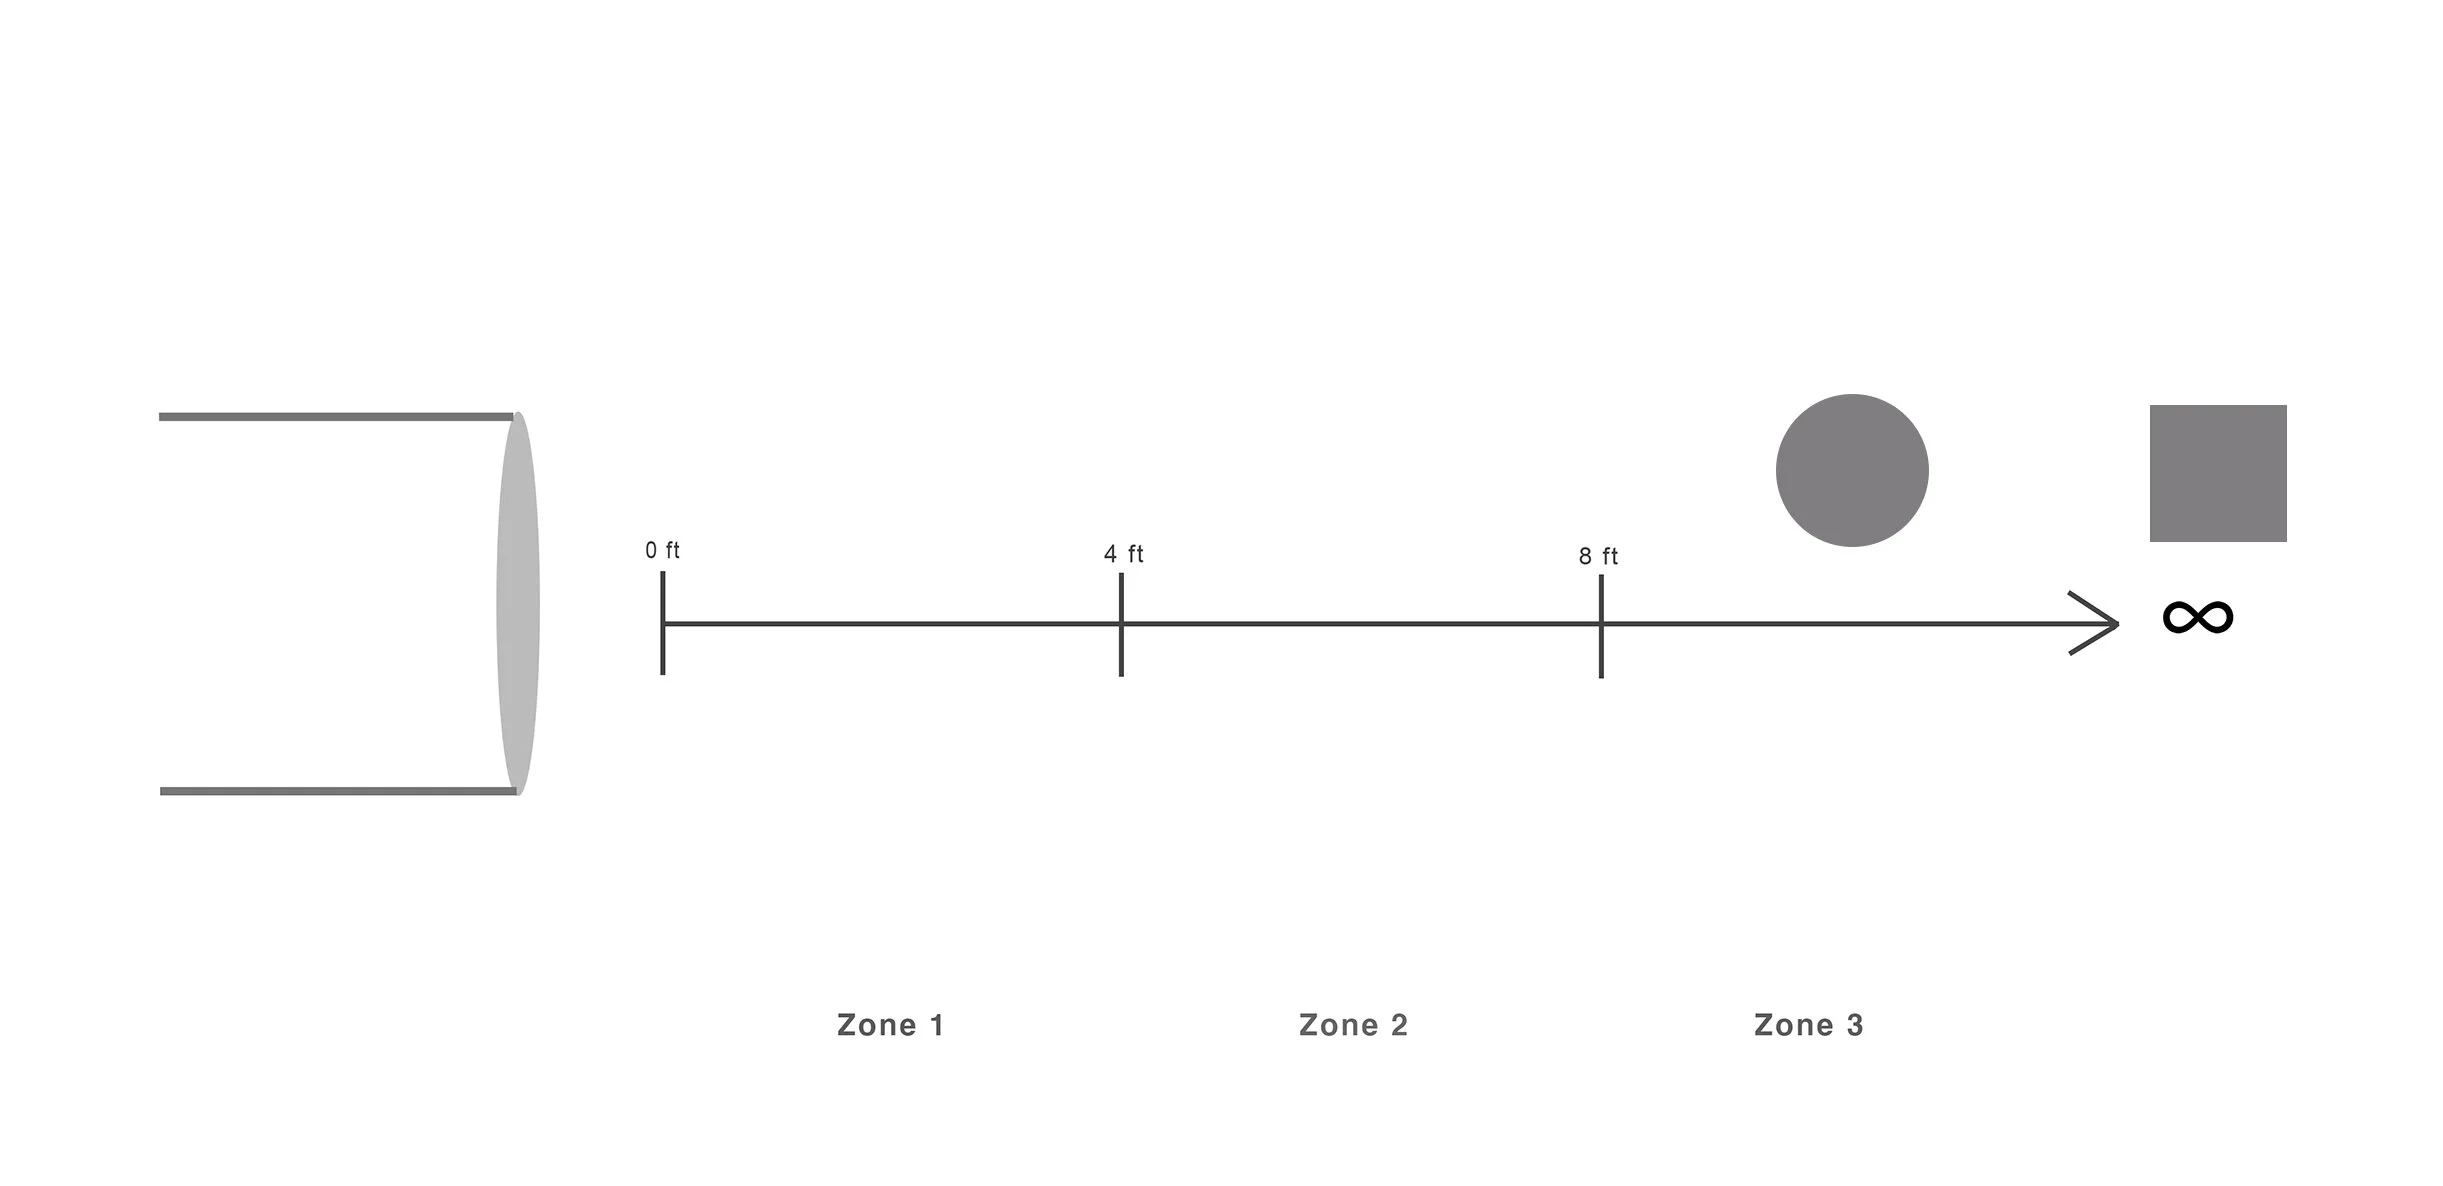
This was the biggest culprit on this assignment.
If you did either of those two things, you were probably really unhappy with your results.
So one thing I’m going to talk a lot about going forward is “Did you fill your Zones?”
In other words, if you aligned your scene so that all three Zones of space are occupied….then the world is your oyster….you can do practically whatever you want with your lens.
You can swap focus, swap apertures, swap focal length….. and every time you do, it will NOTICEABLY change the image.
And if you COMBINE all of those maneuvers in different ways, there are probably between 8-15 ways you could structure the spatial relationships in your shot.
In fact, one analogy I really like to make here is that, when you fill all three zones, using your lens is like steering a Formula 1 race car, as opposed to steering a boat.
Think about it, when you’re steering a sports car, if you turn the wheel even slightly, it changes the direction of the car. Whereas, when you’re steering a large boat, it takes big, sweeping maneuvers (you may have to turn the entire wheel several times) to make even a small impact on the direction the boat is going.
So aligning your scene in such a way that “all Zones are filled,” turns your lens into a racecar.
Any little thing you do with it will have a noticeable impact on the image. If you change your aperture slightly, change your focus slightly, or change your “lens length” slightly….. you should see a visible change occur in the image.
However….if you didn’t fill all of those zones, then your lens will be far, FAR much less useful to you.
For instance, if you filled only two adjacent zones….then yes, you can make SOME changes to the shot. But there will be fewer combinations of what you can do, and the final results you get will be a lot more more subtle.
You’ve now turned your lens from a racecar into a large shipping barge. It’s going to take much bigger changes to your settings to produce even a SUBTLE result.
And finally, if you’ve aligned your scene so that everything is in the same Zone (especially Zone 3), then your lens is almost entirely powerless.
Good luck seeing any change to your image at all as you shift your settings.
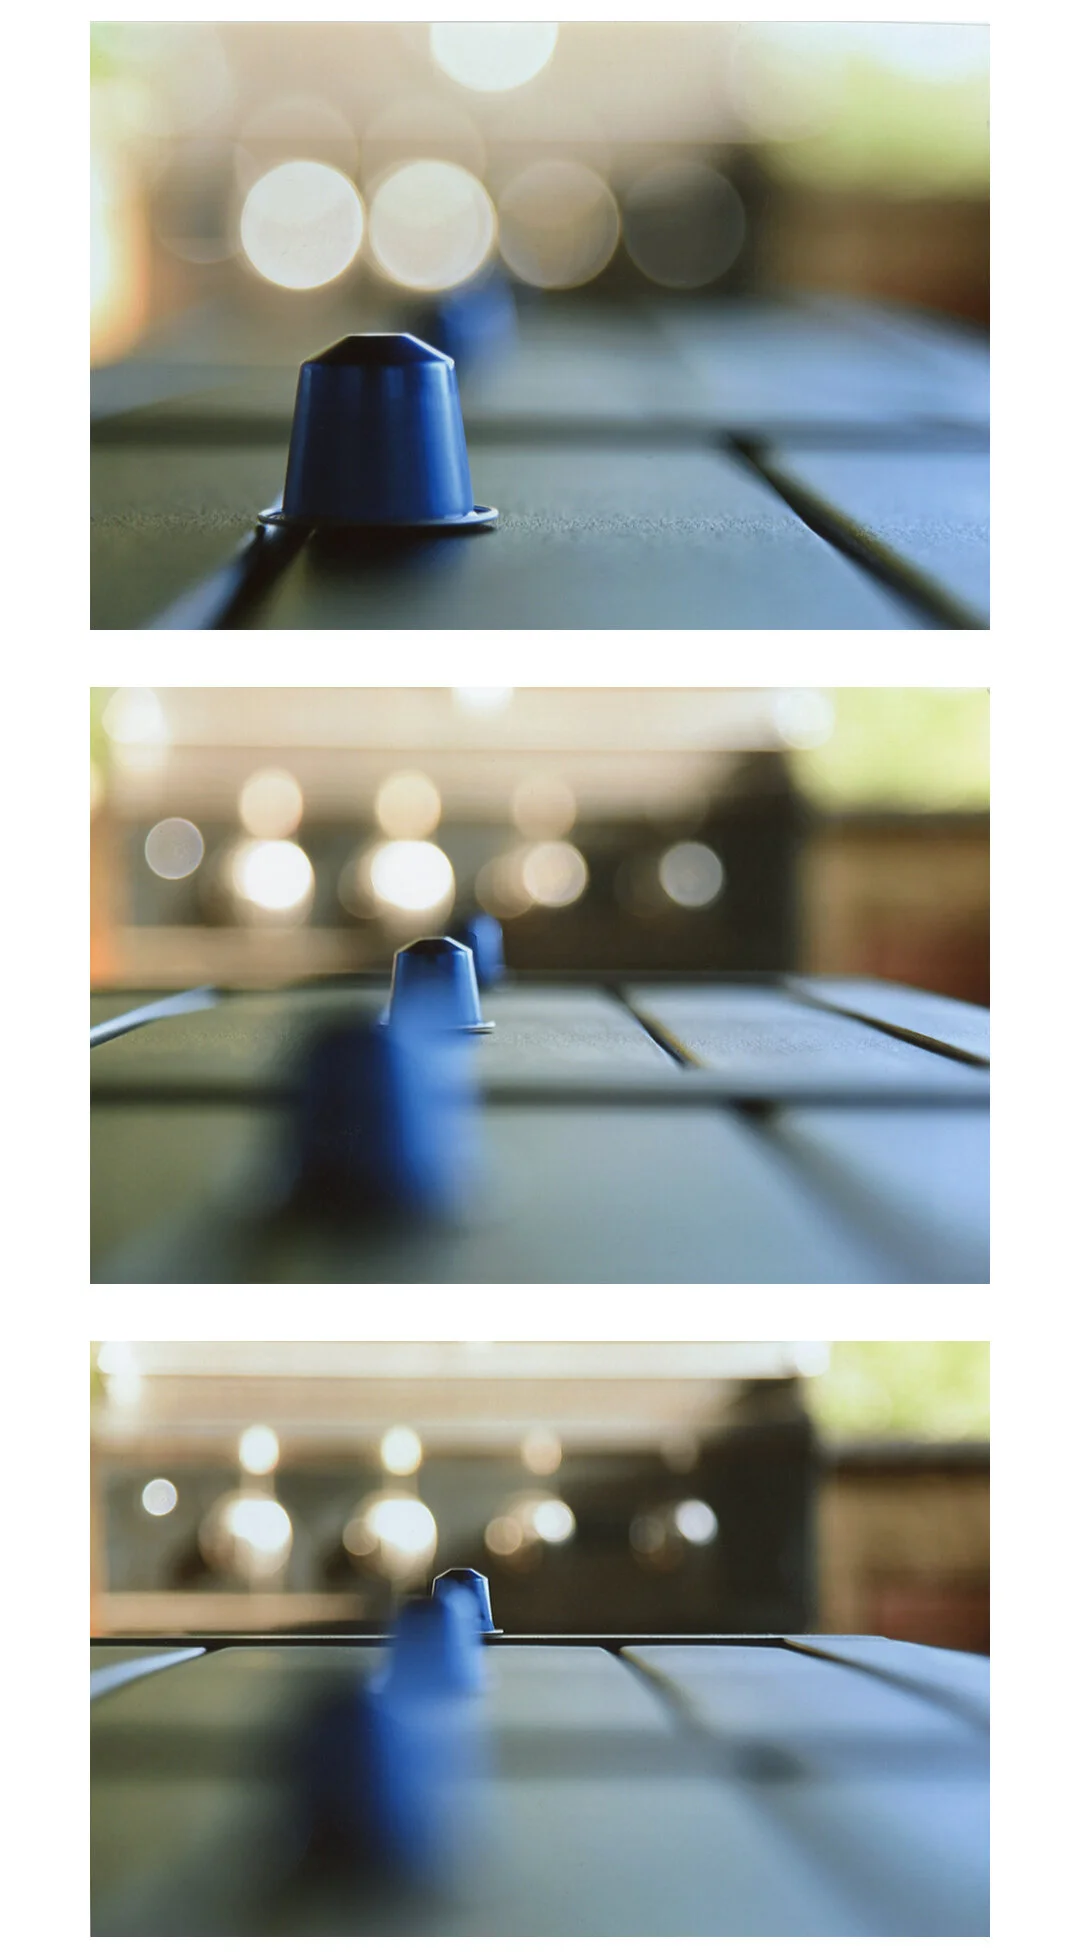
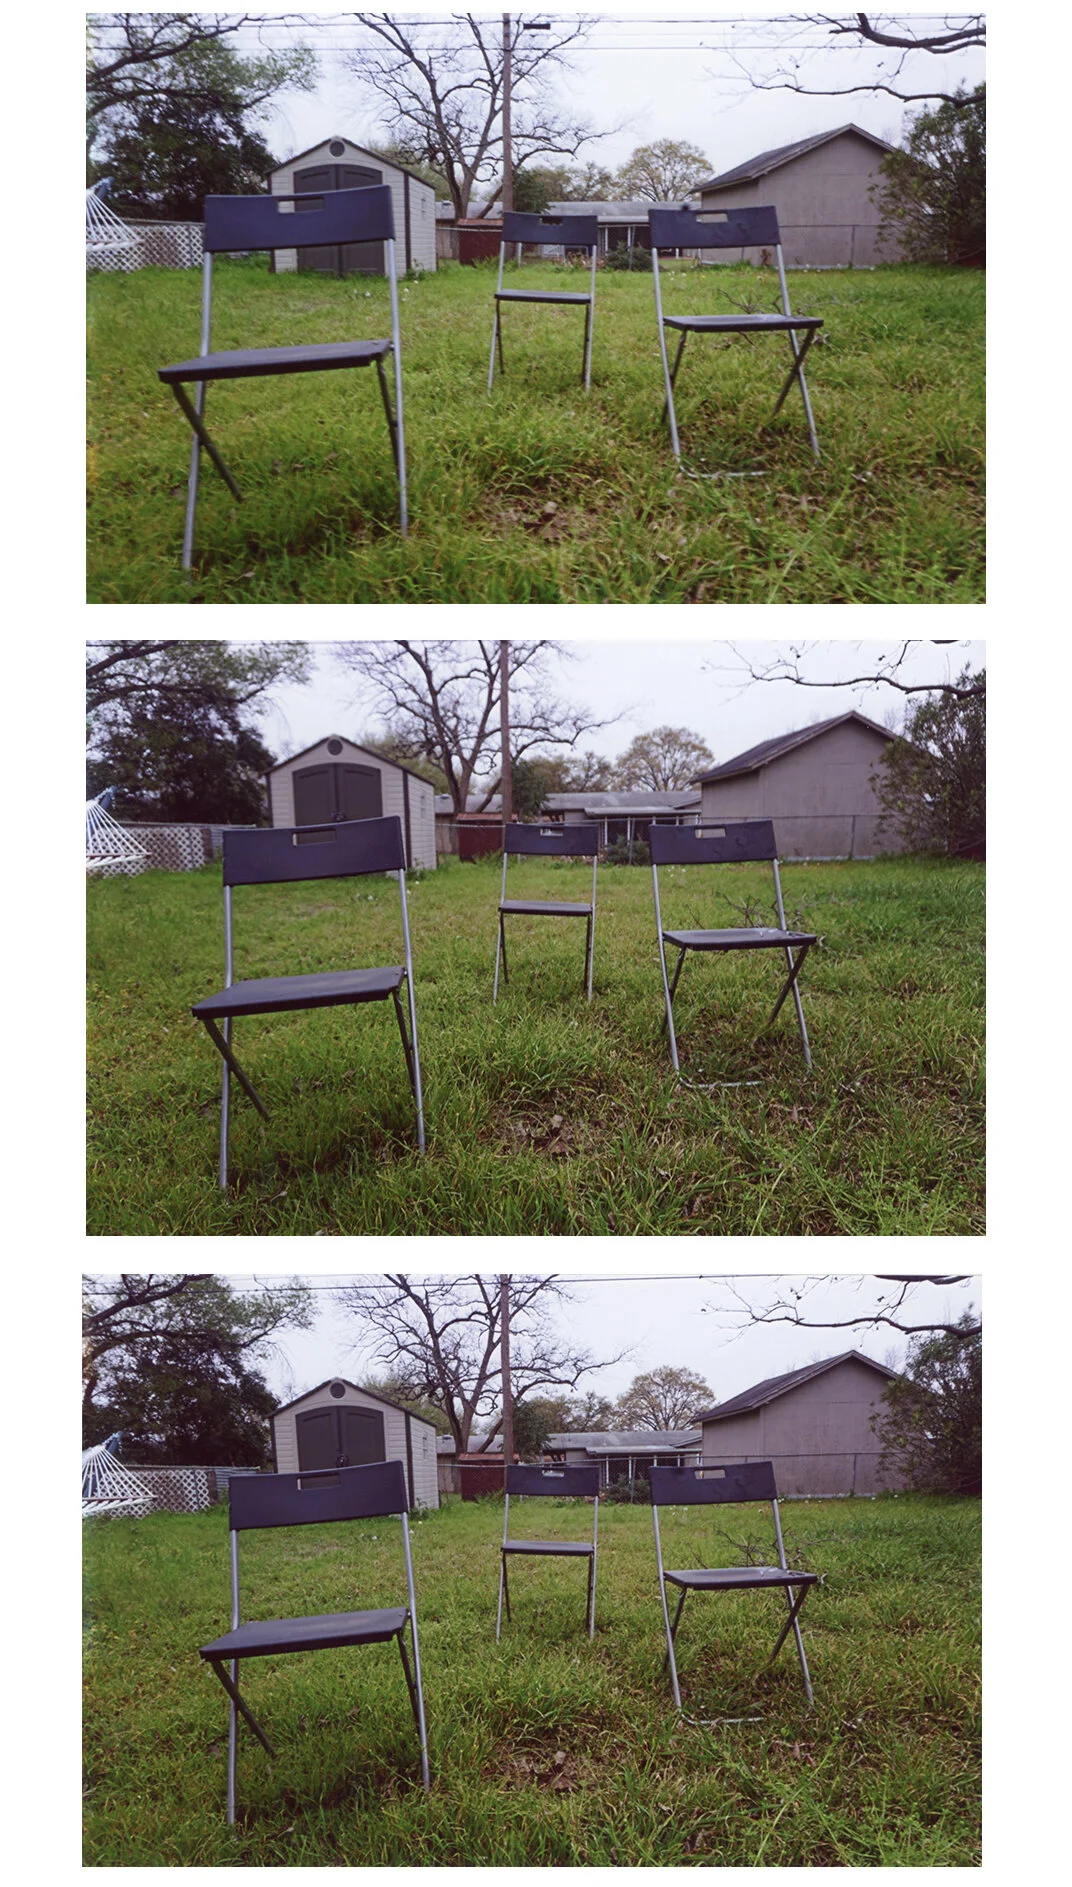
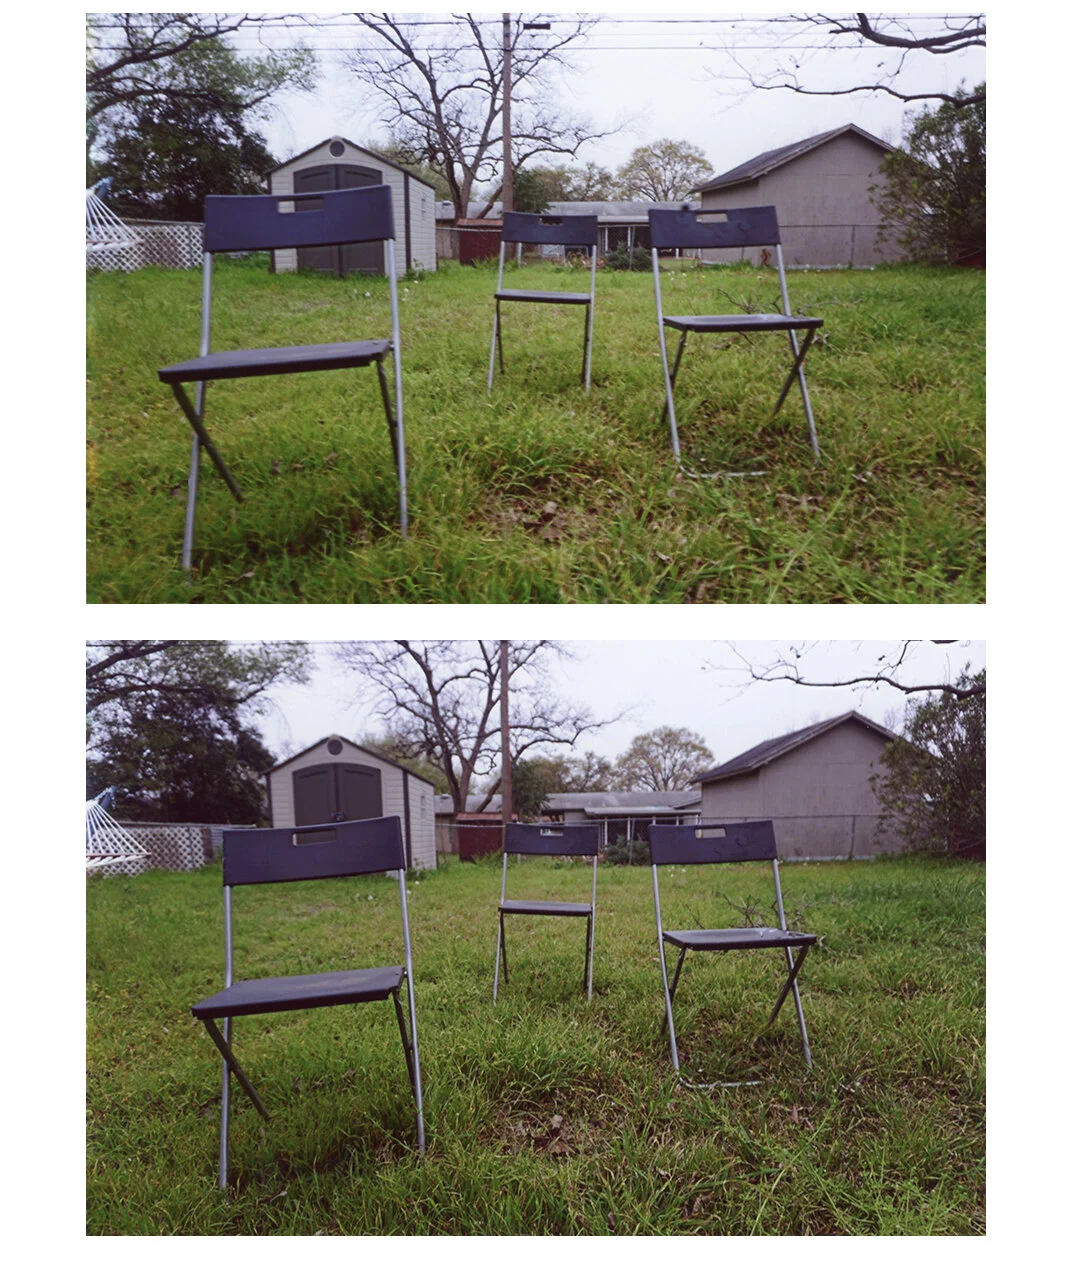
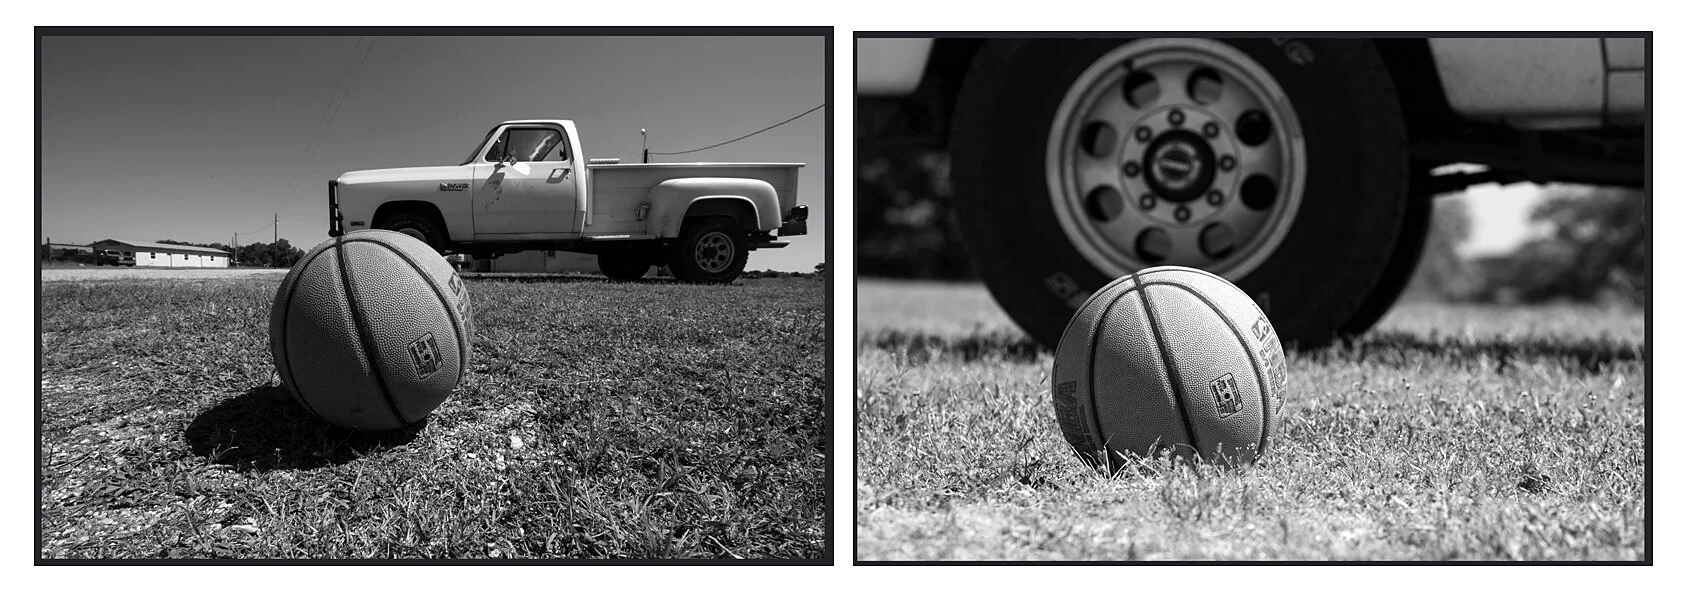
So just to give you a concise visual idea on what I just described, check out these two pictures of the exact same scene:
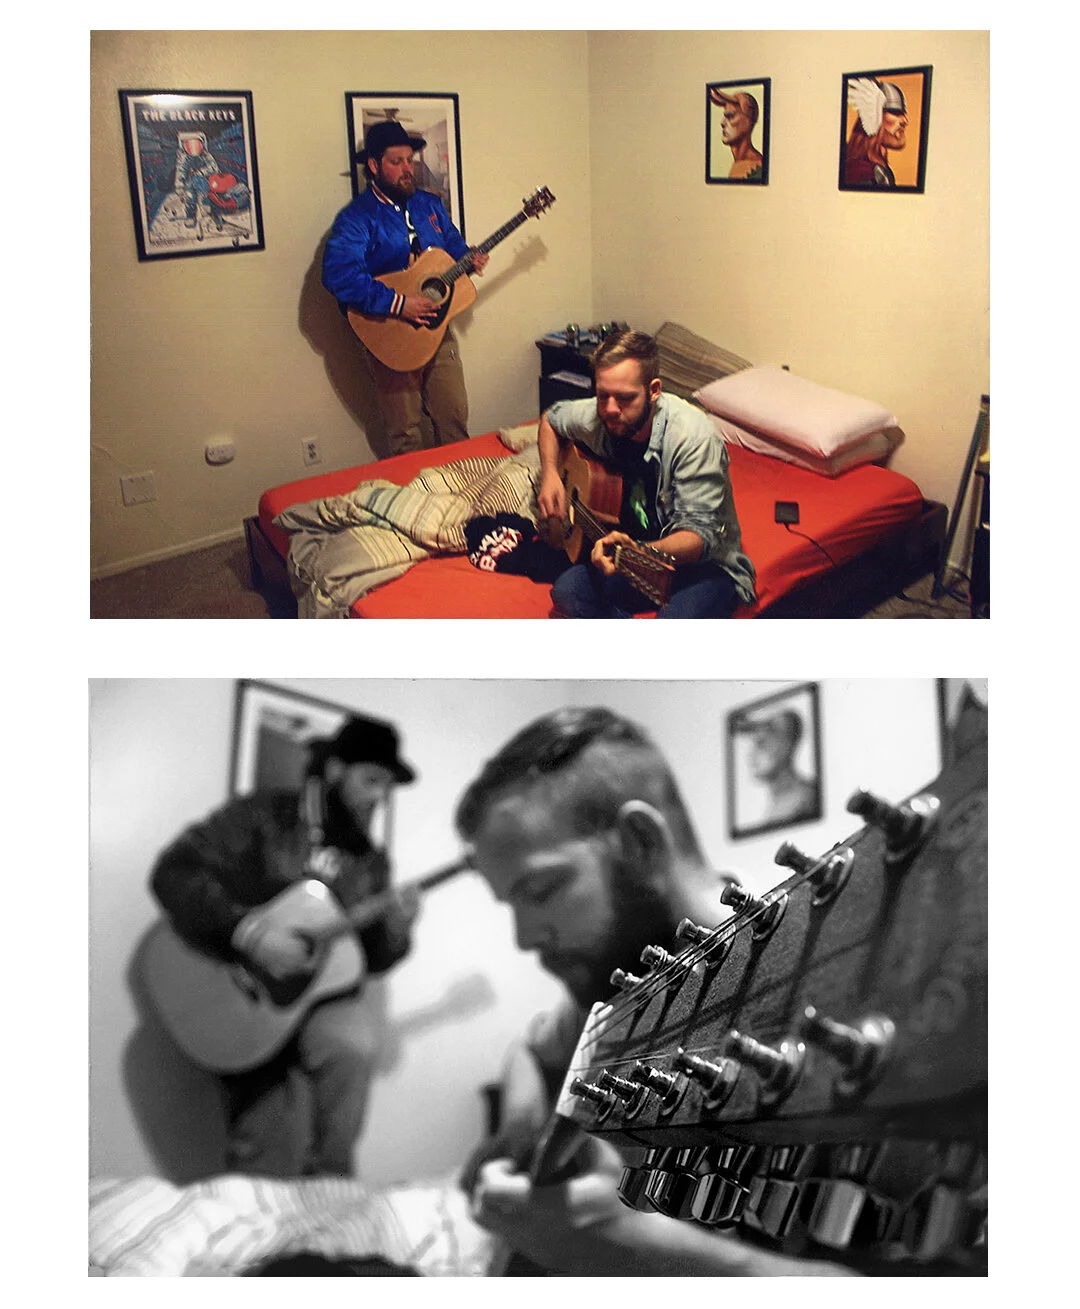
In the top image, the student has aligned the scene so that all of the subjects are off in Zone 3….which means the lens will have a very hard time differentiating them. So if she tries changing focus, changing aperture, or changing lens length, she won’t see much a result.
But in the second shot, the student has filled all three zones, which means now she can swap focus, alter her aperture, or alter her lens length, and she’ll get very different results each time.
So one again, can you see that your alignment of the scene UNLOCKS the ability to use your lens?
It’s the same exact scene. And it might even be the same exact camera settings. But the difference maker is how you aligned the differential.
So I need you to see the importance of alignment.
Furthermore, can you also see (once again) why it’s so dangerous to learn photography through “camera settings?”
I mentioned last week that photographers who post the camera settings they used underneath their images online are perpetuating a profound ignorance as to how photography works.
Well, with every passing week in this course, it’s going to become clearer and clearer what I mean by that.
Does 5.6 always give you the same result?
Not by a long shot.
It not only depends on your distance to the subject, but it also depends on that subject’s distance to the background. It also depends on your angle.
So again, as I said last week, yes, we need to understand our “settings,” …..but hopefully you can see that learning camera settings only gets you so far. Which is not very far at all.
But getting back to the two guitar pictures, I also want to reiterate that there’s not any judgement on any of this.
I don’t really care which shot my students prefer to take.
I just need everyone to understand the facts of how this works…so that they aren’t surprised by any of the result’s they’re getting, also so that they can employ either strategy if the situation calls for it.
I need you to know that if you align your scene one way, you CAN use your lens, if you align you scene another way, you CAN’T use your lens.
But at any rate, this has been an example of what happens when you fill all three zones, as opposed to putting everything into only 1 zone of space.
But finally, I want to end this discussion by going back to what we started with….which was “angle.”
We started this discussion with the thought experiment about shooting a line of people from one angle as opposed to another.
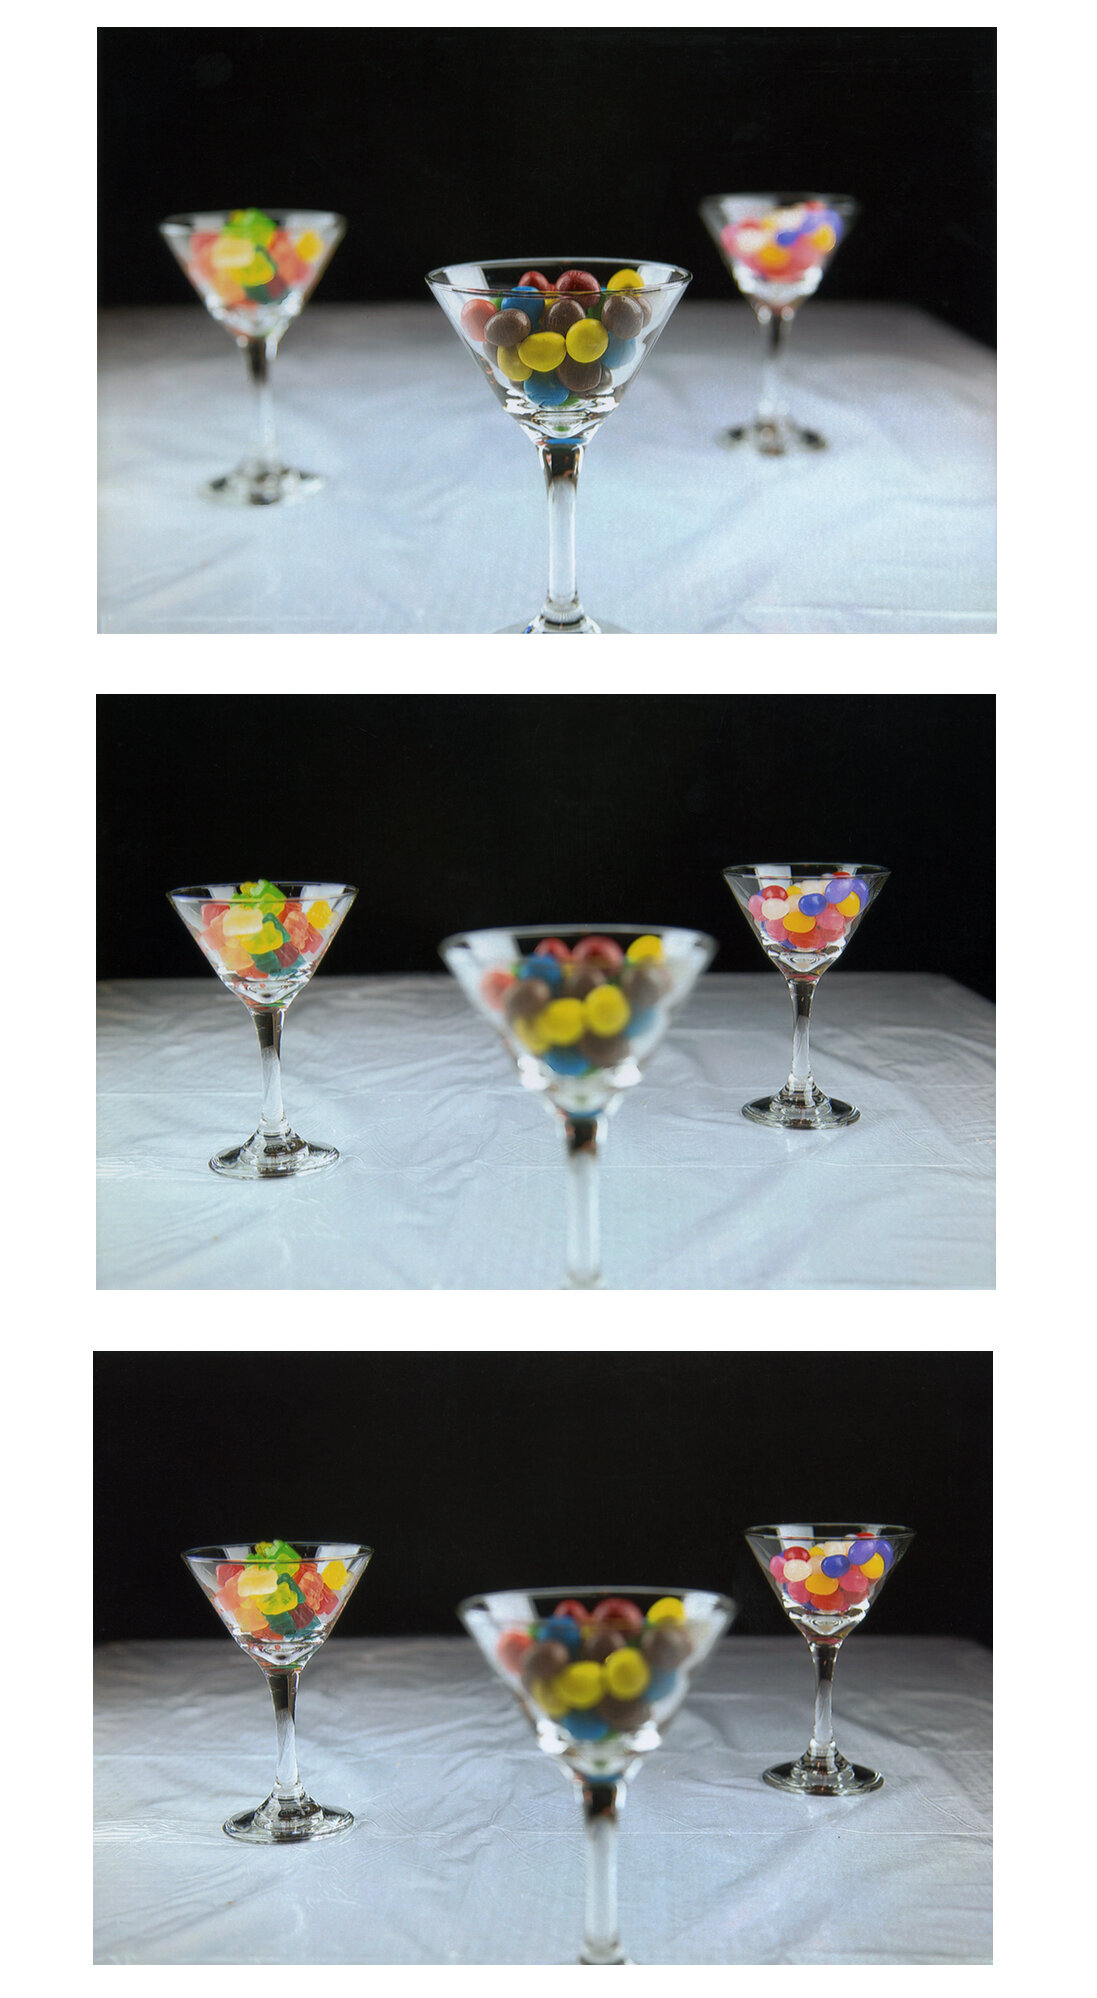
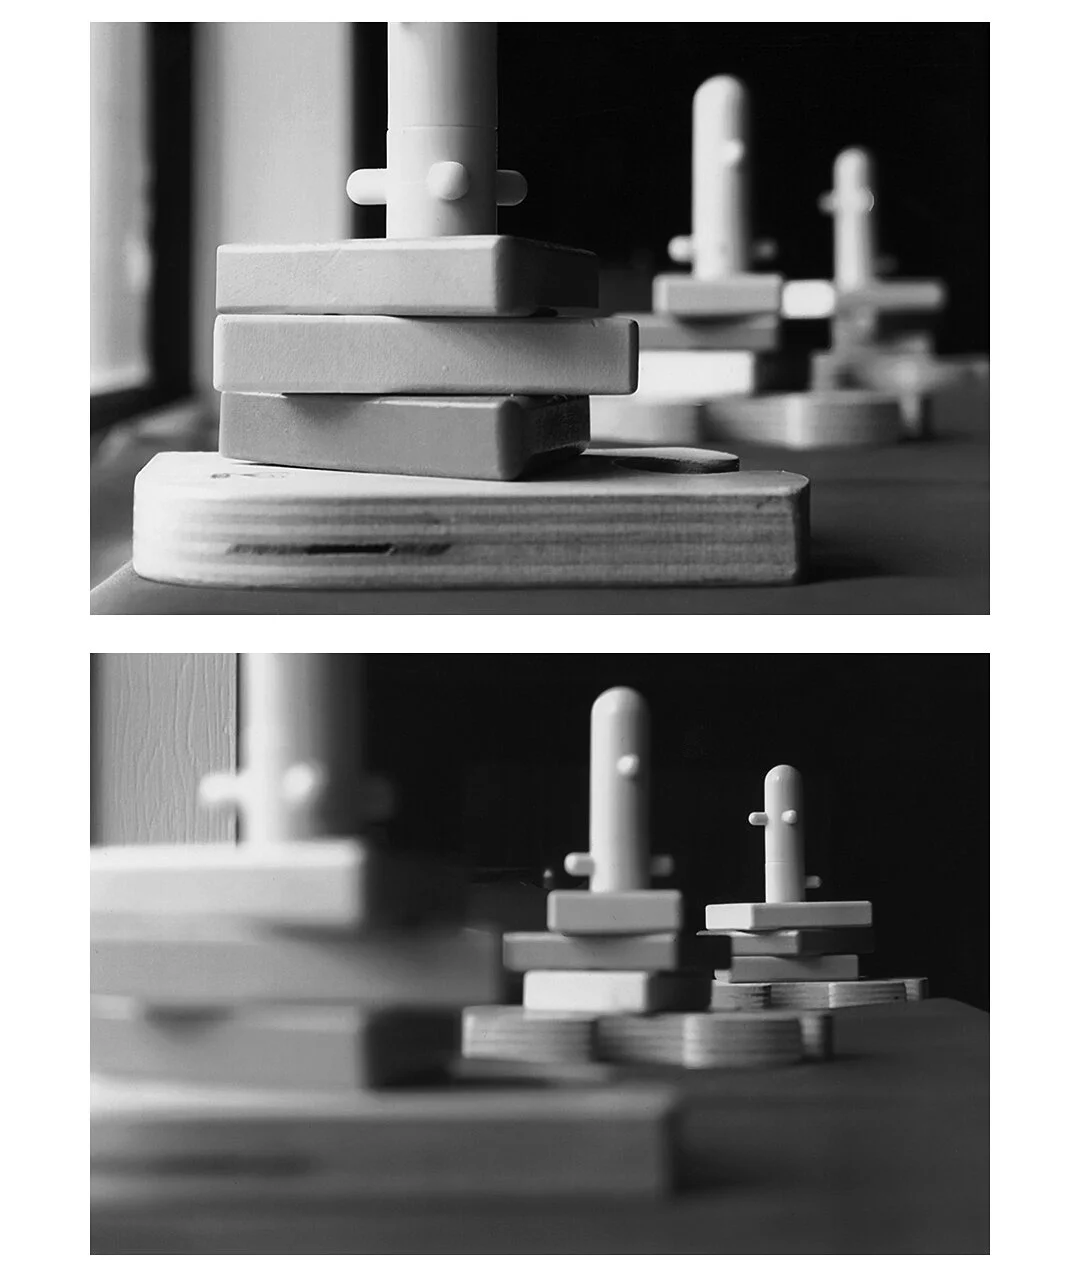
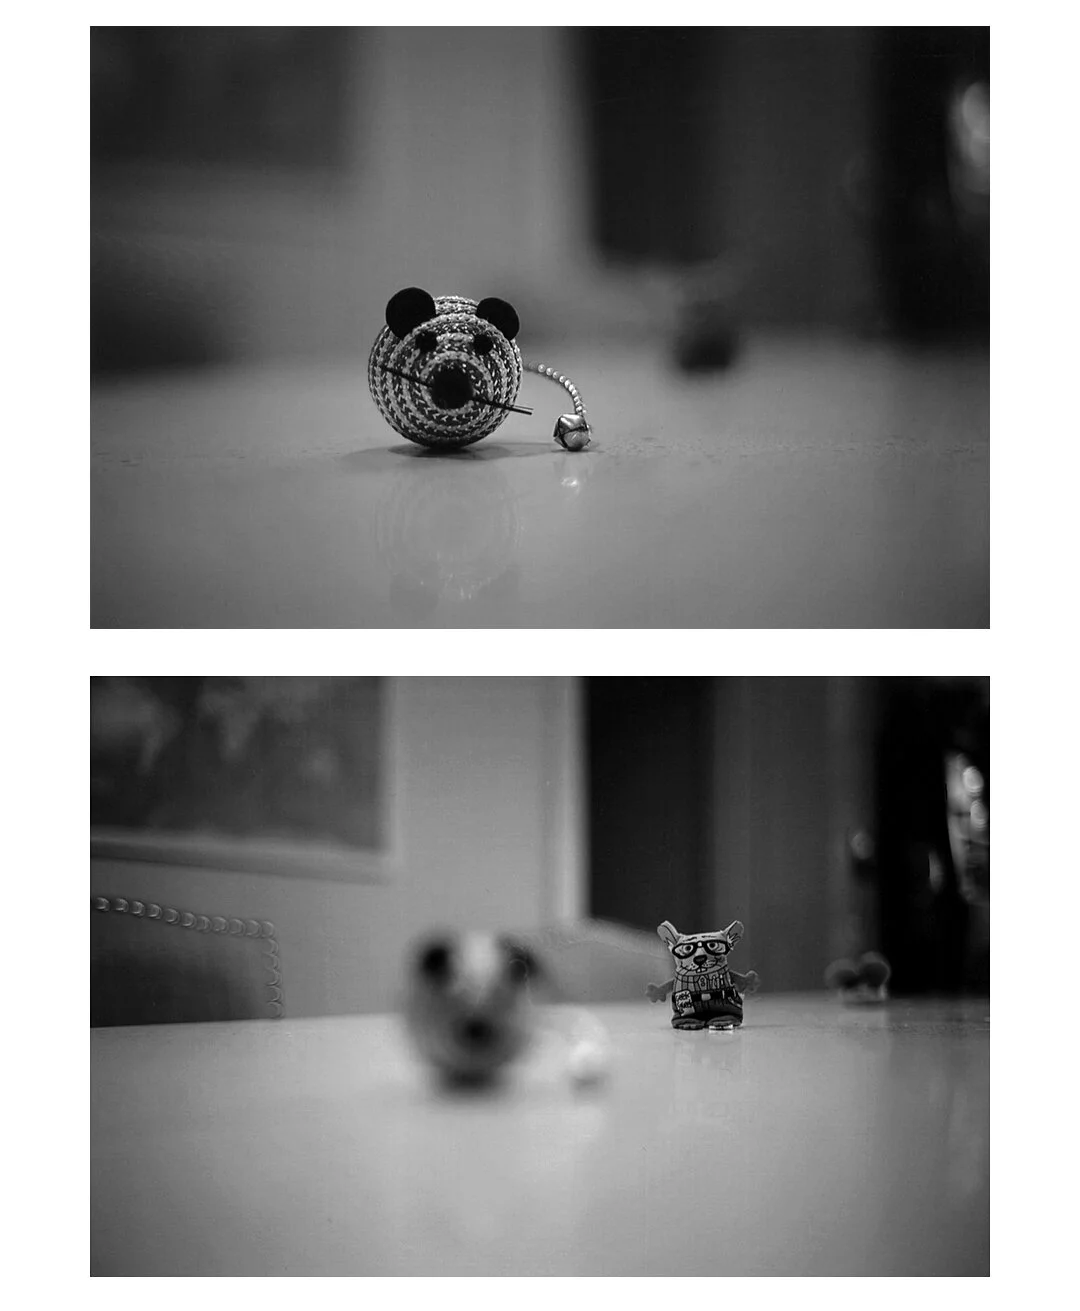
And if the guitar case study above exemplified the importance of distance (and filling your zones)…. then here’s a sequence that exemplifies the importance of “angle:”
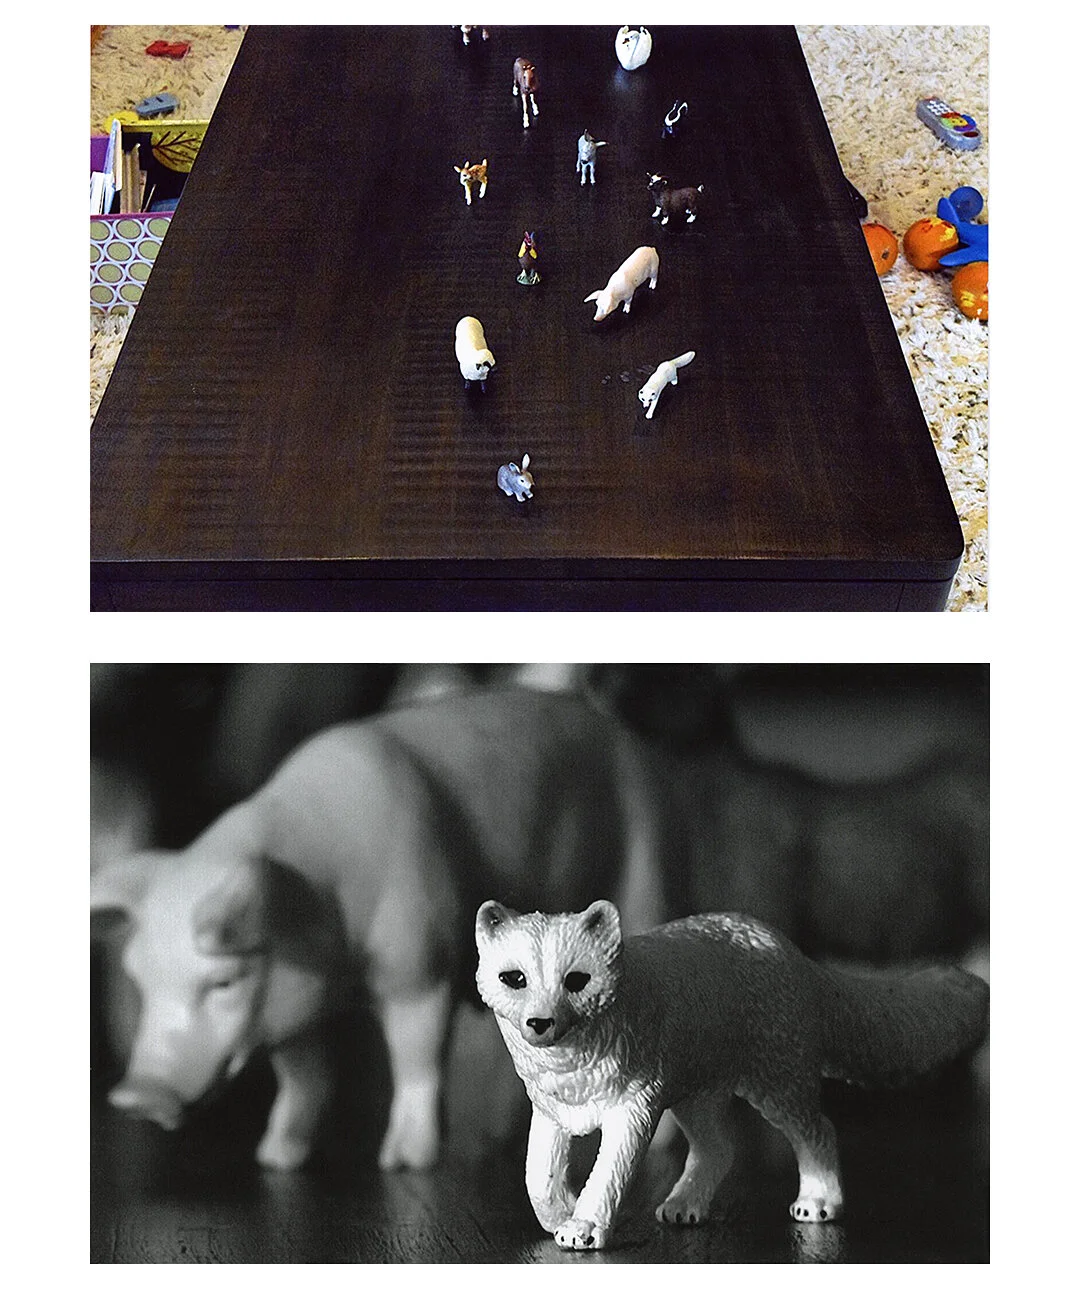
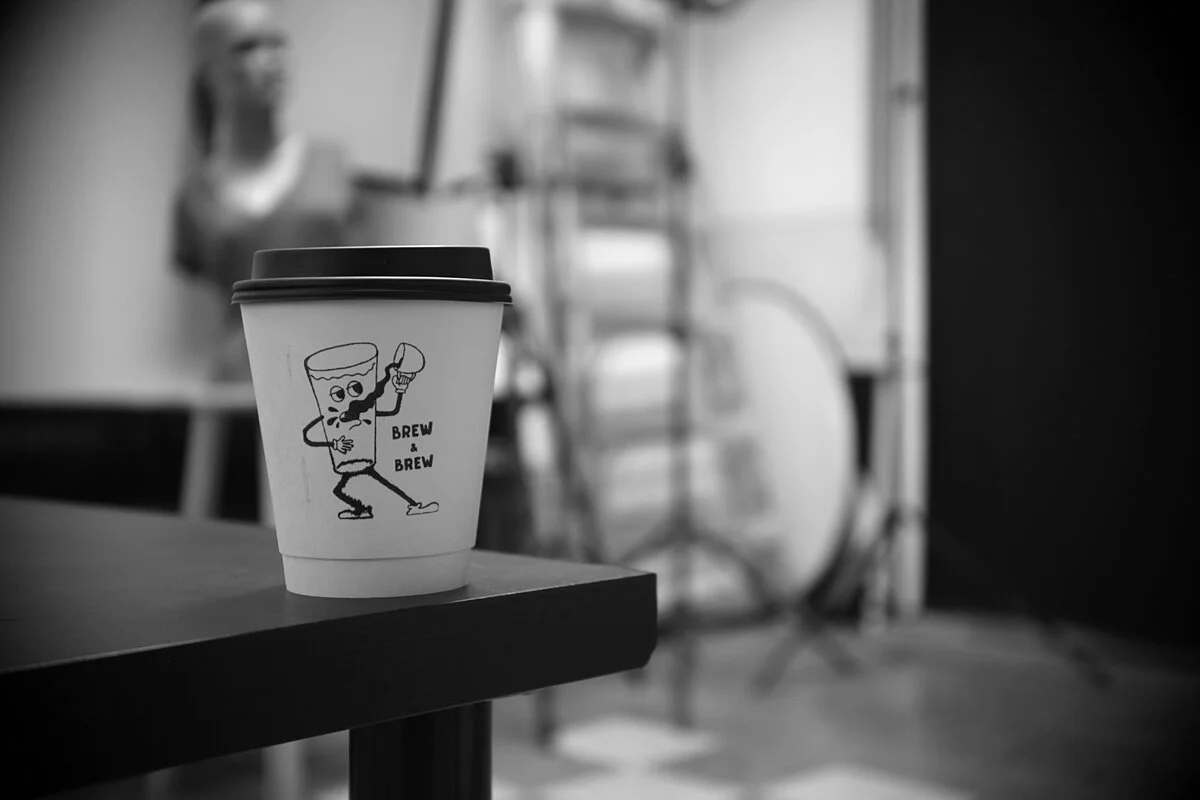
Here we have a group of animal figurines on a table top.
In the first image, we’re shooting at an angle that has neutralized our layers of space.
Specifically we’re shooting from ABOVE the scene, which has put all of the animals on one plane of space, relatively speaking.
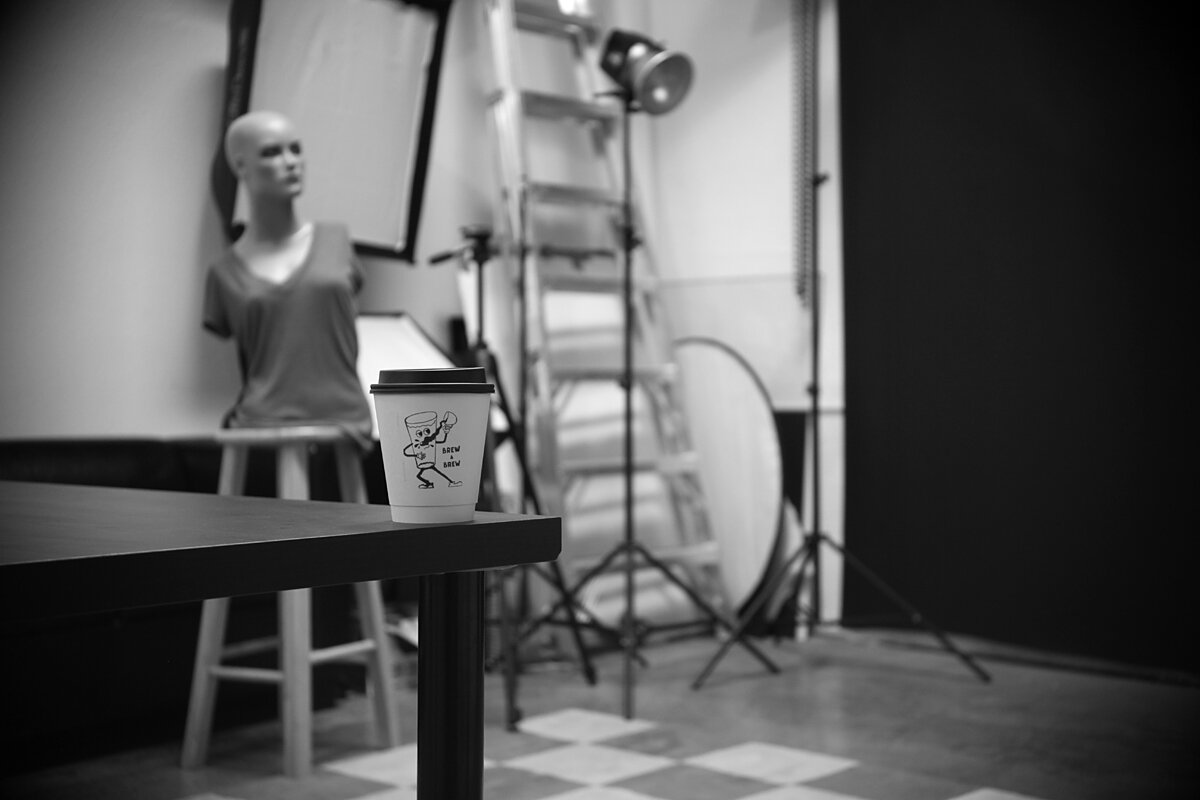
But in the second image, we’re at an angle that has put one object in front of the other.
So again, using your lens to alter the structure of your shot is all about understanding ANGLE….and also DISTANCE.
And hmmmm….that sounds awfully familiar.
That’s exactly what we said last week about our Time exercises.
We found your angle to the action (remember the swingset shot), and also your distance to the action, had more impact on the outcome of the shot than anything else.
So at this point, I want to remind you of the purpose of these exercises.
Remember, we don’t want “good shots” on these assignments.
We want to reveal as many culprits as possible.
We want a lot of insights into what REALLY governs the outcome of these shots (and hint: it’s rarely your camera settings).
And then, once we know which factors are the most important in terms of getting the outcome we want, then we can begin PRIORITIZING those factors in our thinking.
And once we begin putting all of our attention into controlling THOSE factors, then you’ll find that you’ll start getting the results that you want in almost every shot.
No more wondering why some shots came out and others didn’t.
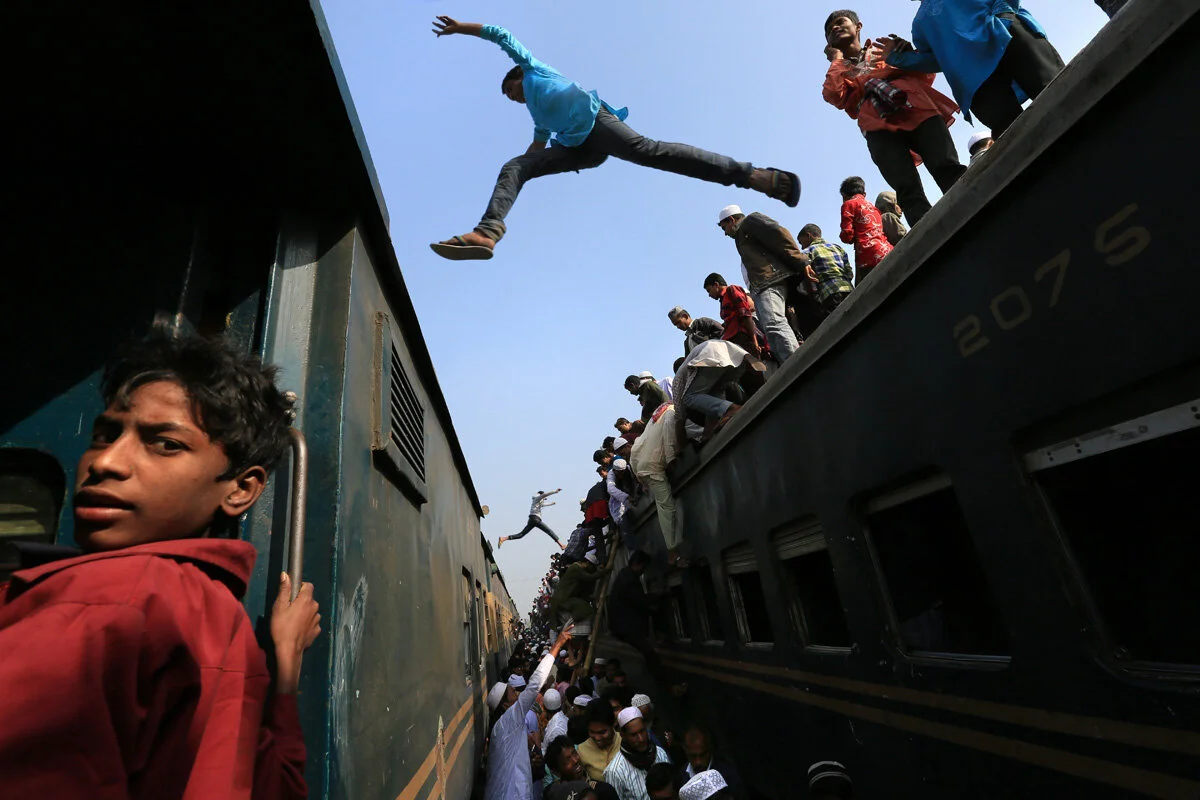
Finally, before we end this discussion on Lenses and Space, I want to show you once last, very interesting case study.
Take a look at this image here:

You’re looking at a very REAL construction site….but most people think they’re looking at a “miniature,” or a toy model.
Why?
Well, remember what I said last week about “visual literacy?” I said that we as a society were “half literate.”
I gave the example of an average person looking at a Journalism image next to a Commercial image, and being able to clearly RECOGNIZE the difference between the two…. but not actually being able to shoot those images themselves.
Well here is some even better evidence.
When you looked at this image, your brain (subconsciously and automatically) understood that we can’t be looking at a REAL construction site because 1) we’re TOO FAR away to get that kind of Depth of Field effect….and 2) the scene is too flat, there aren’t disparate layers of space from this ANGLE.
So this picture violated both principles we just discussed. It was shot at the wrong distance and at the wrong angle.
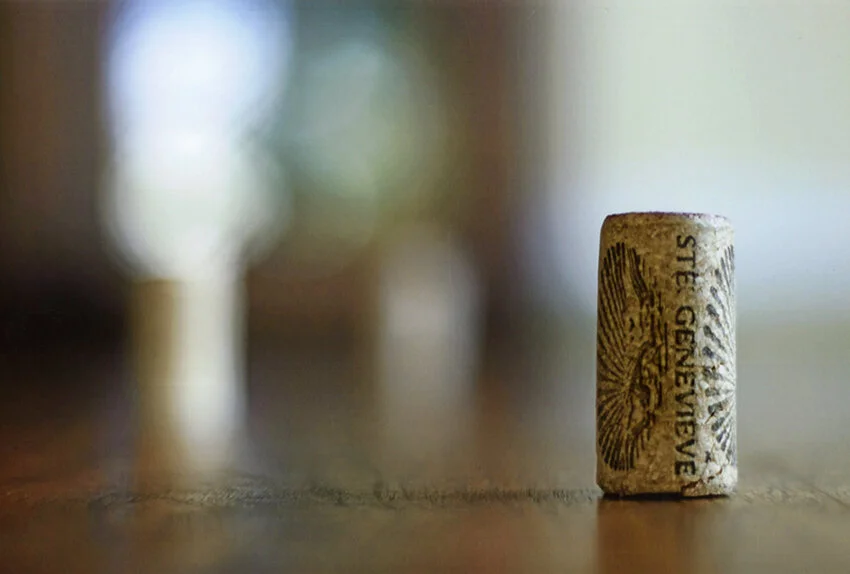
So in an effort to MAKE SENSE of the image, your brain thought back to where it HAS seen this kind of Depth of Field in the past, and the only place you’ve ever seen this kind of softness in an image is when the lens was VERY NEAR to the subject.
Images like this:

So your brain figured out that, if we have to be VERY NEAR to get this kind of effect, then the only way those construction workers could be very near to our lens is if they’re actually miniatures, and NOT real people.
Your subconscious mind connected all of those dots in a nano-second…. and then told your conscious mind that “you must be looking at a miniature.”
And if we plucked someone out of the past, from hundreds of years ago, and showed them this picture, do you think THEIR BRAIN would have read this scene as a “miniature?”
Of course not.
Your brain interpreted it that way because you have become remarkably photo-literate. In fact, you had to see a million pictures before these kinds of patterns and rules became familiar to your subconscious.
And your subconscious mind knows that THE ONLY WAY TO GET THAT KIND OF SOFTNESS IS TO BE VERY VERY NEAR TO THE SUBJECT. And so your brain concluded that you must be looking at a miniature.
But again, that’s only half-literate.
People can recognize these phenomena, and can interpret them….but they don’t consciously know how they work, or how to put them into action.
But once again, this construction site picture is NOT a miniature, it’s a real construction site.
So how did the photographer get this result?
Well, it’s an illusion.
I don’t want to get into the details of exactly how this shot was made at the moment (it has to do with using a lens with “misaligned elements”) so the easier way to make the point I want to make is to say that this “effect” could also have been rendered in Photoshop.
Like a fake DoF effect.
And the point I want to make is that, if you try to render a fake effect like this — without knowing the actual rules for how photography really works — you’ll get a lot of strange effects.
Our brains are so acclimated to certain patterns in photography, this image tricked our brains into thinking we must be looking at a tabletop model. And that illusion only works if the viewer has STRONG ASSOCIATIONS that this effect could never be rendered at that angle and distance.
Even if the viewer can’t consciously articulate that.
Finally, the other reason I show this example is because it’s a perfect transition to our next topic, which is “Authorship in Photography.”
We want to start exploring the notion that viewers respond to the structure of the image FIRST, and then the content of the image SECOND.
In this case, you responded to the structure of the image first (your brain thought “we must be very near to these subjects so it must be a miniature,” ….which informed your entire perception of the scene you were looking at)….and THEN your brain went in for a closer look to see exactly what the subject matter was, and exactly what was happening in the scene.
In other words, your brain determined you were looking at a miniature before it even identified the subject matter…just because of the STRUCTURE of the shot.
And something similar happens when our brains distinguish the structure of an “Ad” as opposed to a “journalism” photograph.
Your brain - at a quick glance - knows when you’re looking at an “Ad,”…… and THEN, a beat later, it goes in for a closer look to see exactly what the ad is trying to sell.
So again, people see the structure of the shot first, which FRAMES the way they’re likely to perceive the shot….and then….one beat later….. they go in to more closely identify the actual content of the shot.
And it’s crucial that you understand that dynamic if you want to be able to control what your images communicate.
The structure of the photograph is absolutely everything to a photographer.
That “one beat” head start allows a photographer to control how a viewer will read or perceive their subject matter.
Now on to Part II of today’s lesson
.