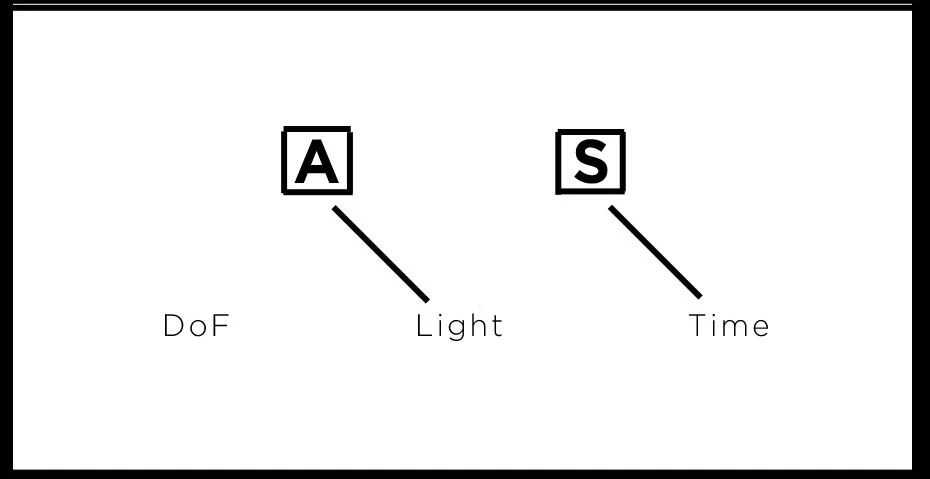
Part 2: TIME
I’d like to begin this portion of class with an anecdote from photo history.
Feast your eyes on the world’s first photograph:
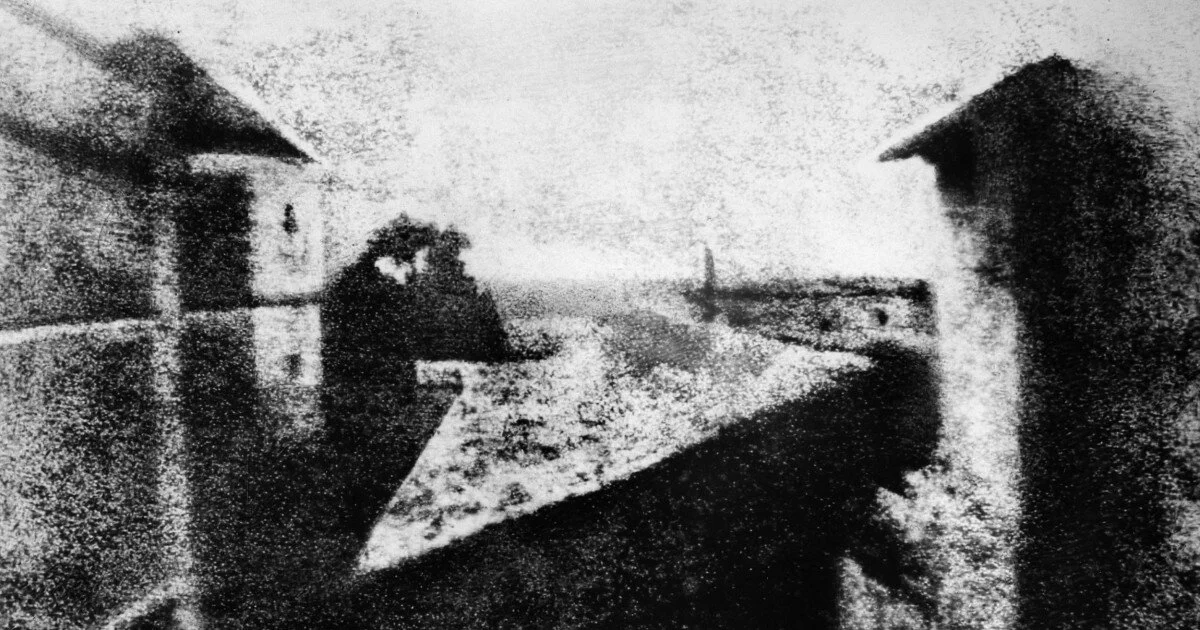
This image was taken in France in 1826 by a guy named Joesph Niepce. And again, it’s widely thought to be the world’s first successful photograph.
There’re not a lot there, mind you- I believe it’s titled “View from my Window,” and you can kind of make out a bit of courtyard… maybe a few trees.
But the reason I’m showing you this is because the exposure time for the world’s first photograph was roughly 9 hours. Essentially an all day exposure. In other words, Niepce put the plate out to expose in the morning, and then when the sun began to set, he took it in to see what he had.
Now, when I say this picture took 9 hours to make, that usually stuns people in 2022. In fact, I very often see my students’ jaws drop.
Because 9 hours sounds totally unreasonable to us today.
As photographers, we simply can’t imagine having to wait that long to see how our picture came out.
But going back to 1826, Joseph Niepce was not a “photographer,” as is evidenced by the fact that photography didn’t exist yet.
Jospeh Niepce was a scientist. Specifically a chemist.
And as a scientist, he had just won a very important race.
See, we had known that getting a “photo - graph” was possible for probably at least 35 years at this point, we just couldn’t QUITE make it work. We knew the theory was sound, we just couldn’t quite stick the landing.
But Niepce comes along and finally gets it to work.
And along with that victory comes an eternity of notoriety and credit.
So I ask you….do you think it bothered him that it took 9 hours to expose?
Of course not. If it had taken 3 weeks to expose, he’d still have been the first to do it.
But also, remember that in 1826 they had no paradigm for what a photograph was yet. To them, 9 hours wasn’t “abnormal,” because they had nothing to compare it to .
Whereas in 2022, have TONS of paradigms for what a photograph can be:
For instance, we see photography as “the encapsulation of our personal sentiment and nostalgia.”
We see it as “artistic or creative expression.”
We see it as “commercial persuasion.”
And we see it as “informing our citizens of current events.”
But Joseph Niepce couldn’t possibly have seen all of that.
He would have seen this medium more the way we currently view things like “MRI’s” …..or sonograms.
It was this new “imaging technology.” And he was simply left to ask “what could we do with this new process?”
To put what I’m trying to say here in perspective, imagine a time traveler from the very distant future suddenly traveling back here to 2022, and the first thing they do is scoff at us about how we’re using our MRI machines (“What do you mean you just use them for medicine?….What a bunch of cavemen!!….ALL of our best artists in the future are MRI artists!!”).
If that sounds a bit silly to you, then just know that it would sound equally silly if you were to travel back to 1826, and then stand over Joseph Niepce’s shoulder on the day he made this very first photograph, and whisper in his ear, “You know what you’ve just invented here? This is the nostalgic encapsulation of my own personal sentiment and memories.”
He would think you were absolutely insane.
The reason we see photography as all these different things today is because we’ve come in at the end of a long historical progression, a progression in which different technical advances “unlocked” different cultural uses for this medium.
In other words, in each generation we invent something new that enables us to apply photography to a wider range of uses….until we finally become very familiar with those new uses. Then, a generation later, we invent more new components, and the medium expands all over again.
And after many generations of that progression, we’ve all been born into a society that takes all of this for granted - as though it was set in stone from time’s beginning that THIS is what photography is and always has been.
But photography had to earn every one of its applications….both through technical innovation, and also through the very difficult task of shifting our society’s paradigms and expectations. And after 3 or 4 generations, we finally forged a new application out of this medium, and then the next generation takes it for granted,
So there are actually several reasons I open with this story.
First, I’m hoping my own students don’t take the evolution of photography for granted. It’s helpful to understand HOW photography got to where it is today so that you can fully comprehend the LOGIC of the medium, and so that you can see that nothing is set in stone, this medium can still evolve, and frankly, I’m hoping students like you are the ones who push it to evolve.
But second, the other reason I mention all of this, is because I think it’s a fantastic way to introduce the concept of TIME in photography.
See, the very long exposure times in the early days of the medium meant that you couldn’t shoot just ANYTHING. You were actually restricted to a painfully short list of potential subject matter — specifically landscapes and cityscapes. Basically, you needed something that was relatively permanent and unmoving.
So there was no portraiture….and certainly no journalism, sports, or wildlife photography.
Basically what I’m trying to establish here is that, for much of the 19th Century, TIME was viewed as an inhibitor, not an asset.
The time aspect photography limited what you could or couldn’t shoot.
But in 2022, we no longer view TIME as an inhibitor. We’ve actually mastered several different ways of dealing with it, and we can now view TIME dynamics as an asset.
And as we discussed last week, the TIME component of a photograph will serve as a “differential” that we can use to alter and improve our images.
So in order to get an idea of how we’re going to do that, let’s jump from 1826 all the way to the present day.
Let’s imagine we’re standing alongside the Circuit of the Americas race track on the day of the US Formula 1 Grand Prix.
The cars on the track are reaching top speeds of 225 mph……and right before one enters into your frame, you choose to set your shutter to 2” (which, remember, is 2 full seconds, not a half a second). And as the car enters your frame you snap the shutter.
In this scenario, what do you think will happen to the car in your picture?
Well, most students will guess that the car will look very blurred.
But that’s actually incorrect.
The truth is that we won’t see the car at all. We’ll have picture of an empty track.
Why?
Well, the car DID enter our frame at some point, so technically we’ll get a little bit of exposure from that car…but it was only in our frame for a tiny tiny fraction of a second.
By contrast, the empty track will have occupied our frame for a solid 2 seconds. Which means our camera is recording the track FAR MORE than it is recording the car, probably over 100 times more.
Thus, all we’ll see in the final outcome of our photograph is an empty track.
Ok, but what if we wanted to “freeze” the racecar, so that we can identify the exact driver.
How would we do that?
Well nearly every student will guess that we need to use a much FASTER shutter speed, which is correct. We would need to quicken our shutter to something closer to 2000 or 4000.
But now here’s the much tougher question.
WHY does that faster shutter freeze the racecar?
I’ve found students have a very hard time articulating an answer to this. I think it just seems too blatantly intuitive to them (“Of course a faster shutter speed will ‘freeze’ a moving object”) that they can’t figure out the PRECISE MECHANICS of what’s happening.
But it’s absolutely vital that you DO understand the precise mechanics of what’s going on here, so let’s dive into this, shall we?
Here’s specifically what’s happening:
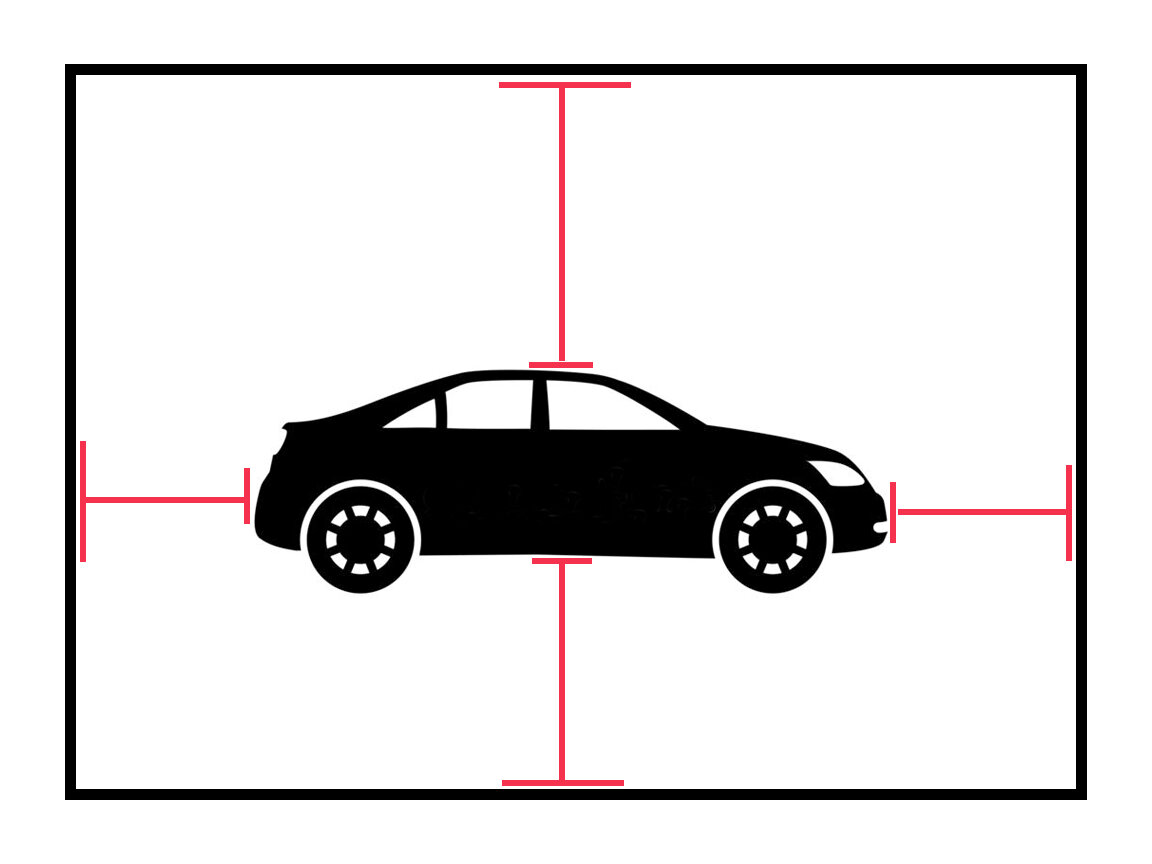
For every object that exists in your frame, at any given moment, that object has a very particular relationship TO your frame, in other words, it occupies a very specific position within your frame:
….and in order to “freeze” a moving object with your camera, you need to use a shutter that is so fast, that for the entire duration that the shutter is open, the object doesn’t have time to change position in your frame.
Because if the object DOES change position in your frame — while the shutter is open and the camera is recording — then we will incur some kind of effect.
For instance, the object may move from one part of the frame to another, which will cause the object to EXPOSE IN DIFFERENT PARTS OF THE FRAME, which is what creates the notorious “blur” effect.
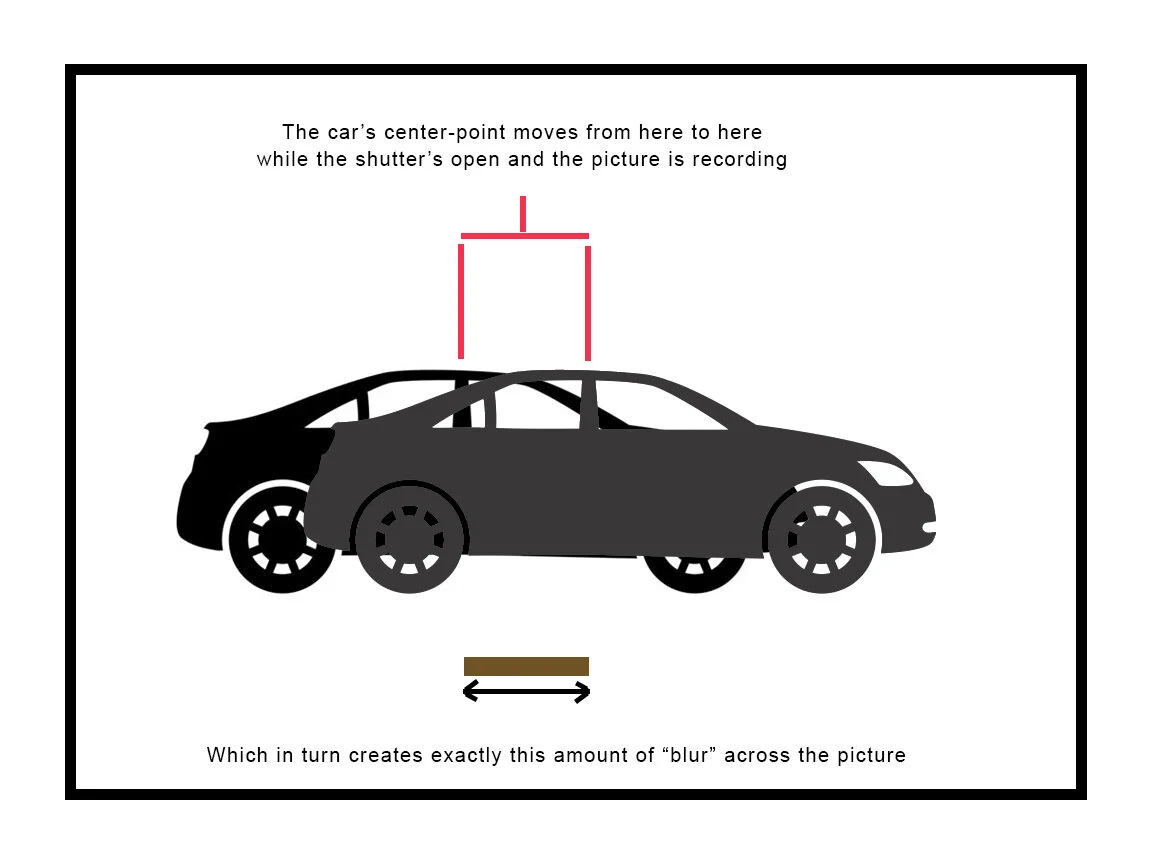
Or, if the shutter is open long enough, the car maybe even has time to vacate the frame entirely, and eventually disappear from the final exposure.
BUT….if from the moment the shutter opens to the moment the shutter closes, the car DOES NOT have enough time to change positions in the frame, then the car will expose in ONLY ONE position in the frame, which means it will appear “frozen.”
That’s specifically what’s happening.
And while it may seem generally intuitive that “a fast shutter freezes movement,” we’re going to find that this principle needs to be understood in this very particular way, because nearly every TIME strategy or solution we discuss from here forward will all be centered around understanding this particular dynamic.
So let’s go ahead and state the cardinal rule for shutter and movement:
It never EVER matters to us how something is moving in reality….it ONLY matters to us how something is moving IN OUR FRAME.
And those are two entirely different things.
To understand why those are two entirely different things, let’s do a quick thought experiment:
Image you’re shooting a spinning top (a “top” as in the children’s toy).
And let’s say the top has no distinguishing markings on it - it’s just one solid color.
Ok, so the top is spinning PERFECTLY. There’s no wobble or side to side movement.
And finally, let’s say you’re shooting it from directly above, from a perfect bird’s eye view.
Ok, so that top is moving in real life, correct?
But is it moving at all in our FRAME?
Nope.
And I can’t stress this enough: that’s all that matters to us.
So I want to go ahead and repeat this one more time: it never, ever matters how something is moving in reality….it ONLY matters how something is changing relationship with the frame.
And those two ideas are not the same thing.
So let’s go back to our discussion of “differentials” from last week.
The TIME differential is maybe the most misunderstood of all.
The differential here is NOT whether something is moving. The differential here is whether something is CHANGING RELATIONSHIP WITH YOUR FRAME.
So in the “spinning top” example above, despite the fact that the top is moving in real life….in that shot, we don’t actually have a TIME differential.
And that distinction may sound incredibly nitpicky and pedantic right now, but trust me, it’s not. In a few weeks, you’ll be very glad to know that distinction, as it will help you to make sense of your “misfires,”
Photographers are notoriously prone to looking at their misfires and failures and just sort of shrugging it off, just saying “eh, photography isn’t an exact science… sometimes it takes several tries before the picture ‘comes out.’”
But we’re never going to do that in our classroom. We’re always going to be able to articulate exactly why one shot “came out” and another shot “didn’t come out.”
In other words, we will not practice this medium unconsciously and through a lot of trial and error….the way far too many photographers do.
And the reason we won’t do that has nothing to do with purity or integrity. No, the very practical reason we need to fully understand each of these distinctions is because, when we do start COMBINING these techniques, you will have to know how to get each of these effects to come off on the first try.
Because trial and error can sometimes get you one SINGLE effect within an image. But if you want to start taking images with more complex structures, then those structures are going to require that these different techniques be combined in different ways….and the fact of the matter is that you can’t trial-and-error all 4 or 5 components to an image structure.
It would become mathematically impossible.
But back to the current discussion.
Ok, so the race car freezes at 1/4000.
But obviously that isn’t true for all moving subjects.
If you were photographing something less extreme, perhaps a jogger, or a skateboarder, or a car on a residential street, you obviously don’t need to get your shutter quite that high, right?
So how fast would your shutter need to be?
Well, let’s take a look at those shutter numbers again from last week:
1 2 4 8 15 30 60 125 250 500 1000 2000 4000
There’e no UNIVERSAL truth here. Make no mistake, the shutter you need to use is going to depend on several factors (all of which we’ll eventually discuss), but for now, I’ll begin with this: textbooks like to cite the shutter speed of 60 as being the “magic number.”
What they mean by that is that 60 is a something like a “threshold.” If you cross it in one direction — for instance, if you go faster than 60 — then most common, everyday types of movement will probably freeze by about 125 (which is just above 60).
And if you cross the threshold it in the other direction — if you go slower than 60 — then most common, everyday types of movement will probably blur by the time you get to 30 (which is just below 60).
So 60 is often considered the dividing line between those two results.
Now, is 60 an absolute?
No, not even close. In fact, comically no.
We’ll find that tons of variables will affect this threshold, so in the end, there won’t be one number you can simply memorize for this.
However, in the interest of learning the dynamics that need to be learned here, let’s assume — just for the moment — that there IS a threshold for each subject you shoot. In some cases that threshold may be 30, in some cases 250, depending on a number of different factors. But ignoring any SPECIFIC number, as I said, let’s just assume that for any given shot there IS a threshold.
What I want to discuss is the far more generic idea of choosing to take the picture above that threshold as opposed to choosing to take the picture below that threshold.
In simpler terms: let’s discuss the incentives behind “freezing” movement as opposed to “blurring” movement.
First, let’s go back to the race car.
Sure, you COULD freeze that race car. But isn’t that a bit boring?
In other words, it might actually look as if it isn’t moving at all, like it’s simply parked on the track.
In that instance, the act of “freezing” the movement largely just discards the energy and action from the scene.
So then what would cause you to want to freeze movement?
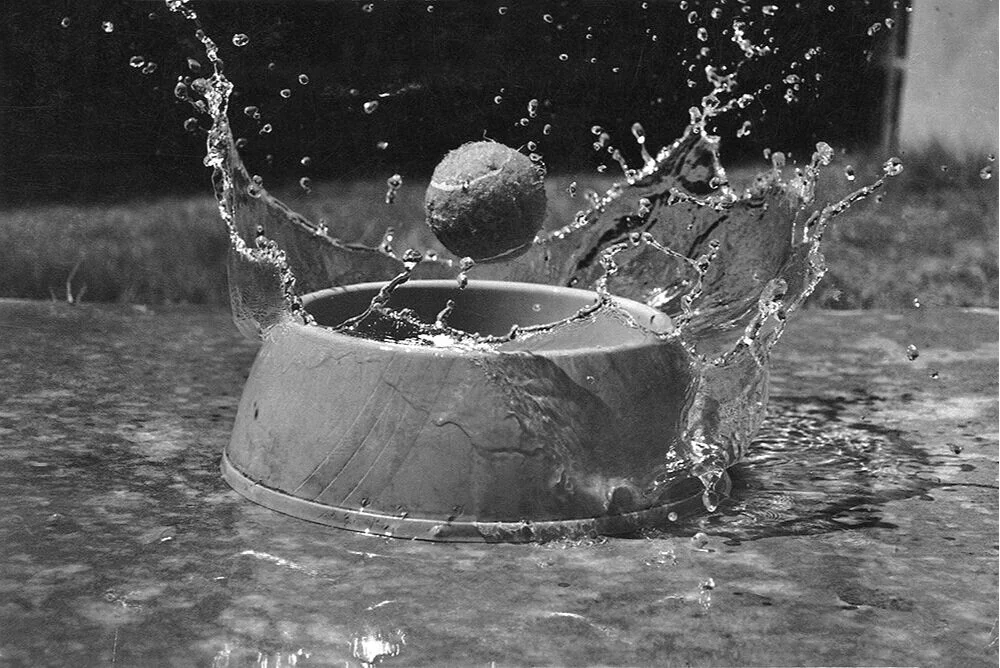
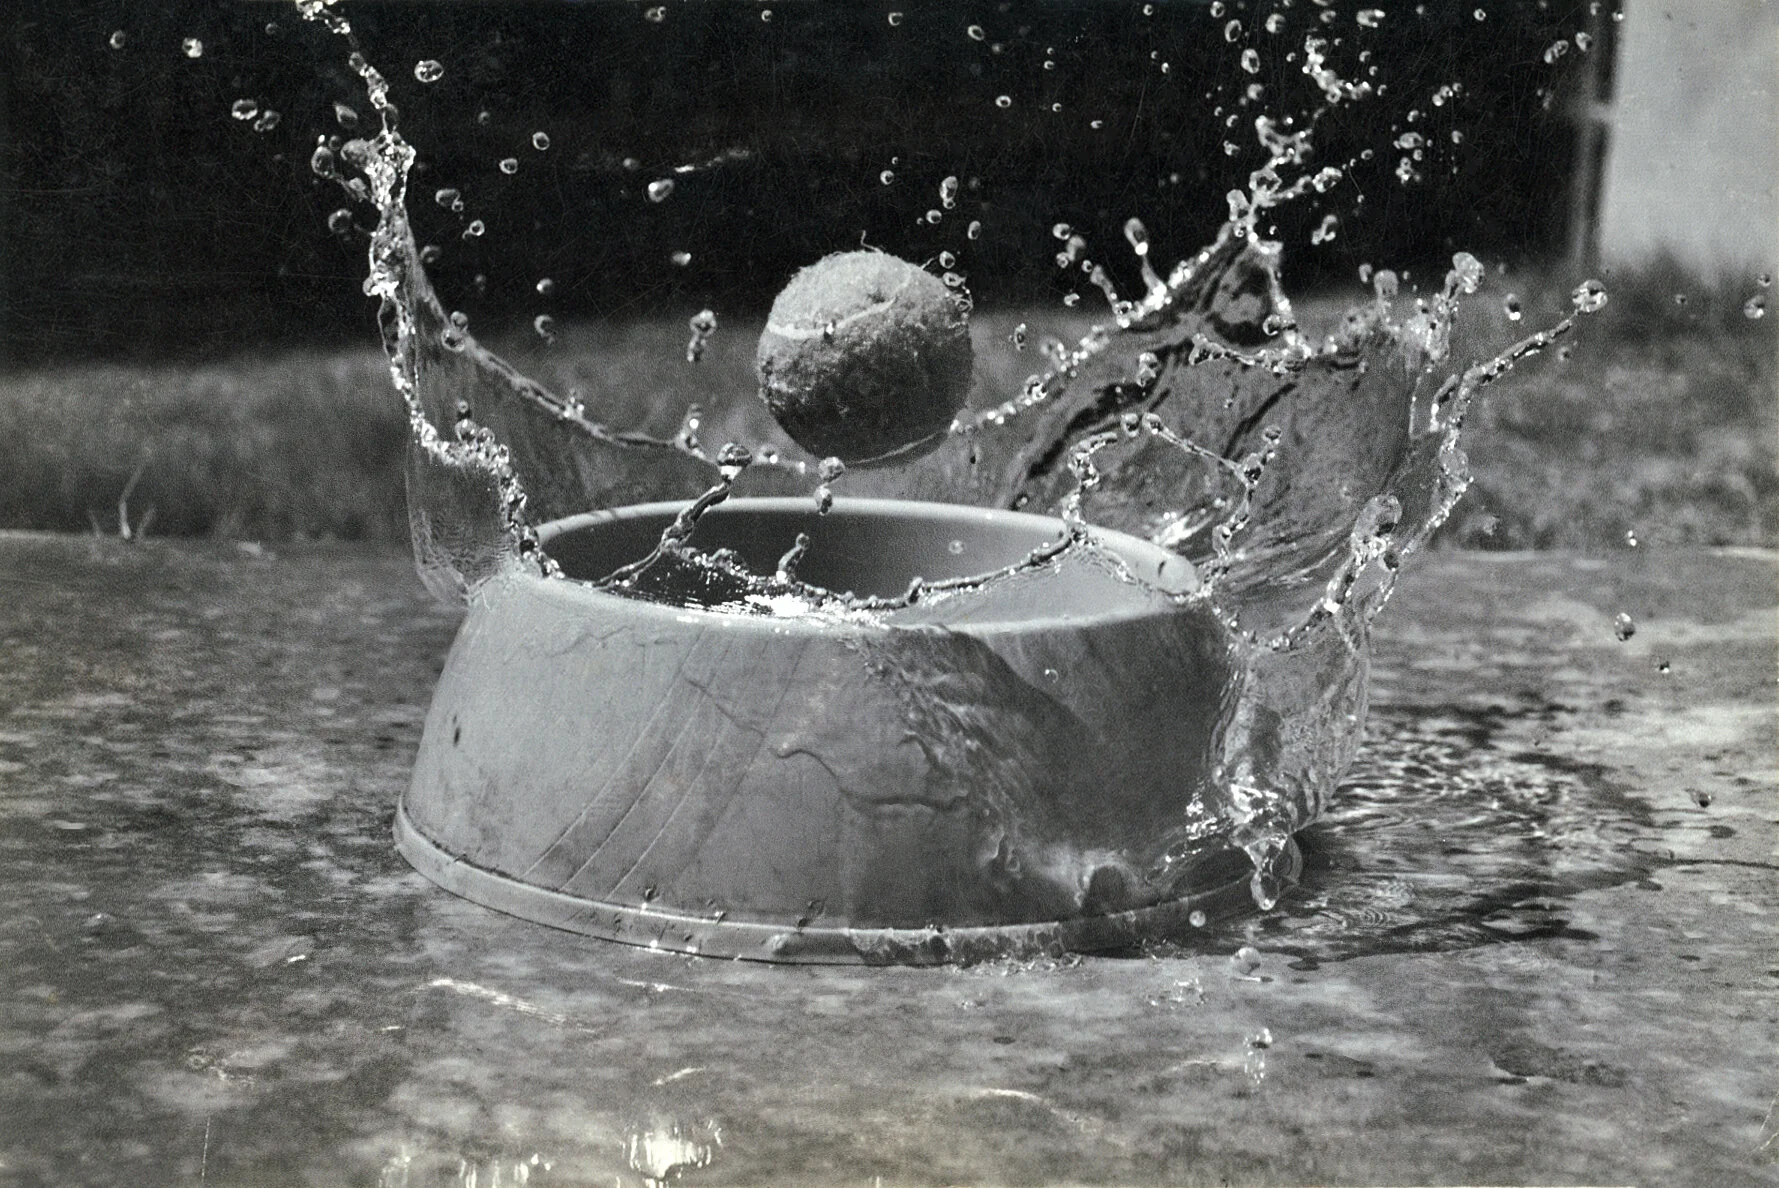
Well one common incentive is when you want to use the camera in order to show us something we can’t perceive with our own eyes, something that we need the help of technology to see:
[Quick Note: I’m using exclusively ASOP student assignments throughout this page, so all of these images were shot by previous Photo1 students]
But again, this image is showing us a phenomenon we can’t easily perceive without the help of photography.
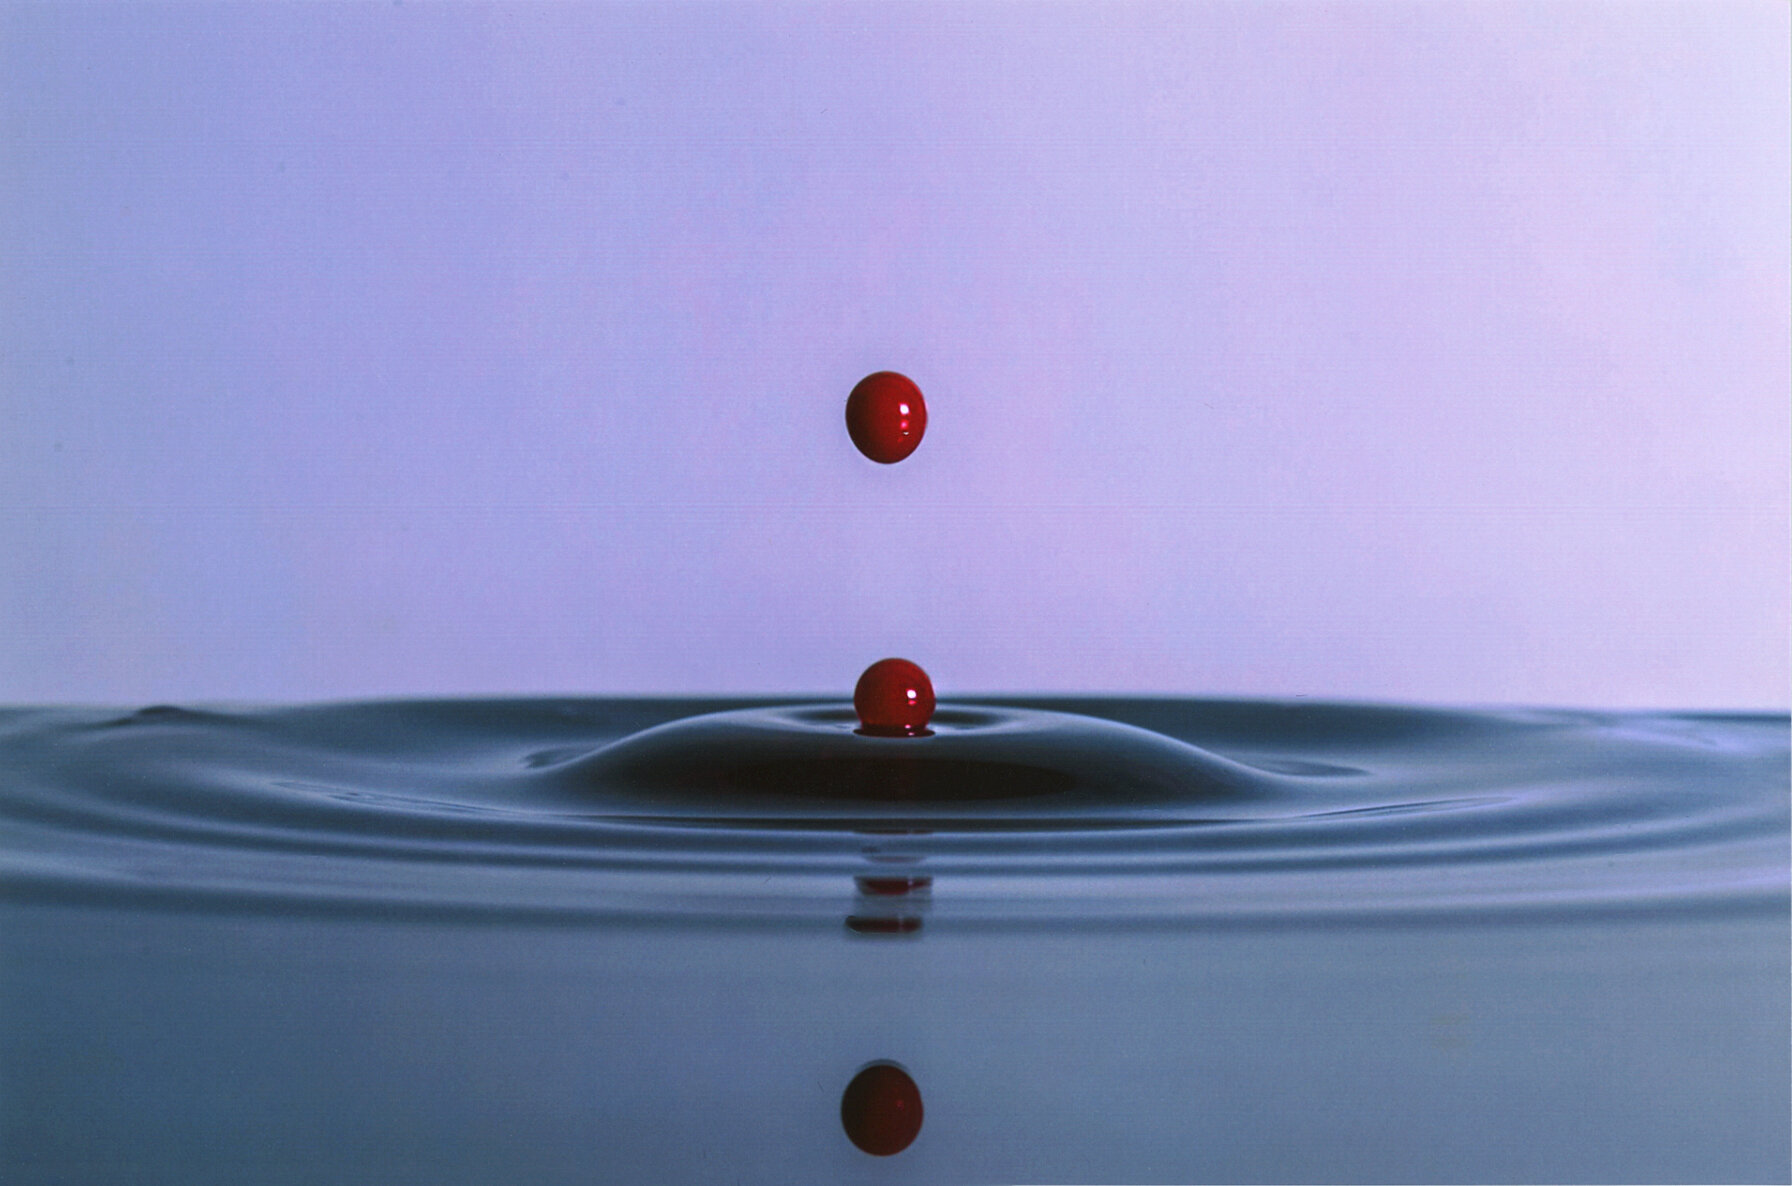
Or how about this one. Here the frozen droplet of water is arguably creating a subtle bit of TENSION:
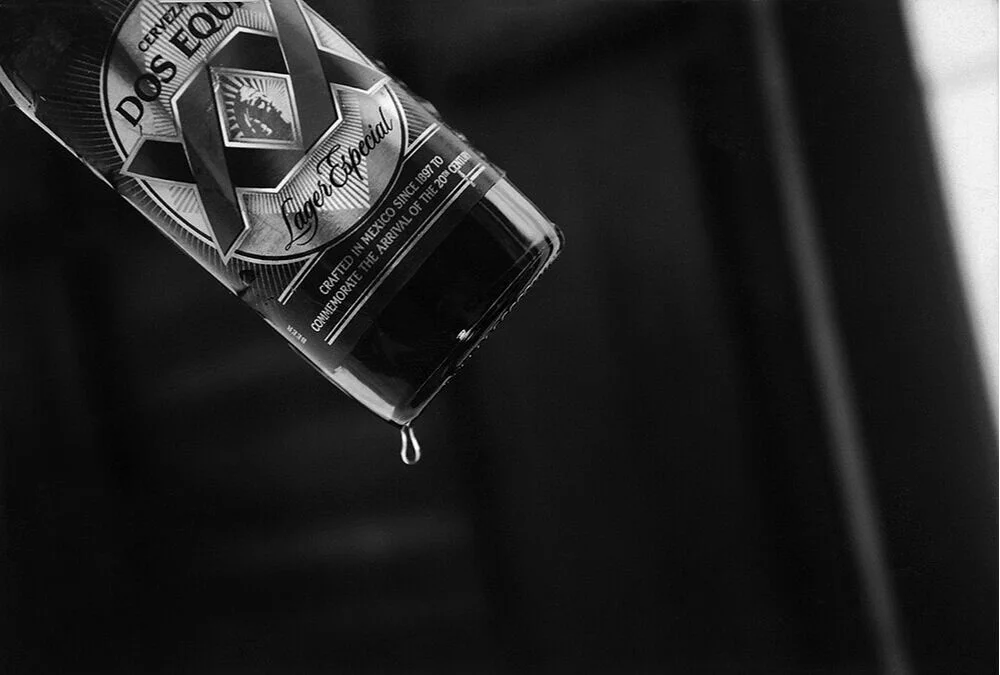
….because we keep waiting for the droplet to fall. But it never will.
So we’ll be perpetually waiting forever.
Ok, but now how about this one:
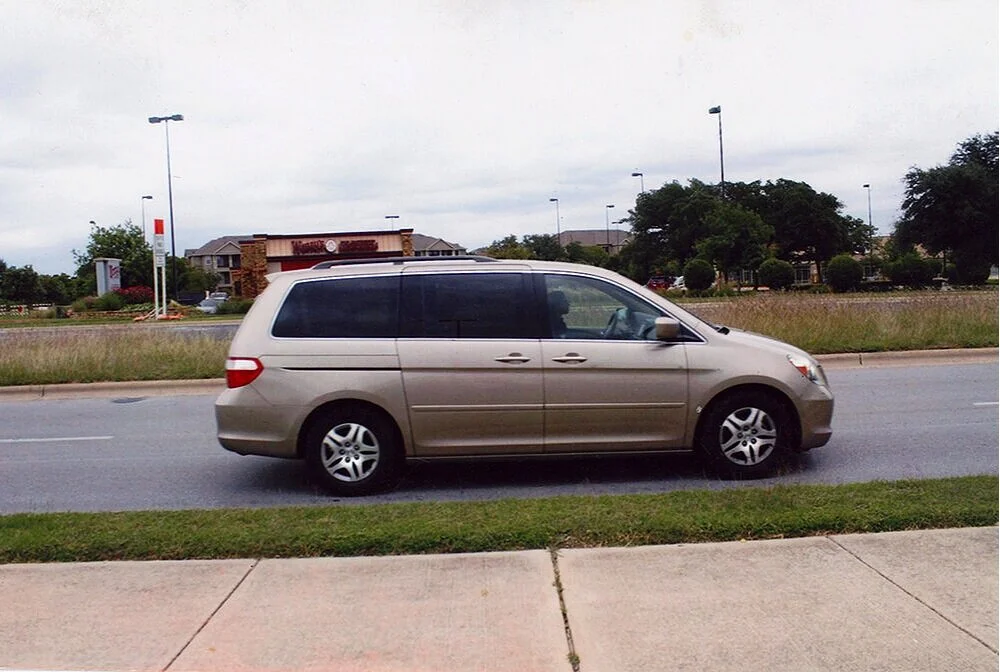
This student SWORE that this van was moving.
But if you were to show this picture to most people, without any explanation or context, I bet that nearly all of them would simply assume the van was just parked.
I get this a lot when students freeze something like a ceiling fan. The first question a viewer might have is “How do we know the fan was even turned on?”
So I want to use this opportunity to introduce a VERY IMPORTANT set of vocaublary that we’re going to be using throughout the rest of this course.
There are two different sides to photography: there’s the “MECHANICS,” and then there’s the “SYNTAX.”
In other words, there’s what you do physically, and there is what the picture communicates.
So let’s begin building that distinction.
These three images I’ve shown you all use the same mechanics, correct? In other words, they’re all taking advantage of the same physics, they’re all using a fast enough shutter speed that they’ve disallowed anything to change relationship with the frame (they’ve “frozen” the subject).
So the mechanics are the same.
But these images aren’t COMMUNICATING in the same way. They’re giving different kinds of signals or “visual cues” to the viewer and those visual cues coax our brain into understanding these subjects in very different ways.
The first two shots have used a time strategy in order to reveal something interesting, hidden, or insightful within in the scene, something that was maybe invisible or imperceivable to the naked eye.
And the third image has done the opposite, it has actually MISLEAD the viewer by HIDING the fact that the vehicle was actually moving in real life.
You could argue that, rather than ADD something to the scene, this last shot actually SUBTRACTS something from the scene. It subtracts the evidence that the van was moving.
Or being even more specific, those first two images have added an insight or idea that couldn’t have been perceived or appreciated if someone were really standing there in real life - the viewer of the photograph has extra insight that the real life bystander wouldn’t have had - whereas the last shot has deprived the viewer of the photograph of something that the real life bystander would have known had they been standing there in real life - that the vehicle was moving and was not in fact parked.
So again, this technique can be used additively or subtractively.
So are you starting to see what I mean when I say “the MECHANICS are the same, but the SYNTAX is very different?”
And let me just pause right here, if I could, and relate a much a broader note now about this curriculum in general.
While the early part of this course will dive heavily into the mechanics of the medium (because we sort of have to, we can’t really get anywhere until we know how to control our images first), the latter part of this curriculum will focus much more on “syntax,” on what your photograph is communicating.
All of that is to say that the first half of this course is a bit more dry and tedious. It’s the nitty gritty of what you absolutely HAVE to know before you can even really get started. But the second half of this curriculum should be a bit more “entertaining,” as we begin to dive deeper into the communicative aspects of photography….the ART of photography.
But back to our discussion here.
If you find that the movement in your scene wouldn’t specifically benefit from being frozen or stopped — perhaps because freezing the movement in the scene might even confuse the viewer into thinking there was no movement at all — then it’s possible you might prefer to go the opposite way with it, to drop BELOW that threshold we discussed, and leave the shutter open long enough that the viewer might perceive the movement itself.
One more time, let’s take a look at those shutter numbers:
1 2 4 8 15 30 60 125 250 500 1000 2000 4000
If we assume 60 is the threshold here, then by the time you get to 30 you might see a bit of blur.
HOWEVER, one key difference between freezing action and blurring action is that when something freezes at a certain threshold — let’s say at 125 — then that action should still be rendered frozen at every higher shutter thereafter. In other words, it will still be frozen at 250, and again at 500, and so forth. Which means, once we reach that threshold, every shutter thereafter should continue to give us the SAME result.
But can you see that isn’t true when you’re “blurring” action. If something blurs at 30, it will blur MORE at 15, and even more at 8 and so on. And at some point you’re going to reach a second threshold, one where you LOSE THE IDENTITY OF THE SUBJECT.
Again, that threshold will vary based on a number of factors to be named later, but for now, let’s put that second threshold at 4. In other words, once you get the shutter speed down to 4, it’s possible that the shutter will be open long enough that the object in motion no longer looks like a car, or a bike, it just looks like unintelligible “streaks.”
So if 60 is our threshold on one side, and 4 is our threshold on the other, then that gives us a window of about 3 different shutter speeds to work with for this technique. 8, 15, and 30.
1 2 4 { 8 15 30 } 60 125 250 500 1000 2000 4000
These are shutter speeds that are long enough to blur, but short enough that you don’t entirely lose the moving object.
So to see what that might look like, I want to share the single most common photograph I used to get from days teaching in New York City:
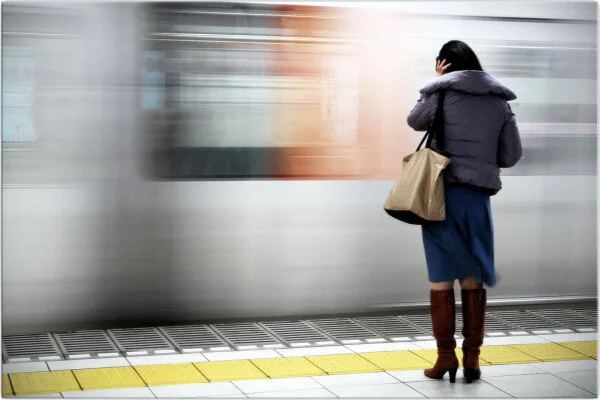
…..probably because my students were doing their homework on the way to class : )
This image was shot at 15 (right in the middle of that window of about 8, 15, 30, that we discussed a moment ago).
And I want to break this image down VERY thoroughly.
First, the fact that the shutter has been held open for a relatively “long” amount of time has given the subway car enough time to move ACROSS the frame while the picture is still recording, which in turn means the train has exposed in different parts of the frame.
And that gives the viewer a strong VISUAL CUE that the train must have been moving.
Next, there are several advantages to going for this result as opposed to “freezing” the train with a higher shutter. .
The first advantage is that this image has more energy or more momentum.
Had we frozen the train, it would have been a much more “static” picture….devoid of all momentum or energy.
Next, had we frozen the train, the image would have been narratively MISLEADING. Viewers would probably have just assumed the train had already stopped….which would be factually untrue.
So before anyone thinks this is "trick photography,” just know that the photographers who use this technique most frequently tend to be photojournalists, because a lot of times their images won’t make sense to us (or would be misleading) if we weren’t aware of the movement in the scene. (And by the way, we’ll consider the concept of “truth in images” when we get into to photojournalism - later on in the curriculum).
But finally, the most important discussion I want to get into here is that, if this picture is successful — in other words, if we can look at this picture and correctly understand the context and also understand what’s happening — so IF this picture is successful, it’s because the movement in the scene has a “foil,” ie: an opposite part of the scene that ISN’T moving.
Which in this case is the woman in the foreground.
This shot has both a MOVEMENT CUE….and it also has a CONTEXT CUE.
Generally speaking, these kinds of images need both in order to make sense to the viewer.
In other words, the RELATIONSHIP between those two parts of the scene allows the audience to understand not only the context (that this is commuter waiting on a subway train), but it also helps us identify what exactly the movement is (it’s a train).
In fact, just to show how important that relationship is, go ahead and hold up your index and middle fingers and press them against the screen, specifically I want you to use them to block her out of the shot, so that ALL you can see is the train in the background:

…I’m guessing that if you took her out of the scene, SIGNIFICANTLY fewer people would consider this to be a “successful” shot. In other words, it would probably end up an “outtake” on the cutting room floor.
So again, generally speaking, “motion blur” will not look like any specific kind of movement to us, unless we have a CONTEXT CUE that tells us what the blurred object is.
This is one of the most important insights into how this aspect of photography really works.
But just as importantly, I want to take this moment to start putting together some of the greater ideas we’ve been discussing.
A few moments ago we introduced the idea of “syntax,” which means that we’re kind of comparing photography to written or spoken language here. Usually when you hear the word “syntax" it’s being used to describe written language or speech.
Well, to build on that comparison, there’s another important note we can make about this subway photograph.
One of the reasons this photograph “works” is that it is not the SUBJECT that is moving, it is the “QUALIFIER” that is moving.
In other words, the woman in the foreground is the SUBJECT of the picture, and the train in the background is “descriptive” information (or “qualifying” information).
It’s information about that women.
We know something specific about her. She’s not just any generic embodiment of a woman….she’s specifically a “commuter.” And she is currently on her commute. So the woman is the subject, and the subway train tells us something specific about her.
Subject….and qualifier.
To illustrate this further, here’s another example of “qualifying action:”
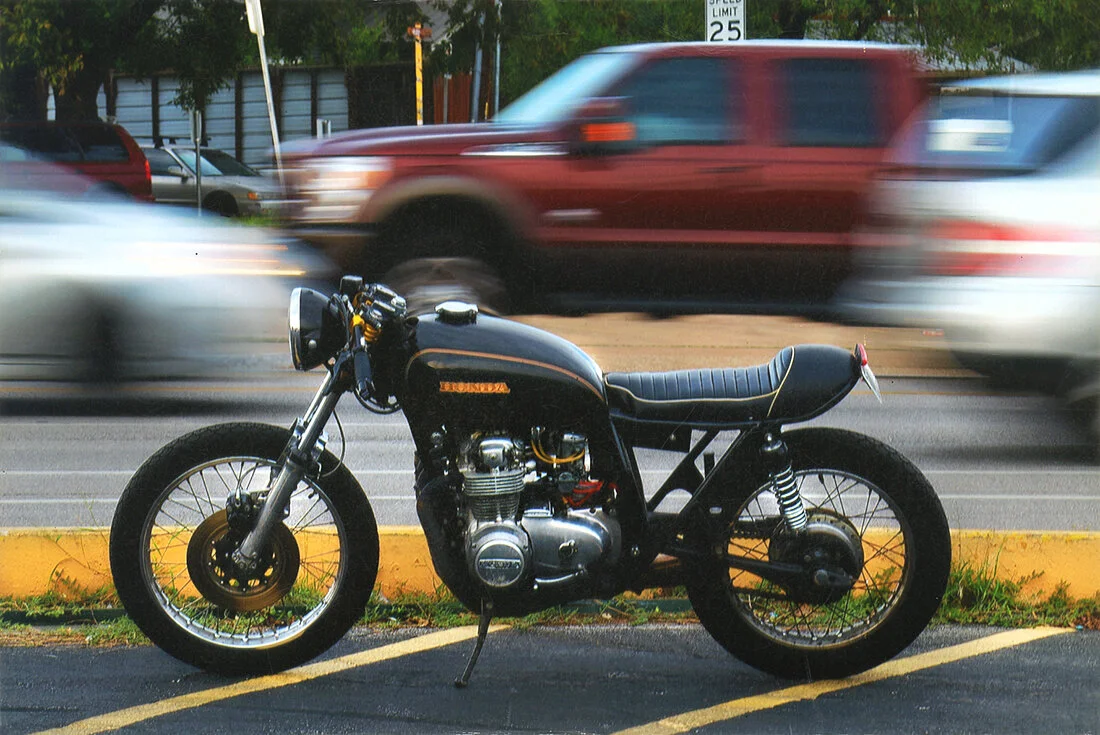
The motorcycle in the foreground is very clearly the “subject” of the photograph, whereas the traffic behind it is merely descriptive of that motorcycle.
It tell us that the motorcycle is an “exciting and dynamic vehicle.” Whereas if there was no action behind it, the motorcycle might look a bit static and dull.
And here’s yet another example of qualifying action:
Clearly the woman looking into the camera is the “subject.” The crowd around her is descriptive. It tells us that maybe she’s urban/social/hip, etc. Maybe she lives an exciting lifestyle.
Alright, so here’s the thing I’ve been building to with all of this…. the viewer is WAY more forgiving of motion blur when it’s used on the qualifier, and WAY less forgiving when motion blur is used on the subject of the photograph.
To see for yourself, as you did with the subway shot, I’m going to ask you to once again use your fingers to block out the “subject” in this last shot.
And now we’re left looking at the very blurred person in the middle of the frame.
In fact most viewers would probably assume that THAT person is now the “subject.”
And if that’s what we’re left with, I’m going to bet again that SIGNIFICANTLY fewer viewers will see this image as a success.
Whereas, I think most viewers are probably pretty fine with the original image. Because they’re forgiving of imperfect motion blur when it’s “secondary” to the subject, or if it’s just “descriptive” information.
But if the subject ITSELF is blurred, then you better absolutely ‘nail it’ as a photographer, because the viewer is far less forgiving if the motion capture isn’t PERFECT.
So long story short, the insight here is that you have a WIDE margin for error when trying to convey “qualifying action,” but you have NO MARGIN FOR ERROR if you’re trying to convey “subjective action” (ie: when the “subject” is the part of the scene that is moving)
Those two tasks aren’t equal. One is MUCH harder than the other.
And the problem is, most photographers haven’t identified that these are two different tasks. They’re lumping all of these shots together as “motion blur.”
Ok, I want to pause here. Because now we’re beginning to touch on the most important part of today’s discussion.
There are a lot of “themes” in this course.
The most important theme by far is that of “differentials,” the idea that embracing variations in your scene allows you to structure your image in more creative and more complex ways.
But the SECOND MOST IMPORTANT THEME of this course is going to be something I like to call “CULPRITS.”
So what’s a “culprit?”
Well, a moment ago I referenced the passive shrug that photographers often give when their image “doesn’t come out.” They try a few more times until it does, and then they chalk it all up to “eh photography’s not an exact science; there’s no way to explain this stuff.”
In fact, my own college professors more or less took that stance.
I wish I were kidding.
But the thing is, it turns out, most of this stuff CAN be explained. If you just take the time to give even a cursory glance at the underlying dynamics of photography.
So throughout this course, we’re going to uncover a lot of underlying dynamics that will be almost single-handedly responsible for pushing an image into the “success pile,” or pushing an image into the “outtake pile.” And rather than chalk all that up to “Eh….these things can’t be explained,” we’re going to identify the exact dynamics that are pushing an image into one category or the other.
And once we’ve identified them, we’re going to refer to them as “culprits.”
So here’s your first culprit.
Suppose two different students are listening to this lecture, and both of them come away with the notion that, if they use a shutter somewhere in the ballpark of 15, it might make part of their scene look like it’s moving.
So both of them go outside to try it for themselves.
The first student, “Student A,” has a personality that leads them to look for “irony” in the world, so the shot they settle on is of a stop sign at the end of their street, where there’s is a busy cross street that provides them with a ton of constant, chaotic traffic in the background behind the stop sign.
The idea is that the stop sign will be in the foreground, and the busily-moving traffic will be in the background. So what they like about the shot is that the sign in the foreground CONTRADICTS all of the commotion and chaos throughout the rest of the scene.
I want to reiterate one more time that it was the personality, and sensibility, of this student that has lead them to attempt this shot.
Ok, so in my experience, that student is 95% likely to succeed with that shot.
For several reasons.
First of all, they’ve chosen to shoot a fairly stable and predictable scene.
In other words, the traffic in the background is always there, it’s also always the same KIND of movement, and finally, it’s always moving in the same direction. Again, it’s all very stable and very predictable. The movement won’t suddenly and radically change on a moments notice (ie: the cars won’t suddenly fly straight up into the sky).
But most importantly, they’ve also chosen to use the movement in the scene as QUALIFYING action, with the stop sign in the foreground being “the subject” of the photograph.
Which means they have a wide, WIDE margin for error on this. The viewer is not going to be so demanding that the background movement needs to be perfectly rendered. If they’re even in the general ballpark of using the correct shutter (probably within 2 stops on EITHER side of the correct shutter), the image will probably come off.
Which means they’ll probably have something usable in only 2 or 3 takes.
So that student is GOING to get a successful shot
And then, when they bring the shot to class the following week, they’ll probably be one of the very few students who actually has an unabashedly successful image for that particular assignment, as most of their classmates will have hit a lot of snags.
So “Student A”leaves class that week thinking “Man, maybe I’m a little better at this whole ‘photography thing’ than most of my classmates.”
The second student, “Student B,” has a different personality altogether. They’re less of an ironic humorist, and more of a loving parent. So they look at the assignment and think “I know…I’ll shoot my children playing on the play ground! That’ll be fun!”
So the shot they settle on is of their daughter hula-hooping.
In my experience, this student is 95% likely to fail.
For several reasons.
First, they’ve chosen SUBJECTIVE action, which means the primary movement in the scene is coming directly from the subject, and not from secondary background elements. Which means it’s no longer good enough to be in “the general ballpark,” this student is going to have to nail the shutter perfectly, right on the dot. If they misuse their shutter by even 1 stop, the shot will likely come across as a messy and incompressible failure.
But further, this student has made things even harder on themsleves by choosing to shoot action that’s moving inconsistently and erratically.
In other words, the traffic in the background of “Student A’s” shot was moving consistently and predictably, which meant that if they didn’t capture it QUITE right the first time, then they could simply adjust their shutter a little bit, or their timing a little bit, etc., and then maybe get it right on the very next try.
But the problem with shooting a child hula-hooping is that her movement is never the same, from one moment to the next. She’s going to be moving left to right, to and fro, starting, stopping, shaking, etc.
And this means that “Student B” has no way to “adjust” from moment to moment, because even if you can figure out what MIGHT have worked a second ago, that second has already passed, and the movement of the child has already evolved into something totally different.
So “STUDENT B” tries the shot 20 or 30 times, and odds are, NONE of them really “come out.”
And then Student B leaves class that week thinking “maybe I just don’t have a knack for this….maybe photography’s just not my thing.”
So just to recap the differences between these two attempts: “Student A” was shooting qualifying action — with a wide margin for error in their shutter speed— and was shooting very consistent and predictable movement, which allowed them to adjust their angle and their timing accordingly, and probably get the shot in only 2 or 3 tries. “Student B” chose to shoot SUBJECTIVE action — with no margin for error at all on the shutter speed — and on top of it chose to shoot erratic, unpredictable movement.
One of them brings their “successful” shot to class and thinks “I’m really good at this,” and the other one brings a pile of failures to class and thinks “I’m really terrible at this…”
…AND THEY’RE BOTH EQUALLY WRONG.
I can’t stress this enough.
By sheer random chance — in fact, by the sheer benefit of their personality types — one of them was drawn toward taking a shot that almost guaranteed success, while the other was drawn toward taking a shot that was almost impossible for a brand new Photo1 student to handle.
In short, those two students weren’t actually attempting the same task.
One of them was attempting a task that required a profound understanding of about 4 different advanced dynamics, and one of them was attempting a task that could be completed without any real substantive knowledge at all.
But they THOUGHT they were attempting the same task.
And one of the key takeaways here is that, as bad as it is “Student B” gets discouraged, here, and thinks maybe they aren’t cut out for being a photographer…..it’s JUST AS BAD that “Student A” comes to class, looks at their own success, and thinks “I got this.”
Because “Student A” is experiencing a warped sense of development. They don’t REALLY have a handle on how these dynamics work, they just LUCKED into taking a shot wherein most of the underlying dynamics of photography happened to work in their favor. It doesn’t mean they actually understand what they’re doing, nor does it mean that they’d be able to problem-solve a more difficult scenario in the future.
And by the way, we’re not talking about shots that APPEAR to be more or less complex. Meaning, if you saw a successful version of the “Stop Sign” shot next to a successful version of the “Hula-Hooping” shot, it’s doubtful that, at a glance, one would APPEAR much more complex or more clever than the other.
But the underlying dynamics tell a different story. A glance at the underlying dynamic tells us that one of those shots was probably 10 times harder than the other.
I’ve spent that past 10 years proving that once someone understands the true, underlying dynamics that are leading to their successes and failures, then pretty much ANYONE can become an elite shooter.
There’s no talent quotient in photography. There are merely those who understand how all of this stuff works, and those who are leaving it to chance. And yes, from the large pool of people who are leaving this to stuff to chance, a small group of outliers will emerge, with unconscious habits and preferences that lead them to more consistently successful images. And then we label those people “talented.”
So rather than chalk all of this up to unconscious talent, here’s what we’re going to do instead: each week we’re going to embark on a different set of assignments. Each assignment is almost like a “fact-finding mission.” In other words, you’ll all be bringing back a diverse set of data, insights, and case-studies.
And then we’ll collectively pool together all of our results, and we’ll examine which type of shots saw the most success, and which type of shots seemed to result in more failures.
And in discussing those distinctions, we’re going to stumble upon a ton of hidden CULPRITS — the kind of dynamic you can’t quite put your finger on at first, but then, once you see it, you can’t unsee it.
A factor that, in retrospect, is very obviously making or breaking the shot.
And then, once we’ve IDENTIFIED those culprits, and they’ve all become very familiar to us, from there the goal will be to get to where you can control these factors in a much more conscious and deliberate way. At which point we’ll all begin to experience far less random luck or unconscious success.
Finally, once you’re aware of, and can control, all of these more subtle, underlying dynamics…..Voila!!…..suddenly all of your pictures begin to look like the pictures “talented” photographers are taking.
But to get there, you have to think of every homework assignment as being a group effort.
I’ve already mentioned several times how important it is that we have a diverse make-up to our student body. The fact that we have artists, engineers, new parents, graphic designers, psychologists, software programmers, etc., all under one roof allows us to uncover insights that often go overlooked by photography programs who cater to one specific demographic.
So with regard to our assignments in here, the more diverse the results, the more culprits we can discover together.
And one last note on all of that. While I understand that there will alway be an underlying bit of human competitiveness here (“I need every one of my shots to be awesome!!”)….as well as some basic underlying insecurities (“why do I suck at this so much!!”)….I can’t stress enough how unproductive it would be to go into each homework assignment thinking “I hope I get great results; I hope mine are the BEST shots.”
This curriculum works much better when you go into each homework assignment thinking “I hope I can bring back a diverse mixture of case studies so that we have A GREATER BODY OF EVIDENCE that will help us better understand all these “culprits.”
Ok, so in summary here, every homework assignment in this course has been designed specifically to unveil “culprits.” We’re not looking to get “great shots,” necessarily, we’re looking to get as many insights as we can from each assignment. And that goal can be heavily undermined by human insecurity.
So just a note on insecurity here.
Experiencing several failed shots in a row can cause a lot of students to want to give up entirely, and it especially makes them reluctant to share their worst “takes” in our discussions.
When in most cases, it’s highly probable that the results those students were getting were EXACTLY the results I wanted. Because those results gave us 3 or 4 extra insights….insights that would have remained invisible had they attempted an “easier” and more successful shot.
So as you can see, I just want to make sure you’re in the right mindset for these assignments. We’re hunting for data and insights.
We’re not necessarily hunting for “great shots.”
The “great shots” come after you’ve encountered all the right insights.
Homework:
Remember that we don't expect perfect results for each of these homework assignments. Far from it.
I'm really just giving you some targets to aim at, and we're actually more interested in looking at the shots that "didn't hit the target.”
First, the SPIRIT of this week's homework:
This week's exercises explore how the passage of TIME can affect the changing elements within your frame.
That means that if you think back to our pendulum model, our pendulum "swings to the right" this week, in that we will first set our shutter for TIME we want, and then we have to use our aperture to compensate for the LIGHT.
Or...you set the shutter for the TIME effect you want, but then you have to "balance your meter" using your aperture.
***ONE IMPORTANT NOTE*** Please pay careful attention to the lighting conditions I recommend for each assignment. Technically, you have to deal with TWO different things this week: you're mostly playing around with TIME, but you will also have to compensate your LIGHT by balancing your meter.
But that's more than I really want you to have to worry about at the moment, I'd strongly prefer you put ALL of your mental efforts into trying to understand the TIME dynamics.
So please follow the instructions regarding lighting conditions very carefully, because if you stick to those guidelines, the exposure/metering part of each exercise shouldn't be too difficult or too distracting.
ASSIGNMENTS:
This week, I would like you to capture MOVEMENT in three specific ways:
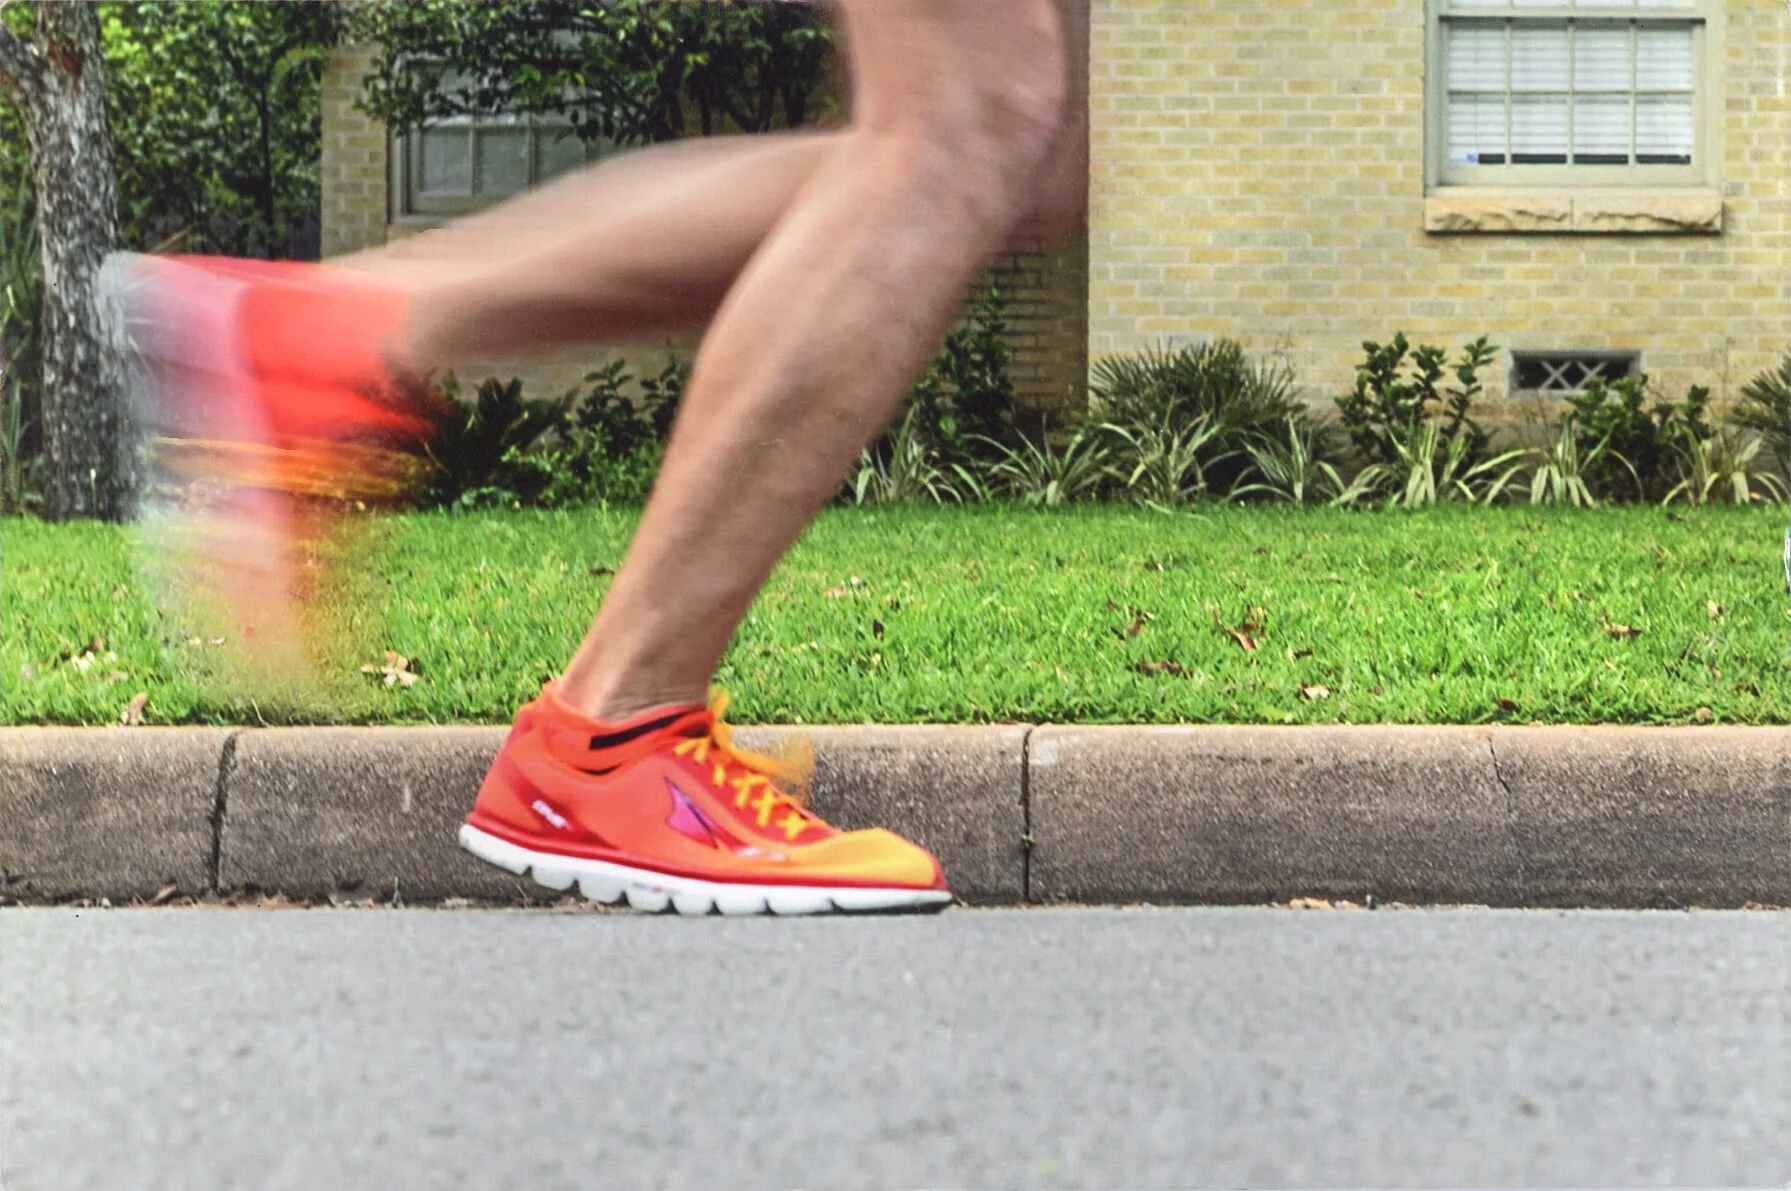
1) Freezing/stopping Movement:
Find some moving objects and freeze them in your frame. Try either to get pictures of things we cannot perceive in real-time (water being frozen into droplets, helicopter blades frozen, etc.) or try to work on your timing (dance, sports, people jumping, etc.).
You will accomplish this shot by setting your camera to the FASTEST SHUTTER SPEED THE LIGHTING CONDITIONS WILL ALLOW (generally you want to try to stay above 500), and then once you have set the shutter, you will attempt to balance the meter using your aperture.
**LIGHTING CONDITIONS*** Please do this in BRIGHT DAYLIGHT because you are likely to have difficulty balancing your meter using such fast shutter speeds in low-light conditions. Remember that for this week I don't want you to get too hung up on dealing with light/metering.
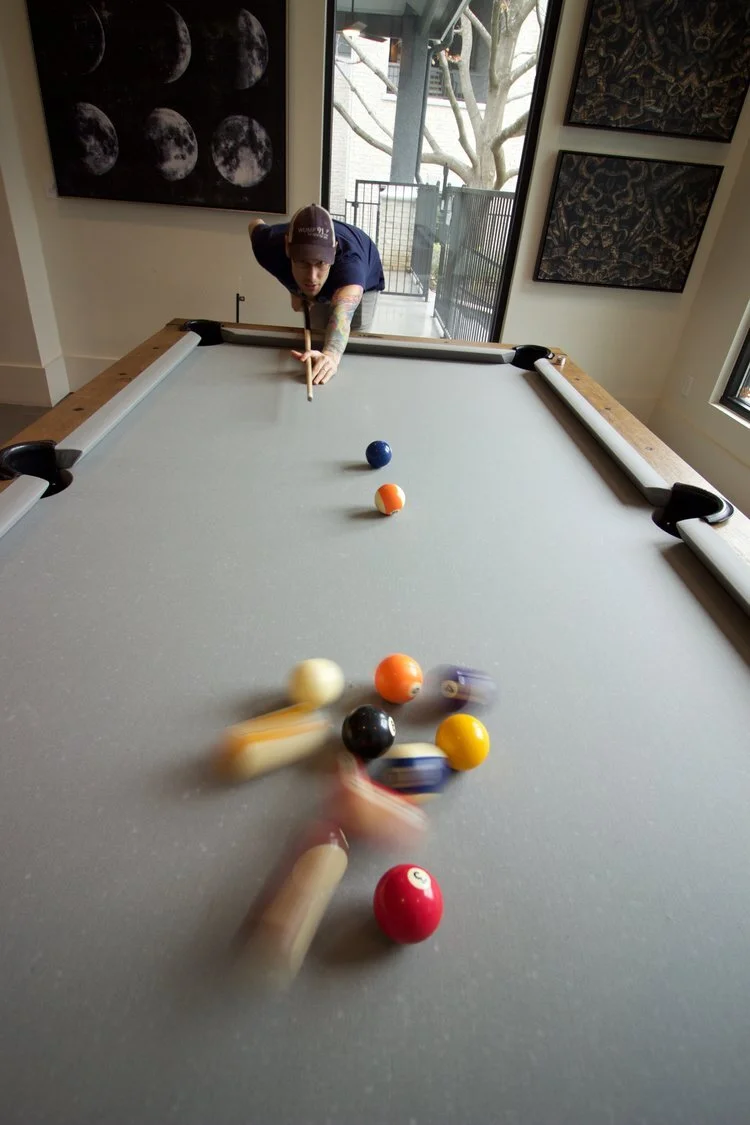
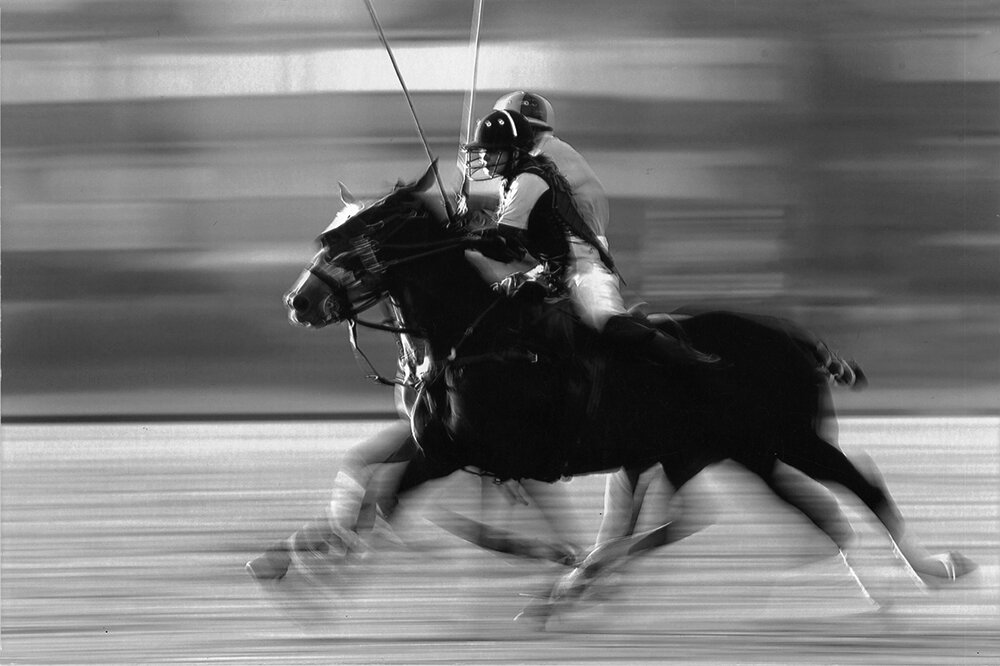
2) Conveying Movement or "Motion Blur":
Here you want to generate a visual cue that SUGGESTS movement to the viewer. For this you need a moving object to move across your frame WHILE the shutter is open and the picture is recording (like the subway shot we looked at in class). The general idea is to have the movement "blur" across the image. Try shooting things like cars, joggers, twirling umbrellas, shuffling cards, someone drumming, waterfalls, windmills, athletes, someone chopping vegetables, etc.
You will do this by first setting the camera to shutter speeds somewhere in the neighborhood of 15, give or take a stop (ie: you're looking to use probably 8, 15, or 30) . Remember, DO NOT use 8" or 15" or 30" as those are full seconds rather than fractions of seconds.
And just like with the first assignment, once you have set that shutter, you will then attempt to balance the meter using your aperture.
***LIGHTING CONDITIONS*** Please do assignment #2 in slightly lower light than assignment #1 (ie: don't do this in very bright daylight). Do this in the late afternoon/dusk or early morning/dawn, or in a very well-lit interior (like a room in your house that has a lot of window light coming in ). This is because you may not have an aperture small enough to shoot these longer shutters in very bright daylight, and remember I don't want you getting too hung up on exposure.
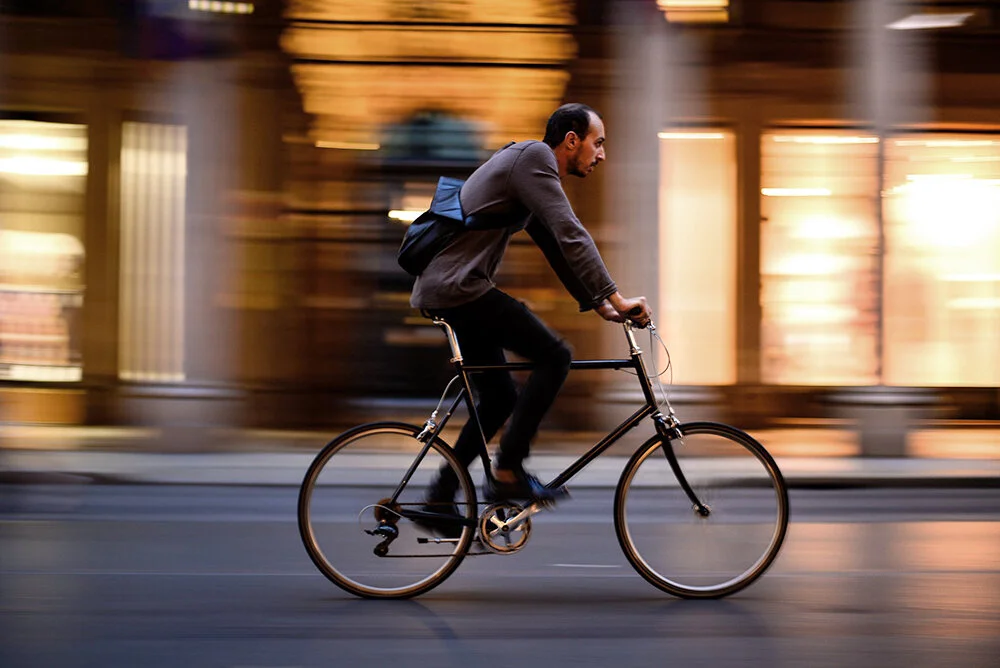
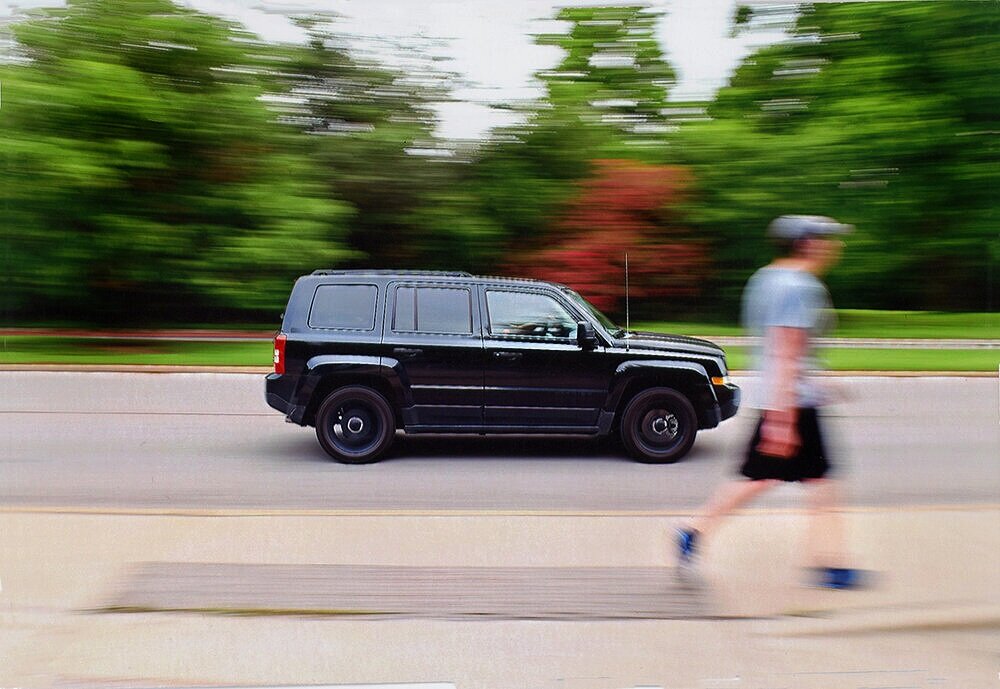
3) Panning (Moving your frame along with the action):
Finally, there's one last shot I would like you to attempt. This last maneuver is called a "pan" shot. It's basically the complete inversion of assignment #2 in that you will "track" (or follow) the moving subject with your frame. So even though the object is moving, because you are following it with your frame, the subject stays in the same position within the frame throughout the entire exposure. This means that the blur effect is now occurring on the background, not the subject.
This is done by using the same shutter speeds as with the previous assignment (around 15 or 8) but you will track (or follow) the subject through your viewfinder so that it remains in the same position in your frame throughout the exposure.
Try shooting cars, bicycles, rowers on town lake, etc.
And note that nobody will get this shot on the first try. Because KNOWING how to do it isn’t enough, this shot is all about muscle memory and motor coordination, and it may take 10 to 20 tries to get the hang of it.
***LIGHTING CONDITIONS*** Because you're using the same shutters as for assignment 2, you will again want to attempt these in the late afternoon/early morning or in a brightly-lit interior. These will be difficult to shoot in very bright daylight.
FINAL SUMMARY:
So just to relate this week's TIME homework with last week's exercise on general metering, you should understand that last week you were to find ANY combination of aperture and shutter that balanced your meter. This week you are to FIRST set your camera to a particular SHUTTER (for instance, use 8 or 15 for assignment #2) and then you are to use your APERTURE to balance the meter. (Our "Pendulum" has swung to the right).
PS -
Shutters: 1 2 4 8 15 30 60 125 250 500 1000
Apertures: 1.4 2 2.8 4 5.6 8 11 16 22 32
.