Ok. So consider this second half of today’s lesson to be a basic “Photo 101,” covering the very core functions on your camera.
I just want to note that the most important points in the lecture are highlighted in bold (ie: those are the parts you absolutely NEED to know), while the rest of the text is to help develop and contextualize those ideas so that they might make sense to someone who has never heard them before. But if you ever wanted to use this page as a refresher, you’d be fine to go back and read only the bold print.
And one more thing to keep in mind before we begin here: we won’t be discussing any STRATEGIES in this first lesson. We’ll just be doing a quick overview of the basic tools your camera has been given (and some of the vocabulary that accompanies those tools). We will begin discussing strategies next week….
Photo 101 Basics:
Ok, so the very first thing you need to know about your camera equipment is that, whenever you’re holding your “camera” in your hands, technically speaking, you’re actually holding two very different things. Your camera…and your lens.
I realize that most of you probably already know that these things are two separate entities, but I just want to make sure you know HOW separate they are, because they’re separate both in terms of their functions and responsibilities, but they’re also separate in terms of their importance.
So which of the two is more important?
Well most people will guess that it’s the lens. Perhaps because a good lens often costs a lot more than the camera. Or perhaps because they’ve heard a professional photographer say that it is.
And the truth is, they’re correct, it definitely IS the lens. The lens matters far more than the camera.
And not only that, some would argue that it’s almost ALL that matters.
So what do I mean by that?
Well, most CAMERAS are designed to do the exact same things — physically speaking — which is to say your camera has a lot of UNIVERSAL tools onboard, and is unlikely to differentiate your capabilities at all (in other words, owning one camera as opposed to another doesn’t generally change what you can and can’t do with your photography).
But lenses are not quite as “universal.”
Lenses are designed to be much more task-specific, which means that different lenses can do wildly different things. Thus, your lens will have way more impact on what you can and can’t do.
But then, why are there so many different cameras…and at such different price points?
Well, there are several reasons for that.
First of all, a lot of it is just marketing.
To give you an idea of what I mean by that, try to imagine the higher-ups at Canon going to their shareholders and saying, “Hey guys, this year we think we might only put out two models of camera instead of seven, because, I mean, we don’t really NEED seven different camera models, do we?”
Those executives would probably be fired on the spot. Because whether it’s necessary or not, giving the consumer 7 choices is more profitable than giving them 2, and so these companies feel pressured to come up with flimsy reasons to add more features and distinctions to their different camera models, just to be able to expand their line of products.
Thus a lot of the cameras in their line will actually take IDENTICAL pictures, but they’ll have a bunch of marketable features added to them just to differentiate the price point. This is almost certainly the case when you’re talking about, say, a $400 camera vs a $600 camera.
But even when it comes to the “substantial” differences between cameras, it still almost never affects your actual photography.
In other words, if you think about the kind of things that drive up the price of the camera (legitimate things, not just marketing noise), they seldom have anything to do with the actual picture you’re taking.
The first thing that drives up the price is durability. A $400 “consumer grade” camera is often made to be more flimsy and “plasticky,” which probably wouldn’t matter for the amateur who only uses it sparingly on holidays and vacations and whatnot, but if you’re a photojournalist who uses it every single day in order to shoot riots or warzones, or if you’re shooting in sub-zero temperatures, etc., you can’t really cheap out on the “build quality” of your camera. So you probably need something that’s been built more sturdily.
Thus, a lot of times, the only thing separating a $400 camera from a $1,000 camera is a much heavier and more durable outer shell.
But from there, the next thing that drives up the price of the camera is the set of “features” that’s been added to your onboard computer. So for instance, things like having a faster processor.
For an example of where a faster processor might be relevant, imagine if you’re looking through all the images you’ve already shot (perhaps to decide which images you want to keep or delete)…if your camera has a faster processor in it, it may allow you to scroll through thousands of images in an instant, whereas a cheaper camera, one with a slower processor, may take ages to scroll through thousands of images.
But there are other kinds of operating system “perks,” as well, such as a built-in GPS device, or bluetooth technology that allows wireless uploads of images, etc.
And some of these perks are fairly legitimate, and may even be deal-breakers for certain kinds of “pros.”
But the basic gist here is this: none of these differences from one camera model to the next will affect the actual PHYSICAL MECHANICS of how that camera captures light.
So just to be as clear as possible here, if you want to purchase a more expensive camera because it’s sturdier, and can handle more wear and tear, etc., that’s totally fine…but for the love of god, please don’t buy a more expensive camera because you think it will take “better pictures.” It won’t. In fact, it often won’t even take DIFFERENT pictures.
In terms of getting different kinds of images, the lens is what really matters here.
And while the specific nuances of all this will unfold in much greater detail the deeper we get into this course…on this very first day, the best way I can summarize it is this:
Whenever we have assignments in this course in which we use the functions on our CAMERAS to restructure our pictures, you will all be capable of getting the same results, whether you paid $400 for your camera, or $4,000. But whenever we have assignments involving the LENS…well, you won’t be equal at all. Some of you will be capable of getting certain results that other students flat-out can’t get, and some of you will be capable of getting certain results to a DIFFERENT DEGREE than your classmates.
So your lenses will separate you, not your cameras.
That’s the very first thing you need to know.
So then what does the camera do, PHYSICALLY, as opposed to the lens?
Well, at this point, your camera is mostly a small computer. It houses your technology, and It houses your image once its been taken. It also gives you access to your operating system, etc.
But from a strictly physical standpoint, in terms of actually taking a picture, your camera really only has one job.
THE SHUTTER:
Right in front of your camera’s sensor (the sensor is what records the light getting into your camera), there sits a small gateway, and that gateway is called a “shutter.”
I’m sure most of you have heard this term before, but I won’t take anything for granted here in the beginning of this course. So let’s fully explain 1) what the shutter IS, and then 2) what it looks like on your camera’s interface, and then 3) how we’ll use it strategically.
First, what is the shutter?
As I said before, it’s basically a door, or a set of “curtains,” that opens when you pull the trigger of the camera. And this allows the light in your scene to record (or “expose”) onto your camera’s sensor.
And very importantly, that shutter can remain open for any amount of time that you want. It can remain open for a small fraction of a second, or it could be open for 3 hours.
The amount of time you leave your shutter open is called a “SHUTTER SPEED.”
[Note, normally during an in-person class session, I would make sure everyone knows EXACTLY where the shutter speed is located on their individual cameras, but unfortunately, in this written format, each student is going to have to make sure they know where the shutter is located on their own camera, either by thumbing through your user’s manual, or perhaps doing a quick google search. If you have trouble locating your shutter controls, please contact me directly]
Ok, quick interjection - if we’re going to be discussing “shutter speeds,” that also means we’ll have to introduce our first set of numbers in this course, so just a quick preface about that:
First, there isn’t really any “math” in photography.
The reason I point this out is that I’ve spent 15 years teaching the “analytical mechanics” of photography to people who mostly identify as being “right-brained,” or “visual thinkers” and I know what tends to trip them up. And the very first thing that trips them up is if they think they’re having to do math.
But always keep this in mind:
While there are a lot of numbers in photography, those numbers are just “reference points.” We’ll never have to do any actual CALCULATIONS with those numbers.
In other words, there will be no adding, no multiplying, no subtracting, and no dividing.
These numbers are going to be very MEANINGFUL to us, sure, but more as “reference points,” because they inform us about things going on in our scenes.
But we won’t be doing any actual math.
I say all of this because if you identify as sort of an “anti-math” personality type, you might start feeling overwhelmed with all of the numbers I’m going to be giving you.
So just keep reminding yourself that the numbers in photography are more analogous to the numbers in your own street address at home, the numbers in your address are a meaningful reference point, but you never need to do any math when trying to find someone’s house.
Photography is a bit like that.
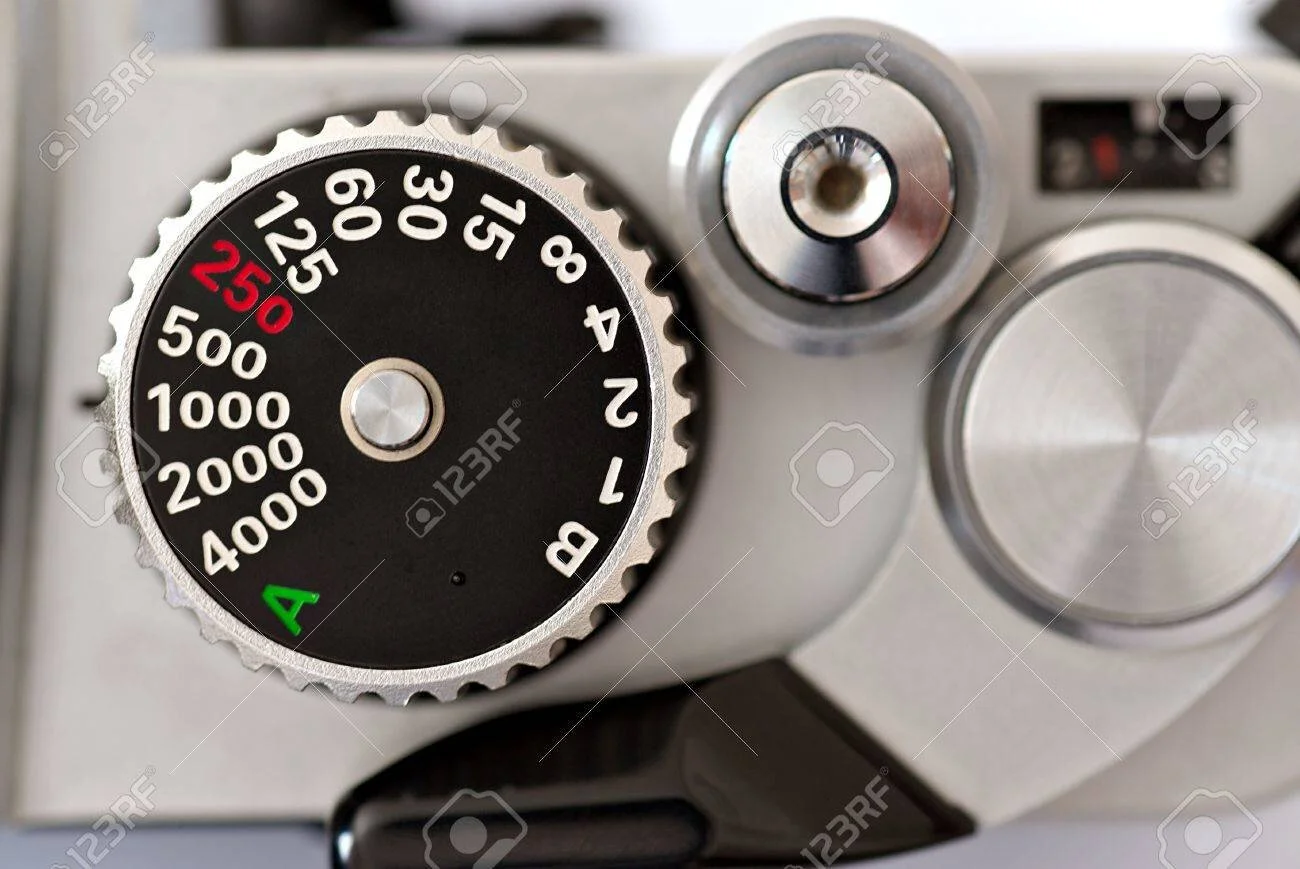
But having said all that, let’s take a look at the “traditional” shutter numbers.
Basically, they begin with 1, and then from they they start doubling, so the traditional list looks something like this:
1 2 4 8….
Now, you would probably assume that the next number in the pattern would be 16, right?
I know I would.
But you would be wrong ; )
The next number in the sequence is actually 15.
Why?
Well this is going to be the first of many “annoying quirks” about the way our equipment has been designed.
The original rationale, here, was that this pattern of numbers was created by the world’s first mass-produced camera makers, way back around the year 1900. And those original camera makers thought that if they made the next number 16, then the NEXT number would have to be 32, and then the next would have to be 64, and the next 128, and so forth.
And here’s the thing, we CURRENTLY live in a society that is pretty used to hearing numbers like 64, 128, 256…., because we see those numbers all the time on memory sticks and hard-drives, etc…… but back in 1900, those manufacturers felt that these numbers might not really resonate with the general public, so they decided that if they ROUNDED 16 down to 15, then the next number in the sequence could be a “cleaner” 30 instead of 32, and then 60 instead of 64, etc.
So that makes the pattern look more like this:
1 2 4 8 15 30 60….
They just thought it would look cleaner.
Ok, so the NEXT number should be 120, right?
Well, once again, the designers intervened and said, “but 120 would lead to 240, and 240 leads to 480….” and, again, they thought those numbers wouldn’t really resonate with people.
So they rounded 120 up to 125.
That way the next number in the sequence can be a “cleaner” 250 (instead of 240), and the next number could be 500 (instead of 480).
So finally….at along last, here is the full sequence of traditional shutter numbers:
1 2 4 8 15 30 60 125 250 500 1000 2000 4000
Basically, they begin at 1 and from there they double…but two of these numbers have been rounded (15 and 125) so as to keep the pattern a little bit “cleaner.”
Now, I would totally forgive any student for thinking that this decision was ENTIRELY STUPID and annoying. But if I may, having been teaching this material for a long time now, I think I’m actually kind of glad they did this. Yes, it’s a bit confusing on this very first day of class, because it means you have to memorize two irregularities in this pattern. But long-term, it means we’re dealing with numbers like 250, 500, and 1000….as opposed to 256, 512, and 1024.
So one more time, the traditional shutter numbers are:
1 2 4 8 15 30 60 125 250 500 1000 2000 4000
Ok, so what do these numbers mean?
Well, before we get into that, I have to interject here and say that, if you’re looking at the shutter display on your own camera right now, you might have a couple of questions.
The first question you probably have is “Wait, I have MORE numbers than that, what’s going on here?”
Like I said, these are the “traditional” shutter numbers.
But modern cameras have added a lot of “extra” numbers to this sequence (in my opinion, kind of annoyingly).
On most of your modern cameras, in between the numbers I’ve written here, you will have two “extra” numbers. So for instance, between 8 and 15, most of you will see “10” and “13.”
These extra numbers are called “1/3 stops” (“one-third stops”).
So what are they?
Well, for a very long time, cameras were made with ONLY the numbers I’ve written above (the traditional shutters).
But at some point, maybe around the early 1990’s, cameras began to have “operating systems” installed, ie: onboard “software” that you could use to govern the camera’s functions, as opposed to just using analog switches and dials.
And this was the greatest marketing bonanza that Canon and Nikon ever stumbled upon.
Because back in, say, 1976, when Nikon came out with a new camera model, the most they could do to distinguish it from the previous year’s model was to maybe try to make it a little more ergonomic, or to build the camera out of a lighter and sturdier metal alloy.
There wasn’t much incentive for a photographer to “upgrade” every year.
But when operating systems came about, it allowed Canon and Nikon to keep adding new “features” to that operating system, new “updates,” which pushed photographers to keep upgrading.
And one of the very first things they did was say “Well, now that we have these fancier operating systems, we don’t need to use these old shutter increments anymore. Our new computerized cameras can have MORE increments on them (in fact, three times more!!), which would make our cameras more “precise” than the other cameras on the market!
Ok, so does any of this matter? Do all those “extra” numbers give you any sort of advantage at all?
Not really.
It turns out, the people who originally created that first set of numbers actually knew what they were doing, and that there was a good reason they chose those increments. Which is to say that you can fully control the outcome of your picture using only those original numbers.
These “extra” numbers were just a marketing gimmick.
But the problem is, once one of the camera companies did this, they all had to do this, because they didn’t want the public to think their cameras were any less precise or advanced than their competitors. It was classic “escalation.”
And unfortunately, once we add something to our operating systems (even if it’s just a marketing gimmick)….we never seem to go back. We’re stuck with it forever.
Which means we’re all stuck with these “extra” numbers” now.
So is that bad? Are these extra increments inherently evil?
No, not at all. It’s just that: 1) they don’t in any way improve your photography, and 2) when students are brand new to this, these extra numbers add a lot of unnecessary “clutter,” and it makes it much harder for beginners to grasp the original logic behind this system.
So my official stance on this is going to be that, for the entirety of Photo1, we’re going to ignore those extra numbers. Just pretend they aren’t there.
There are 4 or 5 reasons why I prefer to do it this way, and most of them will become clearer as we get much deeper into the course. But for now, on this first day, let’s just leave it at this: I don’t want these concepts to be any harder to learn than is absolutely necessary. And these concepts will make MUCH more sense if we just stick to the “traditional” numbers.
However, after this course ends and these concepts all make total sense to you, if you then want to start incorporating those “extra” numbers into your thinking, it’ll be very easy for you to do (although still totally unnecessary).
Ok….so one last time, here are the traditional shutter numbers:
1 2 4 8 15 30 60 125 250 500 1000 2000 4000
Alright, the next question you might have - if you’re looking at your own camera’s display - is that “Wait, even if I ignore those “in-between” numbers, my shutters still don’t look EXACTLY like that.”
Yep. Some of your cameras will display these numbers as fractions: 1/1 1/2 1/4 1/8 1/15 1/30 1/60 1/125 1/250 etc.
And now we arrive at the first point where your own equipment might start to diverge from your classmates.
About half of you will see these numbers written as I first introduced them to you above (1 2 4 8…), and about half of you will see these numbers written as fractions (1/2 1/4 1/8 1/15…).
Why?
Well, it’s a bit of a long story. And to understand it, you first need to know what these numbers actually mean.
Recall that these numbers are called “shutter speeds,” and that they represent a very specific AMOUNT OF TIME that the shutter will stay open.
And even though a lot of cameras will say 60, what that really means is that the shutter will be open for exactly 1/60 of a second (one-sixtieth of a second).
So that means that these numbers are very famously “backwards.”
1 is huge…..and 4000 is tiny.
To clarify….the reason “4000” is actually a very SMALL amount of time is because the shutter will be open for only 1/4000 of a second. Which is so fast that it’s totally imperceptible to our senses. We can only IMAGINE the shutter opening for 1/4000 of a second, but we can’t actually perceive it.
Whereas “1” means the shutter will be open for an entire second, which is actually a relatively long amount of time. We can perceive it.
In fact you can see for yourself if you want. Simply set your shutter to 1, and then pull the trigger. You can hear the camera stay open for 1 full second.
Then, for comparison, set it to something like 1000, and hear how much faster the shutter moves.
So again, the first thing a lot of photographers learn (very famously) is that these numbers are backward. The higher numbers mean LESS, and the lower numbers mean MORE. And wrapping your head around that is almost like a ‘rite of passage” in photography. Everyone goes through it.
But ok, so why not just say 1/60? Why display it as 60?
To answer that, we have to go back to the year 1900 again. When they were designing the very first mass-produced cameras, remember they didn’t have digital display screens, so they actually had to paint these numbers onto a physical dial that was built onto the exterior of the camera. And they quickly realized that putting a “1” on top of every single number took up twice as much space… so they could either build the dial to be TWICE as big (or make the print illegibly small)……or they could just drop the 1 from each number, and the photographer would simply have to know that 60 really meant 1/60.
So that’s what they did.
They listed only the BOTTOM number of the fraction, because the top of the fraction is always 1
And this started a “slang” in photography, where, to this day, a photographer will usually say “250” when they mean 1/250.
But to finish this story, fast forward all the way to the 1990’s again, suddenly cameras had large display screens on them, which had the ability to display ONLY the shutter you were set to at the moment (in other words, you didn’t need display the entire shutter scale, like you did on those old dials, you could simply display the one shutter speed that you were currently set to), and so camera companies were no longer worried about how much space each number would take up on the display.
And at this point, some cameras started putting the full fraction on the display screen (1/250), because they thought that would be more accurate, or would at least make more sense.
Which is great, I’m all for it. It probably DOES make more sense to do it that way.
But here’s the problem. Not ALL cameras did this. Only about half. The other half stuck with the traditional way of just displaying 250.
So now we’re all divided.
Half of you will see 250, and the other half of you will see 1/250.
And just to be totally clear about what these camera companies did here….they took something that was already sort of confusing to begin with (the fact that these numbers are “backward,” or inverted), and then, on top of it, they also made it INCONSISTENT.
Yay, camera companies!
But here’s the greater point I want to make. In this course, I’m going to be articulating these shutters as a whole number, not as a fraction (ie: the old fashioned way).
Here’s why. 1) Most of the literature your going to find about photography still tends to use 250 instead of 1/250, so if you’re reading up on any of this, you need to get used to seeing those numbers, and 2) while about half of your operating systems display the number as a fraction on the BACK of your camera, for many of those same cameras, if you look through your viewfinder, the number displayed inside your viewfinder is usually just 250. This is because once again, they’re trying to save space - your viewfinder is much smaller than your LCD screen, and they don’t want the shutter number to take up the entire viewfinder.
So long story short, I would say closer to 75% of you will see the older, “whole number” style shutters, whenever you’re actually composing and taking your images.
I’m trying to be as democratic as possible, here, and if one day this ever flips, and 75% of you have fractions written in your viewfinders….I’ll flip too.
But for now, you will need to know that when I say “60,” it really means 1/60.
Ok, but in summary, one more time, these are the shutter numbers:
1 2 4 8 15 30 60 125 250 500 1000 2000 4000
And what we’ve established so far is that 1) they represent FRACTIONS OF SECONDS, 2) they may not quite look the same on every camera, and 3) we’re ignoring the “in-between” numbers.
That’s all.
Ok, so there’s one last little logistical issue we have to cover here before we can get into the real purpose of these numbers:
When scrolling through the shutters on your camera, many of you may notice that you can scroll “lower” than 1. In other words, once you get down to 1, you can still keep scrolling, but if you keep going you’ll see the same pattern repeats in the opposite direction but with one important difference….every number will now have a “quote” mark next to it. So if you keep scrolling past 1, you should see: 2” 4” 8” 15” 30”
Again, the same pattern as before…..but this time with a quotation mark.
This means you’re now dealing with FULL SECONDS as opposed to fractions of a second.
So to be as clear as possible, if your shutter is set to 15, the shutter will stay open for one fifteenth of a second, but if your shutter is set to 15” the shutter will stay open for fifteen full seconds.
And while they make LOOK very similar on your display, that is a WILDLY different amount of time. So you’ll want to pay close attention to which of those you’re actually set to.
Finally, if you keep scrolling through your shutters in that direction, then most of you will hit a wall after 30.” And after that you may see something curious, it will probably say “Bulb,” or maybe just “B.”
So what is “bulb?”
Well, bulb is the camera-maker saying “if you want a shutter speed longer than 30 seconds, you’re just going to have to do it yourself.”
They’re not going to program the camera to stay open for 1 minute, and 2 minutes, and 4 minutes, etc., instead, they’re giving you a manual open/close switch, and the way it works is that, when you’re set to “bulb,” you PRESS the trigger to open the shutter (as you normally do), but the difference here is that the shutter will remain open as long as you keep holding the button down.
Then, the moment you release your finger from the trigger, the shutter will close.
So you can open and close the shutter at your own leisure, rather than for a specific, pre-set amount of time.
In other words, you can simply hold it open as long as you want.
So why on earth would we ever need that?
Well, take a look at these pictures here:
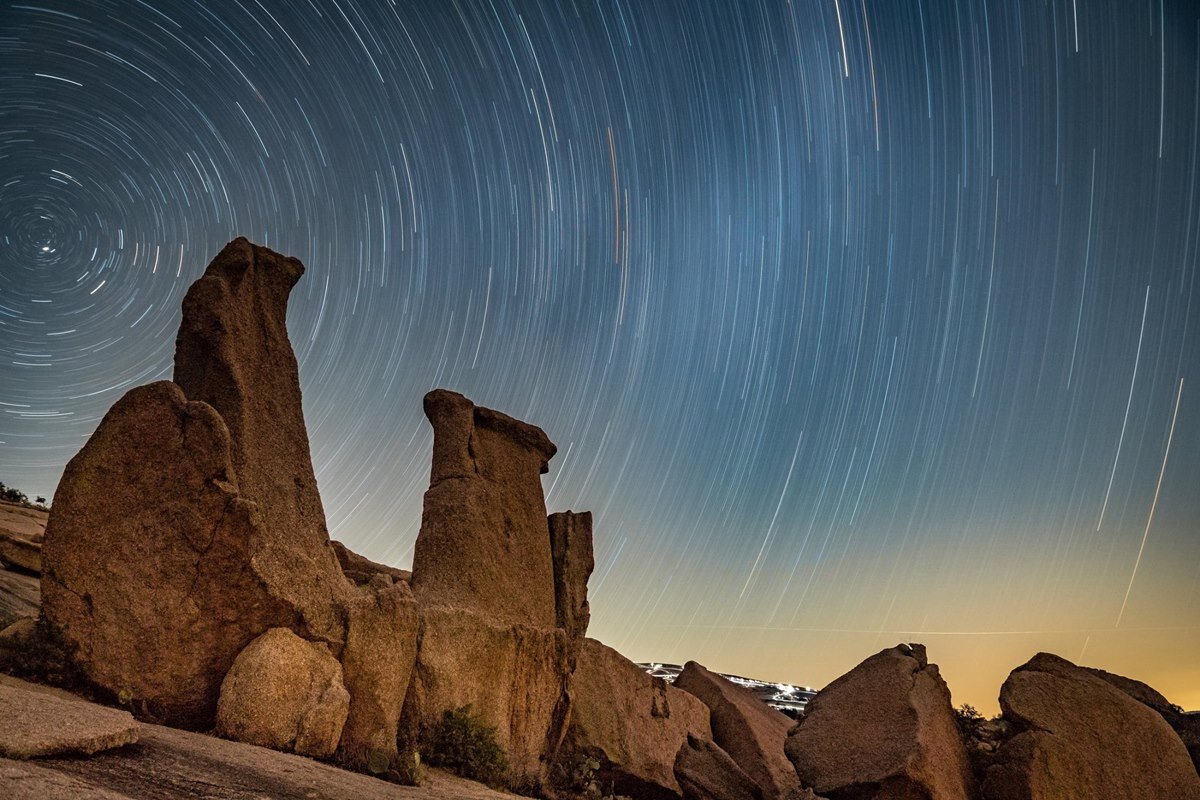
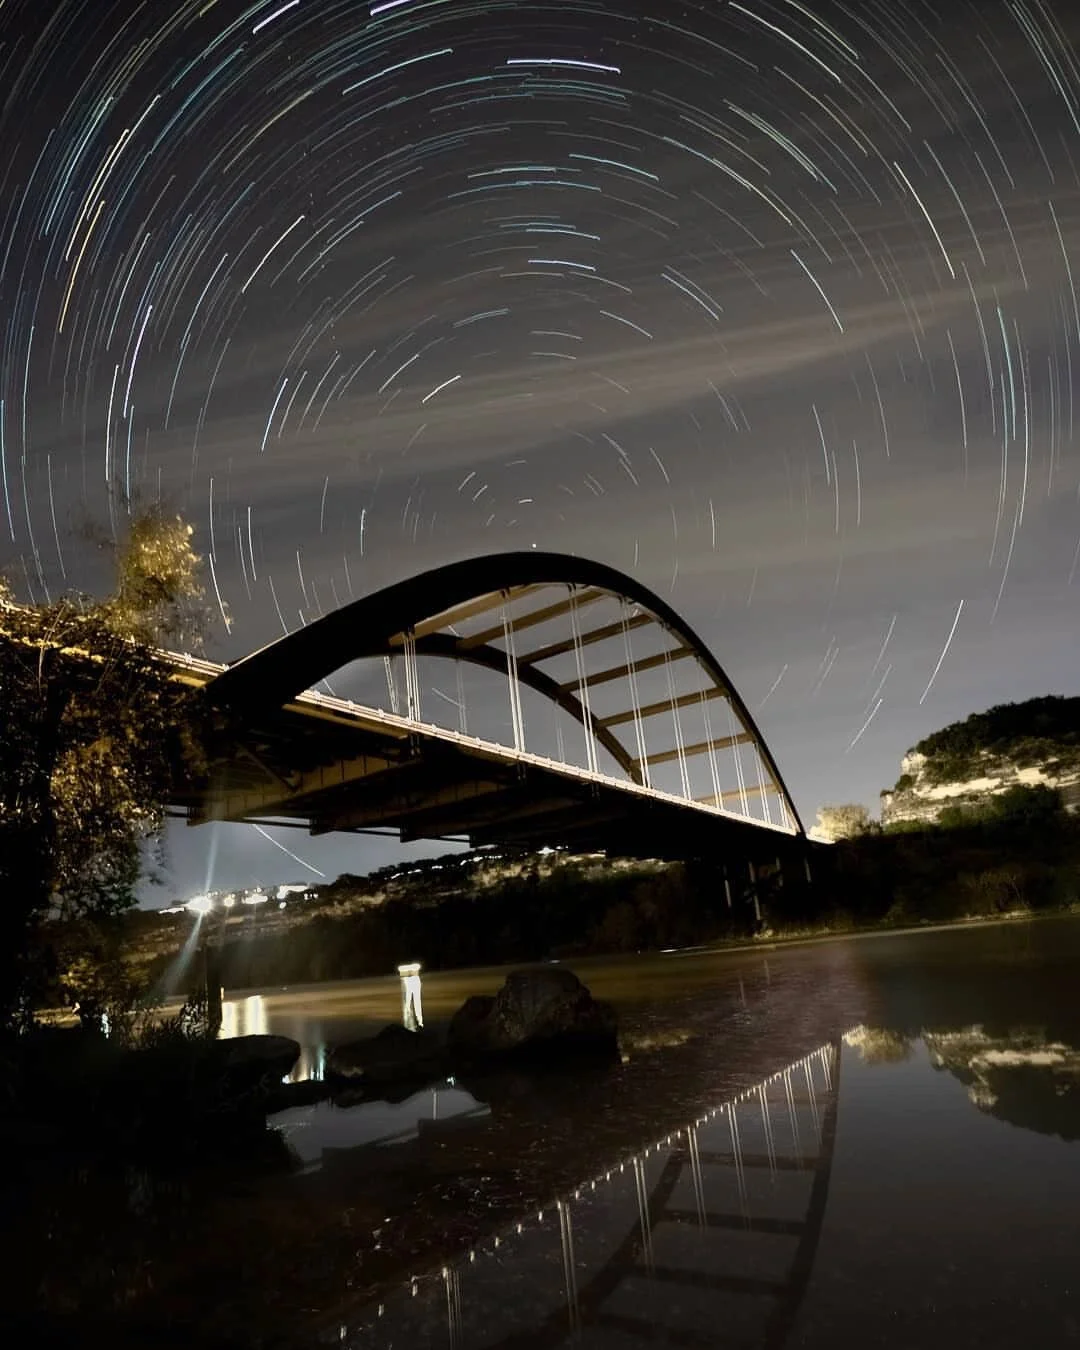
These were both taken by ASOP students.
And this technique is called “Star Trails.”
The idea is that, on a clear night, if we were to leave the shutter open for a VEY LONG time, perhaps as long as a half-hour to an hour, then the Earth would actually have time to rotate while the shutter is still open and the picture is recording. Which means the stars will have time to change position in our composition.
[quick side note: if you’re using bulb for that length of time, don’t worry, you won’t need to keep your finger on the button for an hour….that would be INSANE….the way it works is that for super long exposures you have to buy a “remote” trigger, kind of like a remote control, which usually allows you to press the shutter button and then “lock” it, so that it stays open continuously. Then you can come back an hour later and “unlock” it so that the shutter can be closed]
Ok, so now we’re finally getting to the good stuff.
I know this shutter discussion has been tedious up until now, because we’ve had to clarify a lot of annoying details and quirks about these numbers, etc.
But now, I’d like to discuss what we’re going to DO with our shutter speeds…..ie: what shutter speeds actually bring to the table.
The shutter allows you to control two entirely different aspects of a photograph. And I need to preface this by stating that those two aspects are going to have absolutely nothing to do with each other.
First, your shutter can control the amount of LIGHT that gets into your camera.
Obviously the longer you leave the shutter open, the more VOLUME of light will expose onto your camera’s sensor. And this affects how bright (or dim) the image will appear.
However, and totally unrelated to that, your shutter can also control HOW MUCH TIME PASSES while the picture is being made.
So again:
1) How much LIGHT you’re letting into your camera
2) How much TIME is passing while the picture is recording.
To understand the difference between those two things, let’s go back to this “Star Trails” image:
Let me ask you this? If I told you that we used 30-minute shutter to achieve this image…do you think that it took 30 minutes to expose this AMOUNT of light onto our sensor? In other words, do you think it takes 30 minutes to achieve this amount of “brightness?”
The answer is no, not even close. Even at night, you could probably achieve this amount of exposure (this amount of brightness) in just a few seconds.
So then why did we need 30 minutes?
Well, we needed 30 minutes because we needed enough TIME TO PASS, that something in our scene had enough time to CHANGE, or to OCCUR.
In this specific case, we needed enough time for the Earth to rotate a little bit.
So can everyone here see the difference between HOW MUCH LIGHT we’re letting into the camera….as opposed to GIVING OUR SCENE ENOUGH TIME TO CHANGE?
Those two concepts are entirely separate, and if you want to be able to control these phenomena, you need to learn to think of them as being separate.
So here’s the very first thing I want you to understand about your shutter (in terms of strategy - in terms of “how we’ll use it”): The shutter can either control the amount of LIGHT we’re exposing, or it can control the amount of TIME passing. But we’ll almost never use it for both of those things in the same image.
It’s going to be either/or..…not both.
So while today we’re just introducing this vocabulary…several weeks from now it will need to be very clear and organized in your thinking, “when I go to set my shutter, am I setting it for the amount of LIGHT I want….or….am I setting it for the amount of TIME I need to pass?”
Because you won’t be using it for both.
But no worries…this doesn’t need to be nailed down today. Today I just want you to begin familiarizing yourself with this mindset, and with these terms.
There will be plenty of opportunity to solidify these concepts later.
So before we move on, let’s summarize everything we know so far about shutter:
1) We know what it the shutter is physically (it’s a curtain that opens and closes for a specific amount of time),
2) We know what numbers are associated with it (1 2 4 8 15 30 60…) and that those numbers represent FRACTIONS of seconds
3) We know what we’re going to do with them strategically (Light OR Time, never both).
So far, that’s all I need you to know. Swear to god.
And as I said at the top, that’s mostly all your CAMERA really does. Your camera is basically a sensor with a shutter in front of it. The rest is just bells and whistles (although we’ll eventually explain some of the more useful bells and whistles, later on).
So if that concludes our introduction to the camera and shutter, let’s move on to the other half of this system: The Lens.
Your lens actually has a lot of different core functions, but for today, I only really want to discuss one of them.
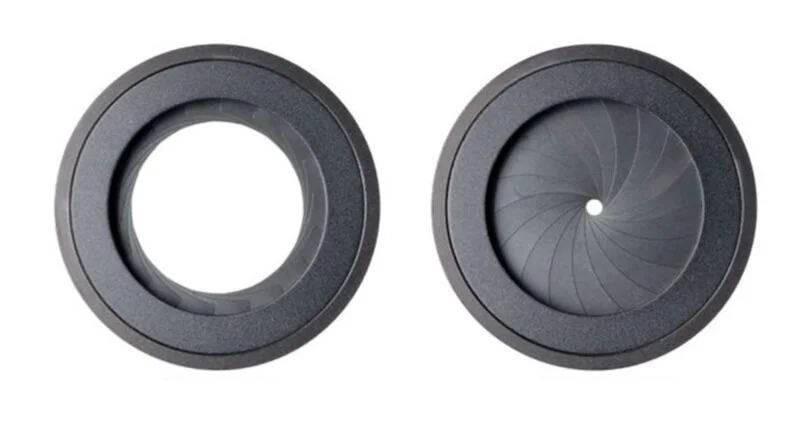
Inside your lens, there’s a tiny opening, an iris, called the “APERTURE,” and that aperture can widen and shrink, just like the pupil in your eye. In doing so, the aperture can also regulate the amount of light that comes into your camera. But it does it in a slightly different way than shutter.
Rather than regulate HOW LONG we let the light in (which is what your shutter does), it instead regulates HOW MUCH light is passing into the camera at any given moment, by feeding the camera either a wide-open gushing amount of light, or a very narrow trickle of light.
So let’s now discuss the Aperture in exactly the same terms we discussed the shutter.
We want to know what it is, we want to understand the “numbers” that have been assigned to it, and most importantly, we want know how we’re going to be using it strategically.
Ok, in terms of what it is, physically, as I mentioned before, it’s a valve that can narrow and widen. Much like the iris muscles in your eye.
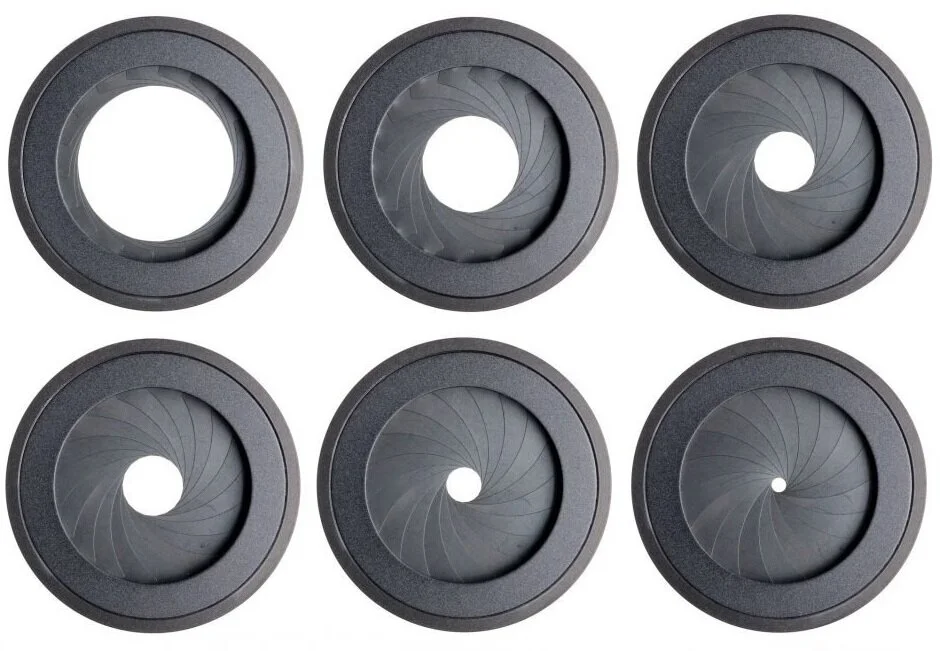
That’s what the aperture is, physically
So let’s get right to the [very famous] set of numbers that are associated with it.
But first, I want to invoke the same preface as before: “yada yada yada…there’s NO MATH in photography….but…..because of all the numbers, it kind of seems mathy.”
[Also, same apology as before. Normally with an in-person class, I would make sure everyone knows how to find and manipulate the apertures on their own equipment, but in this case, if you can’t figure out where your apertures are, please contact me]
The “traditional” aperture numbers are as follows:
1.4 2 2.8 4 5.6 8 11 16 22 32
Ok, so there will usually be a LOT of questions about these numbers.
First, looking at these numbers on your own equipment, you’ll probably have the same exact questions you had about the shutter. For instance, you all have “extra” numbers again. So between 5.6 and 8, all of you should have 6.3.
And same deal as before… we’re going to ignore those numbers, because, again, those “extra” increments were mostly just a marketing gimmick and won’t improve your photography at all, and, furthermore, given that these numbers are hard enough to memorize as is, you absolutely don’t need to clutter your mind with “6.3.”
So one more time, go ahead and ignore those extra, “in-between” numbers.
Next, if you scroll through your own aperture numbers, you might also ask, “Hey, wait a minute, I actually don’t have ALL the numbers you listed?”
This is true.
Whereas you probably had ALL of the shutters that I listed, in the case of aperture, you will NOT have all of the apertures numbers I’ve listed. For instance, some of you will have a range that begins at 4 and ends at 32, and some of you might have a range that begins at 2.8 and ends at 16.
No lens ever made has ALL of these numbers.
Which means that if you want access to all possible aperture numbers, you will have to purchase multiple lenses.
So remember earlier when I said your cameras are all pretty equal, but your lenses will differentiate you? Well you’re already starting to see some tangible evidence of that.
But don’t worry too much about it - absolutely none of you needs to rush out and buy a new lens. Let’s first learn this material, and then, once all of it makes complete sense to you, you will be in a much better position to determine which new lenses are worth investing in for your own personal photography.
But back to apertures.
One more time, these are the “traditional” aperture numbers, and keep in mind that your own lens won’t have ALL of them….just a limited range:
1.4 2 2.8 4 5.6 8 11 16 22 32
Ok. So looking at those numbers, at a glance, they can seem really bizarre (and even intimidating). There are a bunch of decimals in there, so it starts seeming kind of “mathy”, and on top of it there doesn’t even seem to be any obvious pattern.
But there actually IS a pattern. Can you spot it?
These numbers double, but not every time….they double EVERY OTHER iteration.
In other words 2 doubles to 4, which then doubles to 8, etc. And in between those, you have 1.4 doubling to 2.8, which then doubles to 5.6, etc.
The only one that’s been “rounded” is 11. That number should technically be 11.2, but think back to when they were building older, analog cameras. In order to fit 11.2 onto the dial they would have needed 3 digit spaces instead of 2 digit spaces….so they decided that it would be easier to round 11.2 to 11, so that none of the apertures numbers would have more than 2 digits. And once again, we’ve kept with that tradition ever since.
So that’s the pattern. They double EVERY OTHER iteration. And I’ll explain WHY we use that pattern in a minute.
But first, the other thing you need to know about these numbers is that, like the shutters, they are also BACKWARD.
In other words, the BIGGEST, most gaping aperture is 1.4, and the TINIEST little pinhole aperture is 32.
So here we have 1.4 on the left, and 32 on the right:
Why?
Well, same reason as with shutters. These numbers are actually fractions.
But this time we’re not talking about fractions of a second, instead, each one of these is a fraction of how long your lens is.
So in order to visualize this properly, imagine a pro sports photographer using one of those GIANT lenses.
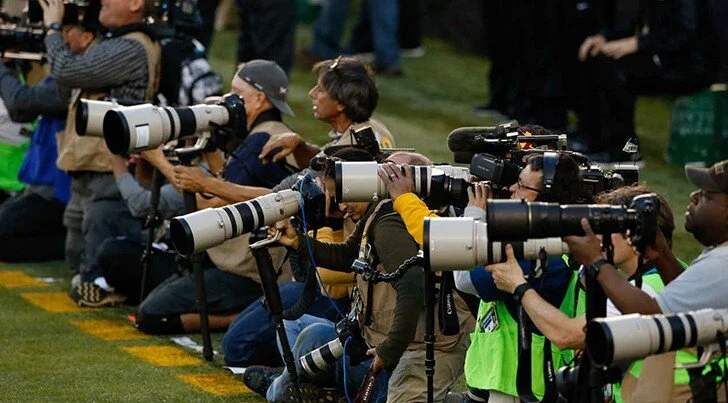
If you took the length of that lens, and then divided it by 2, then you’re talking about a HUGE opening, because the distance across the aperture is now HALF the total length of the lens. Which, again, would be huge. And that’s why those lenses aren’t just longer than the average lens, but they have to be built with to be much wider than the average lens, too.
But on the flip side, if you set your lens to 32, then you’re only talking about 1/32 the length of that lens, which would be a relatively small opening.
So that’s why these numbers are backward. That’s why 2 is a larger opening than 32.
And by the way, this isn’t really something that you NEED to know. In other words, this will never ever come up in your shooting - this is mostly just trivia. Most photographers don’t even know the WHY behind any of this. They just know that these numbers are “backward” for some reason.
[As a quick side note, here’s a bit more trivia: most of your cameras will express the lens length as “F.” In other words, most of you will see an “F” next to each of your aperture numbers, so on your operating system, these numbers might look more like F1.4 F2 F2.8 F4 F5.6….etc. Again, just to satisfy your curiosity, the “F” stands for “Focal Length,” which we’ll come to understand as “how long your lens is.” So, just FYI, that’s why you might see an “F” next to your aperture number]
But again, can’t stress this enough: you don’t really NEED to know any of that yet. Just trying to satisfy your curiosity here.
And finally, for anyone who wants a COMPLETE understanding of what these aperture numbers really mean, I’m going to go just a bit further with this trivia…
You might still be looking at these apertures and thinking, “I sort of get why they’re “backward,” but why do they need to be these PARTICULAR decimal numbers? 2.8? 5.6? They sound kind of strange.”
Well, the reason these aperture numbers are so strange is because they were designed to CONFORM TO YOUR SHUTTERS. In other words, the shutters were designed first, and they were designed to be fairly simple and logical. But then the apertures came next, and they needed to be designed to work with, or to accommodate, those shutters.
To understand the full “origin story” for these apertures, let’s go back and have a look at some Photo History:
When photography first became common (back around the 1850’s), we didn’t actually have any “shutter speeds” because we didn’t have SHUTTERS.
There was no physical shutter on the camera. Instead there might have been something closer to a “lens cap” covering the lens, and the photographer would simply take the lens cap off, at which point the picture would begin exposing. And then after a few minutes, the photographer might look at their pocket watch and say “Eh, 4 minutes ought to be enough,” at which point they would put the lens cap back on, which would end the exposure.
No kidding. That’s how it worked.
And not only was this a very inexact way of taking the pictures, but worse than that, every photographer was using different chemicals to expose with, different vocabulary, different increments of measurement, etc.. Nothing was standardized. Every photographer was doing their own thing.
So a few decades later, the photography community got together and said, “look, if we want to advance this medium at all, we need to be able to achieve more exact results, and more consistent results. We need more standardized processes, and more standardized increments etc.
So when they got together to sort it all out, they could have done anything they wanted (because they were the first ones to set any kind of standards at all, and photography was more or less a “blank slate”), and what they CHOSE to do is to start by establishing a basic unit of measurement. A basic incrementing of light.
They decided that, going forward, whenever a photographer wants to INCREASE the amount of light in their picture, they must do so by DOUBLING the amount of light. In other words, if you want more light than you’re currently getting, the next increment on your camera dial should DOUBLE the light. If you still want more light? You’ll have to double it again. And so forth.
Light will always be increased by doubling it.
And conversely, they decided that if a photographer wants to DECREASE the amount of light in their picture, they must do so by CUTTING THE LIGHT IN HALF. So if you want less light than you’re currently getting, then the next increment on your camera dial will HALVE the light. Still want less light? You’ll have to halve it again. And so forth.
So they decided that we’ll always be doubling or halving our light.
And we still use this increment today, but we call it a “STOP” worth of light. So for instance, you might have heard a photographer say something like “I’m going to overexpose this picture by 1 stop.”
A “stop” just means double or half the light.
Ok, so once that had been established, the next step was to look at all of the different FUNCTIONS in photography, and then conform each of those different functions to 1-stop increments.
So they first looked to the TIME function (which we now call “the shutter”), and they said, ok, so we need the TIME to be able to double and halve.
And that was pretty easy.
They just took a basic universal unit of time (1 second), and decided to cut in half (1/2 second) and then cut it in half again (1/4 second) and then again (1/8) and so on.
And on the flip side, we can also double it.
We can go from 1 second to 2 seconds to 4 seconds, etc.
Easy peasy.
But then they turned their attention to Aperture.
And aperture wasn’t quite as easy, because instead of just taking any unit of time we want and then simply doubling and halving it, with aperture, they knew they were dealing with geometry.
They knew they needed the [circular] opening of the lens to get twice as big, or half as big, with each increment. So they had to do some geometric math (THEY did….you don’t) in order to determine which exact aperture numbers would serve as the correct ratios of lens-length so as to cut the area of the circle in half every time.
And when they ran that math, these are the ratios that that math spit out:
1.4 2 2.8 4 5.6 8 11 16 22 32
These are the ratios that cut the size of the circle in half each time. So these are the numbers we use.
Ok, but I’m going to repeat this one more time: you don’t HAVE to know any of that.
I seriously don’t think I’ve ever met a pro photographer who knows anything about what I just explained to you.
I only went this deep in the weeds here to satisfy some of your curiosity, but also because I wanted you to have some insight into the mindset of the people who designed your system.
I wanted you to get a glimpse of WHY these number are what they are.
But at the end of the day, all you NEED to know is that these are the aperture numbers:
1.4 2 2.8 4 5.6 8 11 16 22 32
The numbers on the left are BIGGER openings, and the numbers on the right are SMALLER openings.
I also need you to know that each of these apertures is exactly 1 STOP apart from the next. Meaning that as you make the aperture number smaller, you will be incrementally doubling the light with each step on your dial, and as you make the aperture number bigger, you will be incrementally halving the light with each step on your dial.
That’s it.
Ok, so then our last step here today is to start putting these ideas TOGETHER.
The first thing we established here is that your camera has a SHUTTER inside, which can control your light in “1 stop” increments.
And then we learned that your lens has an APERTURE inside that also controls your light….in the very same “1 stop” increments.
So some of you might see where this is going.
If both of these functions can be used in the exact same increments…..then maybe they can be used INTERCHANGEABLY. Or they can be used to compensate for one another.
So let’s put these two functions together, shall we?
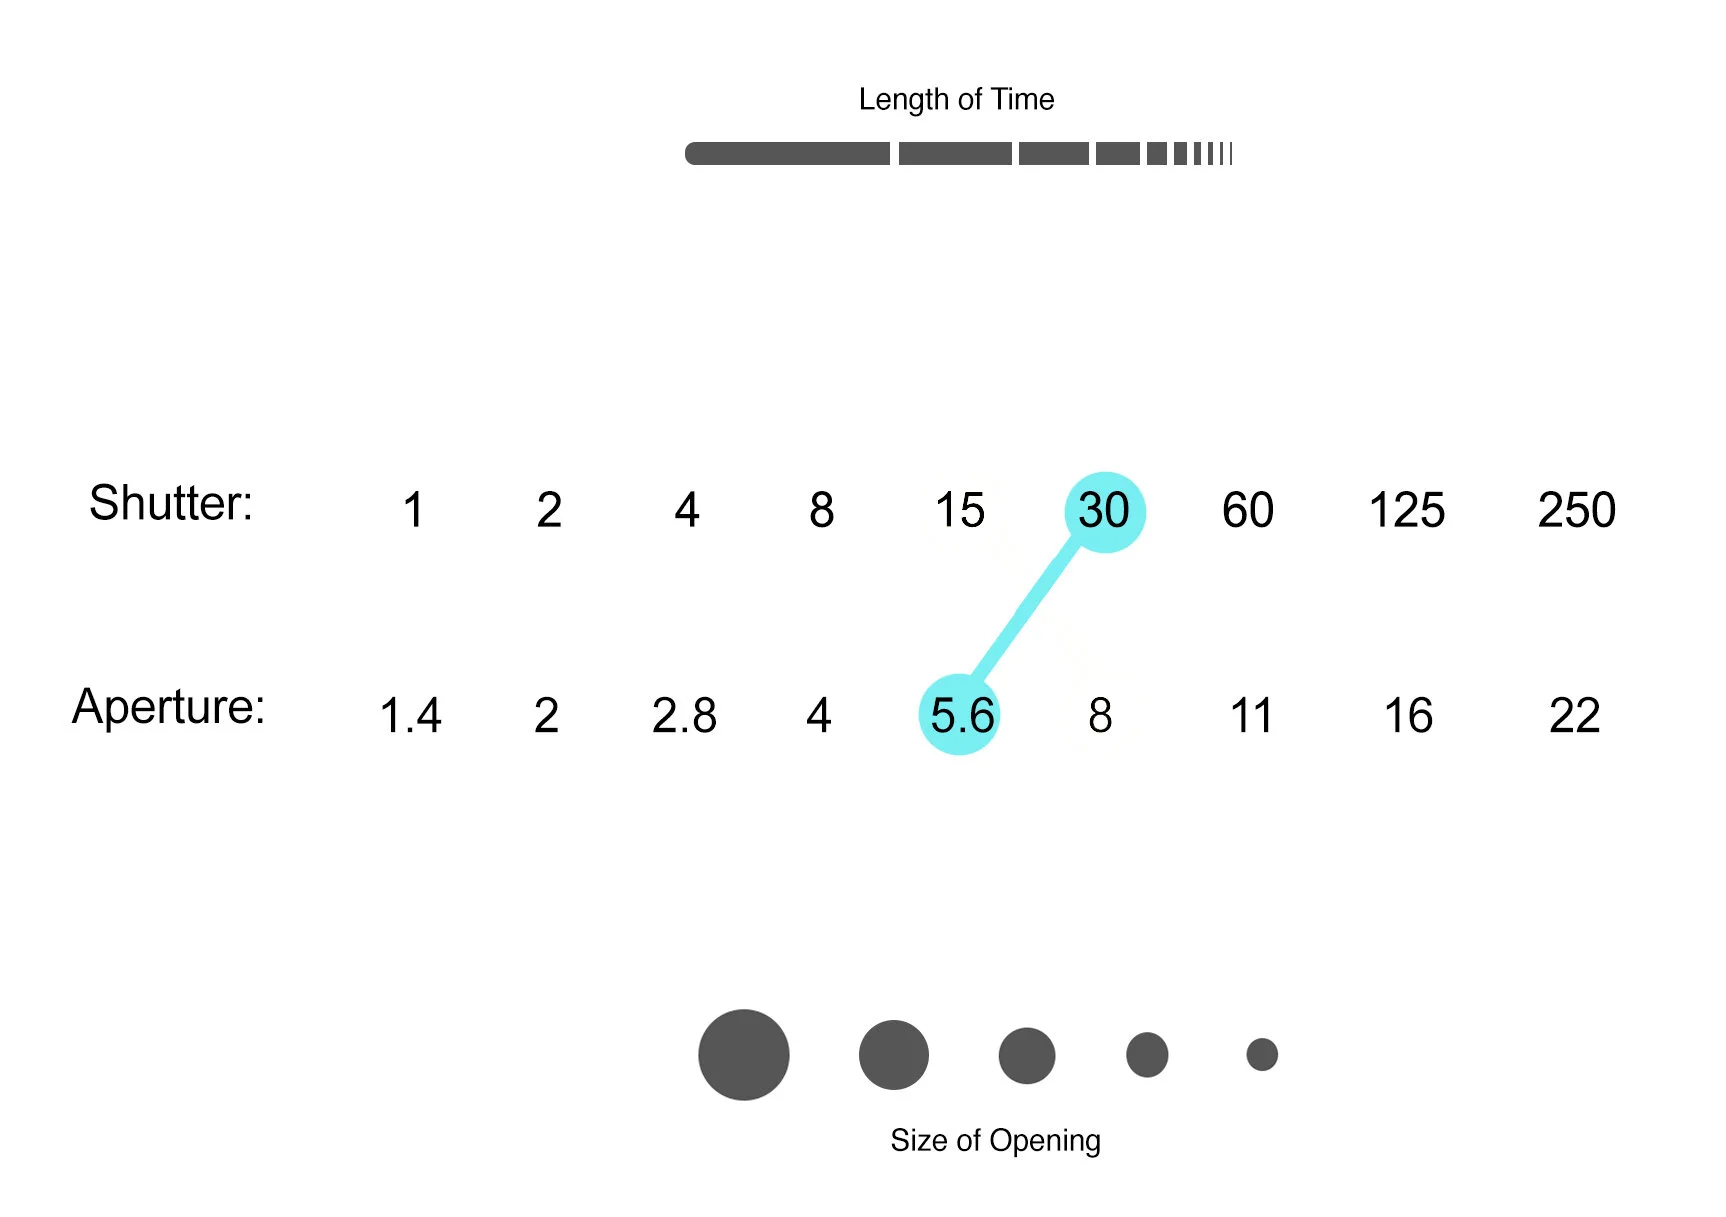
First, here are your shutter settings and your aperture settings together.
Shutter: 1 2 4 8 15 30 60 125 250 500
Apertures: 1.4 2 2.8 4 5.6 8 11 16 22 32
So let’s say I choose a certain aperture at random, let’s say 5.6.
Ok, that’s how big I want the hole to be. That’s HOW MUCH light is pouring in.
And then let’s say I choose a certain shutter at random, let’s say 30.
That’s HOW LONG I want the light pouring in.
How MUCH light…and for how LONG? 5.6 and 30.
Those are my settings.
Ok, so here’s the million dollar question: is that the ONLY combination of settings that would give me that particular amount of light?
Nope.
Lot’s of combinations of settings would give me that same amount of light.
For instance, what if we decided to change the aperture from 5.6 to 8
Well that would make the aperture exactly HALF as big, which would mean we’re REDUCING our exposure by “1 stop.”
So in order to recover that 1 stop of light (and maintain the same exposure we had before), what would we have to do with our shutter?
We’d have to lengthen it, of course. We’d have to make sure the shutter stays open LONGER, in order to make up for the smaller opening in our lens.
How much longer, exactly?
One “stop.”
So we’d need the shutter to go from 30 to 15, because that would double the amount of time the shutter was open (1/15 of a second is twice as long as 1/30 of a second).
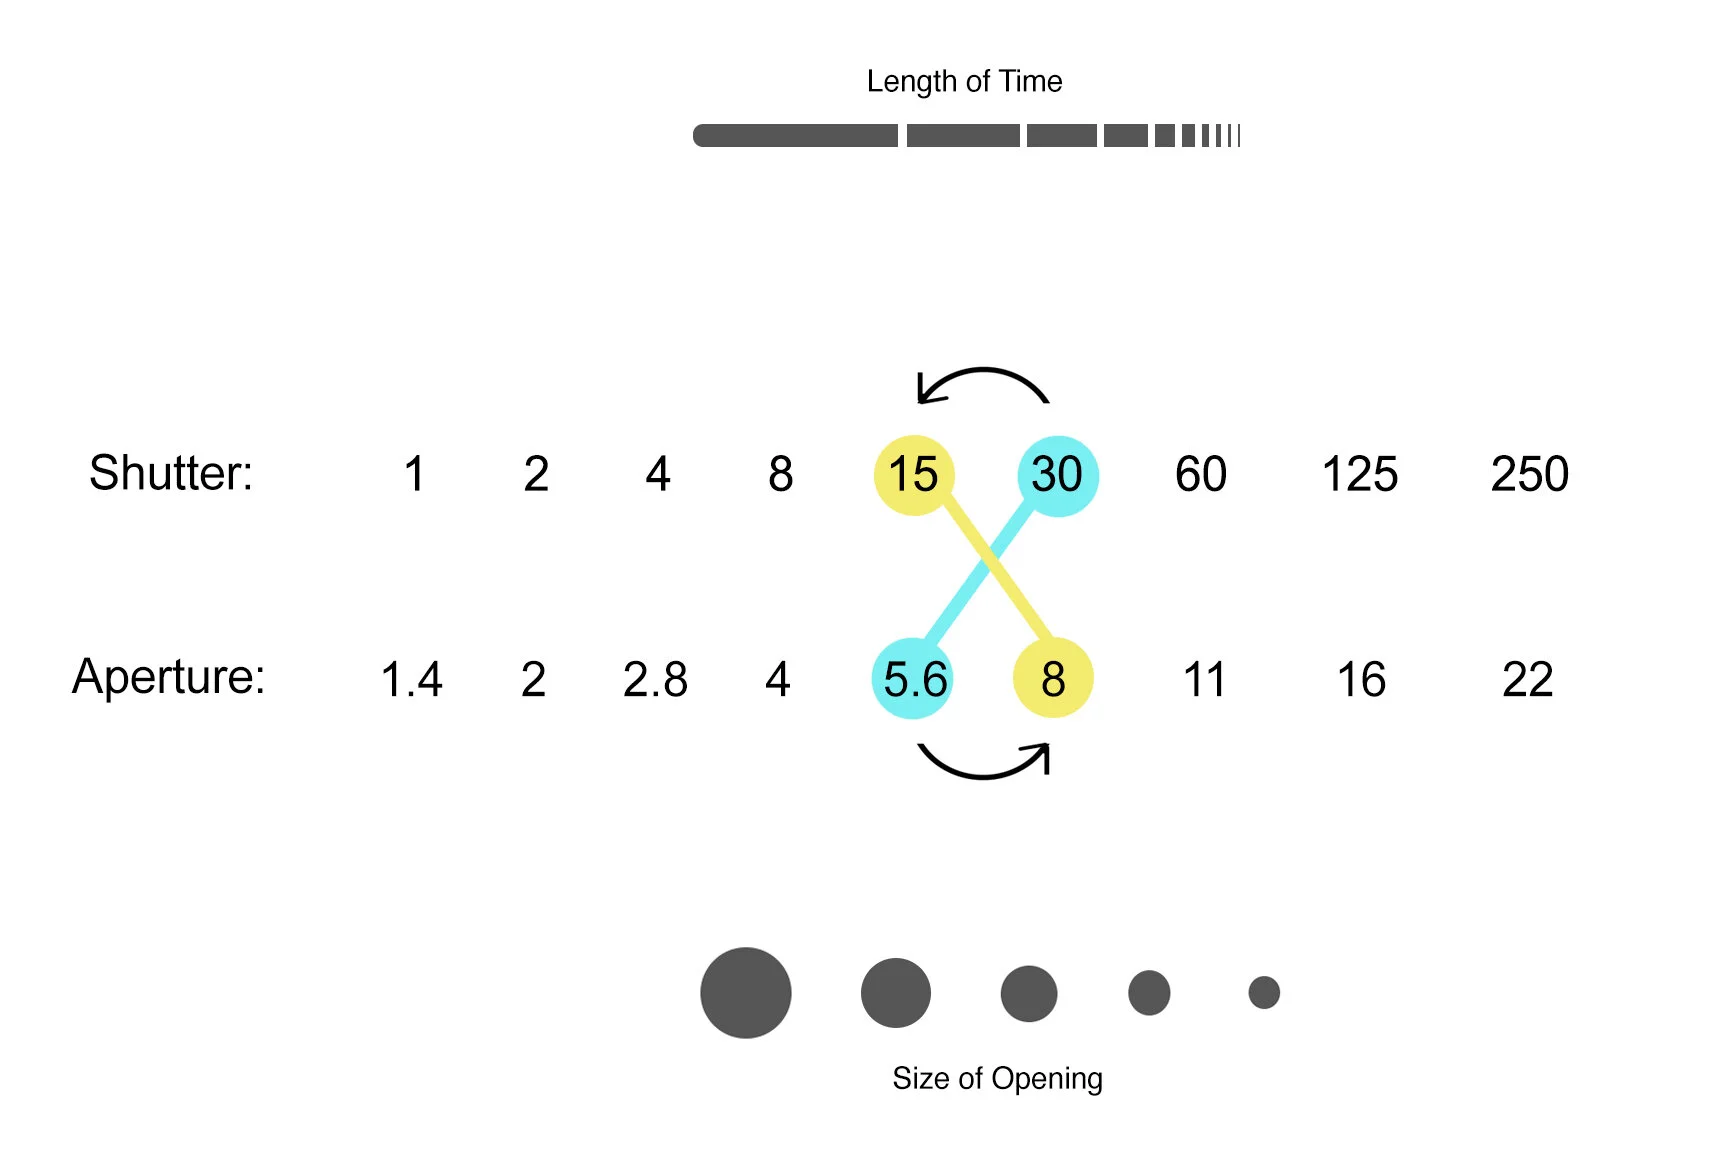
So one setting lost a stop of light, and the other setting gained a stop of light.
And the two cancel each other out.
A lot of photographers will specifically call these “equivalents.” They’ll say, “F5.6 and 30 is the ‘EQUIVALENT’ of F8 and 15.”
Ok, let’s pause.
This is where roughly half my students will start to panic, thinking “this sounds a lot like math.”
There is no math here, I promise.
Just to illustrate that there’s no math here, let’s make an analogy. Let’s say this wasn’t Austin School of Photography at all, let’s say this was Austin School of Baking.
And at ASOB, on this first day of class we’re going to be making cookies. So I give each one of you a measuring cup, and ask you to retrieve precisely ONE CUP of water from the faucet we have in our kitchen.
Well, when you go to do that, whether you know it or not, you’re going to be using two strategies simultaneously: first, there’s how MUCH you open the valve of the faucet, and then second, there’s how LONG you hold the cup under that faucet. But that doesn’t seem like math to most people. In fact, that process is so intuitive, it might not even occur to most people that they’re using those both of these functions at the same time.
So let’s say the first “baking” student goes over to the sink and opens the faucet a tiny amount, so that the faucet is only dripping: drip…….drip…….drip……drip.
Well, if we leave the faucet like that, how LONG will it take to fill the cup?
It’ll take forever. We’ll be here until tomorrow.
So another student shoves that first student aside and says “we don’t have time for this!” and they open the valve on the sink ALL THE WAY, so that now the water is gushing out of the faucet.
Well now how long will it take to fill the cup?
Probably just a couple of seconds, right?
But do you see that we could have gotten the SAME amount of water using either method?
We could either spend an entire day letting it drip, or we could spend a few seconds letting it gush.
Ok, so if that makes more sense to you than all of this aperture/shutter gobbledygook, the good news here is that’s not really even an “analogy,” that’s just straight-up literally how photography works.
The wider you make the aperture, it means the light is “gushing” in….so you’ll have to close the shutter pretty quickly. And the smaller you make the aperture, the light is “trickling” in, which means you’ll have to leave the shutter open for much longer. But you can get the same amount of light either way. Exactly like a kitchen faucet.
And yet, no one thinks you need to be a math whiz, or have a degree in engineering to bake cookies.
And the same goes for photography. There’s no real math in any of this.
It’s just that, when you fill a measuring cup with water, the way you know to stop the faucet is by looking at the line on the cup. That line is your “point of reference.”
But in photography, there is no “line on the cup,” So we’re going to have to use other kinds of “reference points,” and a lot of those “reference points” will involve numbers.
But I can’t stress this enough, we won’t be doing any actual math.
So again, at the end of the day, all I need you to understand here is that, the bigger the hole, the less time it needs to be open….and the smaller the hole, the more time it remains open.
Swear to god, that’s it.
The rest of this - the specific numbers, the specific “WHY” of all of this, the specific strategies, etc. - don’t worry about any of it yet.
I just need you to wrap your ahead around the basic LOGIC of this system. How these two functions work together.
I just want you to be able to close your eyes and visualize what’s actually happening inside your camera.
So don’t fuss too much about the specific numbers just yet. The way to master this medium is to truly be able to visualize the underlying concepts. If you just try to “memorize a bunch of numbers,” photography will always remain abstract and intangible to you…probably for the rest of your lives.
At this point, I need you to close your eyes and see if you can visualize what’s actually happening inside your camera.
“Ok, so if the hole is smaller, I’ll need more time. Yep, that makes sense.”
The numbers will sink in eventually, the deeper we get into the course. Because you’re going to hear them over and over and over.
So one last time: the bigger the hole, the less time it needs to be open……the smaller the hole, the more time it remains open.
Finally, as this first lesson comes to a close, I know there’s a MILLION questions floating around in your head.
And I promise, we’ll get to all of them eventually.
But there’s really only one more question I want to address today, and that is:
If F5.6 and 30 is the EQUIVALENT of F8 and 15…in other words, if each of those combinations gives you the SAME exposure…then what’s the point? Why choose one over the other?
Well, we’re actually going to be spending the rest of this course unraveling the various reasons for that.
But for now, here’s what I want you to know:
Yes, each of those combinations gives you the same EXPOSURE (ie: the same amount of LIGHT).
But do they give you the same photograph?
Nope.
Remember, there are more things to consider here than just LIGHT.
For instance, we already discussed that shutter can control either Light OR Time.
So while these settings will EXPOSE the same (they’ll achieve the same BRIGHTNESS), separate from that, they will also allow for different amounts of TIME to pass…which can alter the image in a lot of ways (which we’ll begin discussing next week).
However, one thing we didn’t discuss earlier today is the that, like your shutter, your aperture can also control two very different aspects of an image.
The aperture can obviously influence your LIGHT/EXPOSURE (that’s what we’ve been discussing so far)….but….it can also control something called “Depth-of-Field,”
“Depth-of-field” is how sharp an image is from foreground to background.
We’ll be discussing “depth of field” more thoroughly, later. But just to put the proper idea in your head right now, in order to imagine what it is, I’m sure most of you have seen portraits wherein the background was much softer than the subject’s face, right? Well, that’s a “depth of field” effect. Sort of like the “softened bride” picture we looked at earlier.

That’s a depth of field effect. The idea that one layer of space is sharper than another.
And “depth of field” is largely controlled by your aperture.
So at this moment, I need you to recall everything I said earlier about how your shutter can control both LIGHT and TIME, and then I need you to copy and paste all of that here for aperture.
First, the amount of LIGHT you’re exposing has NOTHING TO DO with the amount of sharpness that’s in your shot….the two are entirely unrelated.
It just so happens that your aperture can control either one.
But never both.
And second, while today we’re merely just introducing this vocabulary…several weeks from now it will need to be very clear and organized in your thinking, “when I go to set my aperture, am I setting it for the amount of LIGHT I want….or….am I setting it for the amount of SHARPNESS I want throughout the picture?”
Because you won’t be using it for both.
So in summary, we have two different tools here. An aperture and a shutter.
Both of them can control Light.
But each one also has a secondary aspect of the image that it is responsible for.
Shutter can control time, and aperture can control sharpness.
So the reason we might want to mix and match these different “EQUIVALENT” pairs of settings is because we want to be able to alter our TIME and our SHARPNESS without having to sacrifice the brightness of the image.
And whenever that’s the case, this system has been designed so that these two functions - aperture and shutter - can compensate for one another.
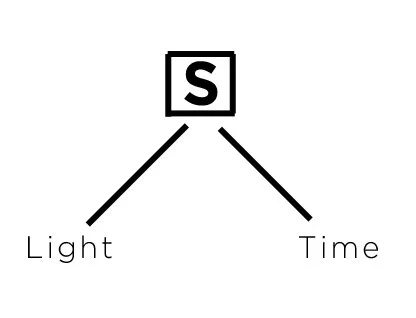
So in order to visualize how these two tools work together, here’s a diagram that summarizes just about everything we’ve learned so far in this first lesson.
We know that our shutter can control two very different things: light and time:
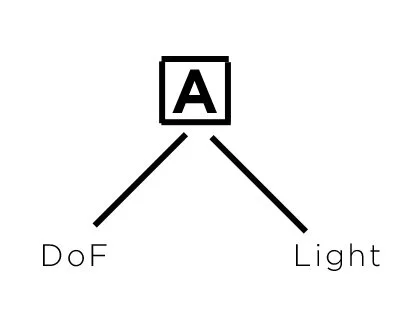
And we also know our aperture can control two very different things: light and depth of Field:
So if we put it all together, here’s what we’ve got so far:
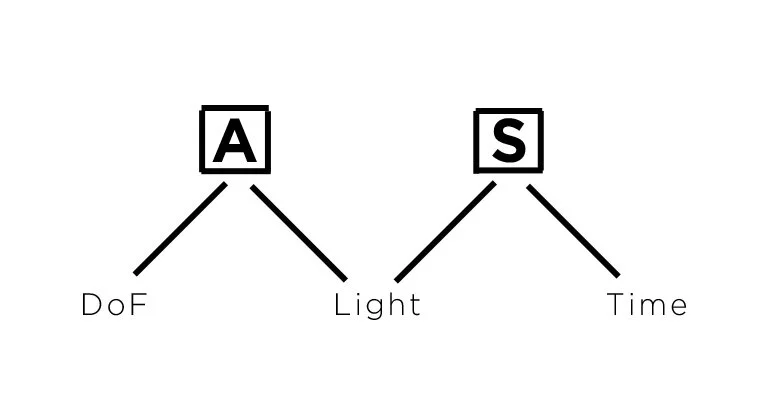
So both aperture and shutter can control LIGHT, but then each has a secondary responsibility (either time or DoF).
But that means we have three different “concerns” in our photograph, and only two physical tools in order to address those three concerns.
And that doesn’t quite add up, does it?
It means we might not be able to address all three concerns in the same image.
But we should be able to address any two of those concerns, right?
Well, the problem with that logic is that one of those three concerns is an absolutely deal breaker…meaning we can never neglect it, we absolutely HAVE to have it.
Which one?
Light, of course.
It does us no good whatsoever to have the perfect “sharpness” and the perfect “time effect”….if the picture turns out jet black.
So we HAVE to get our exposure. We have no choice there.
So that means it isn’t quite accurate to say that we can address ANY two of these concerns.
It’s more accurate to say that we’ll always need to address the Light in the scene…..but then, we get to address ONE OTHER concern of our choosing…either Time, or Depth of Field.
So the way this is going to work is like so:
We ALWAYS need our Light. So one function will always have to be dedicated to that purpose. But we can then use the REMAINING function to control either our Time OR our DoF.
So for example, let’s say we’re shooting something like “Star Trails,” or maybe an Olympic hurdler. Well in those instances, because the MOVEMNET of the scene is key to the picture you’re taking, you might prefer to play with the Time elements of the shot.
And only one of these functions CAN manipulate time…...the shutter.
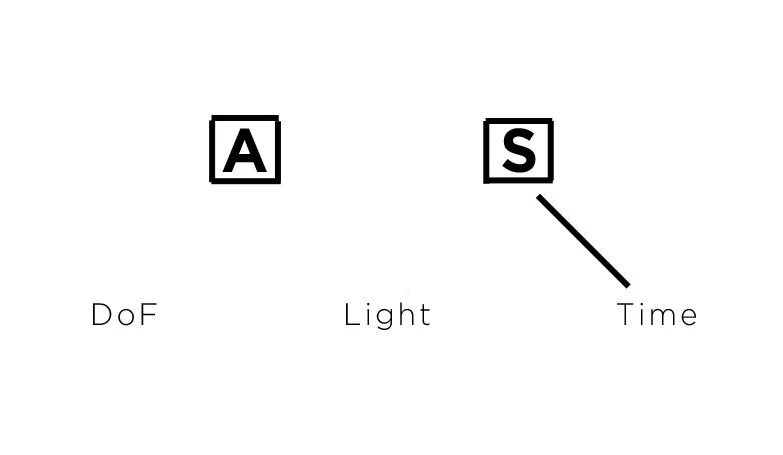
So the shutter HAS to be assigned to that responsibility.
Which means the shutter no longer can be used to get the exposure you want.
So SOMETHING will have to be assigned to controlling your exposure. And that means the aperture.
So the aperture has to abandon its “depth of field” responsibility and instead deal with the exposure:
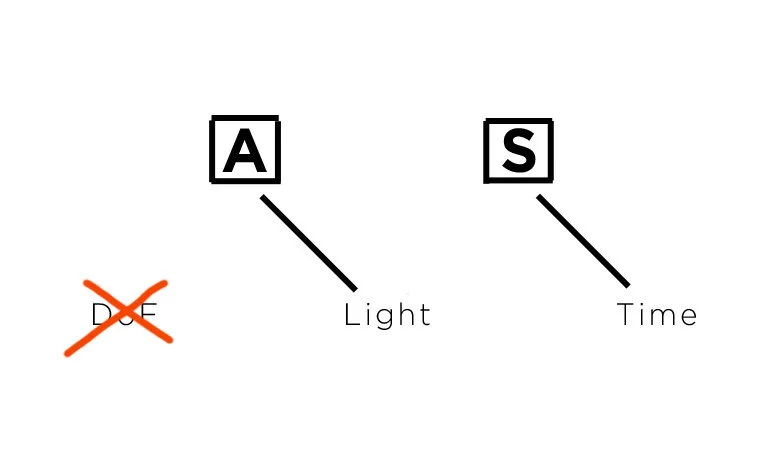
….and so “our pendulum swings to the right.”
In other words, why did we choose a certain shutter here? For TIME, not for light. But that means something has to deal with the LIGHT. And so aperture is going to have to pick up that slack.
Make sense?
But then other times, if you’re shooting portraits….or maybe architecture….it’s possible you will be more concerned with “depth of field” as opposed to the time aspects of the image.
And whenever that’s the case, there’s only one function here that can control depth of field….the aperture. So the aperture HAS to be deployed to that responsibility.
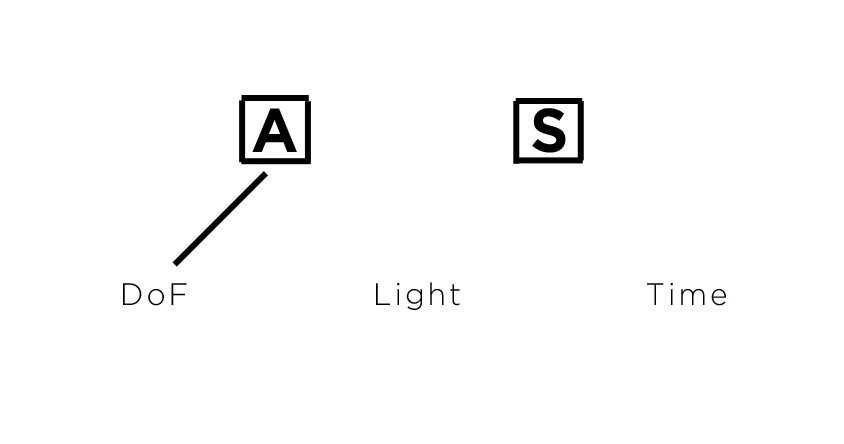
But that means the aperture is no longer available to handle your light (your “exposure”).
So then what’s going to have to handle the Light?
You guessed it, the shutter.
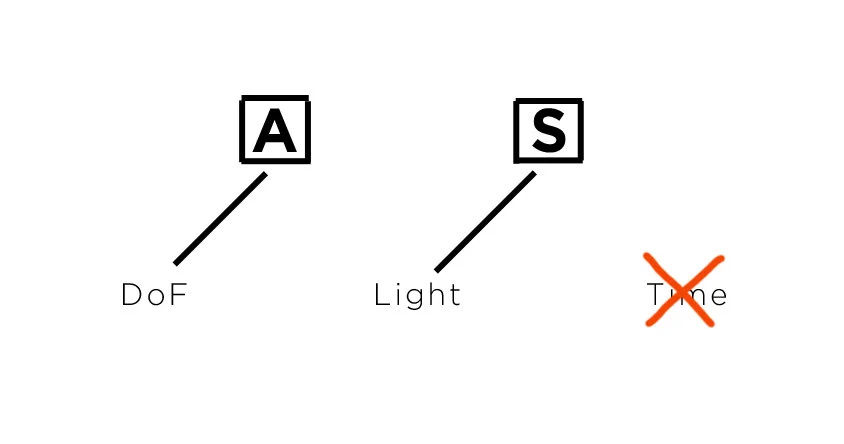
So the shutter abandons its Time responsibility in order to make sure your exposure is properly dealt with.
And now “our pendulum swings to the left.”
In other words, why did we choose a certain aperture here? For Depth of Field, not light. But that means something has to deal with the Light. So the shutter is going to have to pick up that slack.
Make sense?
That’s more or less how this system was designed to work. Two different tools, with alternating responsibilities.
And so far we have two different ways those tools can work together (pendulum to the left, or pendulum to the right), depending on what your priorities are within a given scene.
This is one model for how photography works.
But is this model complete? Is the the sum total of how photography works?
Of course not. This model is an oversimplification.
We’re leaving out a TON of factors here.
But one step at a time. This “pendulum” model is a good start.
If you can get this framework into your head first, then we can begin to ADD to this framework as we move forward in this course.
But on this first day of the curriculum, I want you to go ahead and just stick to this model.
I want this set of relationships to make sense to you before we go any further.
And one last time, I don’t expect you to know HOW to do any of these things yet. I just expect you to understand that this is what your equipment was designed to do.