Challenge #1: Building your Parts into a Whole:
…..Or give me a scene’s entire “Christmas Tree” [1 Differential, 2 Differentials, 3 Differentials]
This first challenge is basically the full distention of the ASOP approach regarding identifying and exploiting differentials.
Find a scene that has all 3 major differentials (Light, Space, and Time), and then:
1) Start with a “Brick-Wall-Overcast-Day” alignment of the scene, and take the one basic image configuration that that alignment allows for…..
2) Then realign the scene until you can exploit each differential, but only 1 at a time (ie: align the shot so you can exploit Light but not Space or Time, then realign the shot so you can exploit Space, but not Light or Time, and then realign the shot so you can exploit Time, but not Light or Space)….
3) Then realign the scene so that you can exploit 2 differentials in the same construct….
4) And then finally, realign the scene so that you can exploit all 3 differentials in the same shot.
In short, you’re breaking the entire scene down and then building it back up again. You first demonstrate the exploitable differentials a scene has, one at a time…. And then demonstrate how they can be combined.
Or, if you prefer a more visible framework for this exercise, another way to look at this is to imagine that you’re creating a Christmas Tree of image constructs, by mapping out the various image structures your scene allows for:
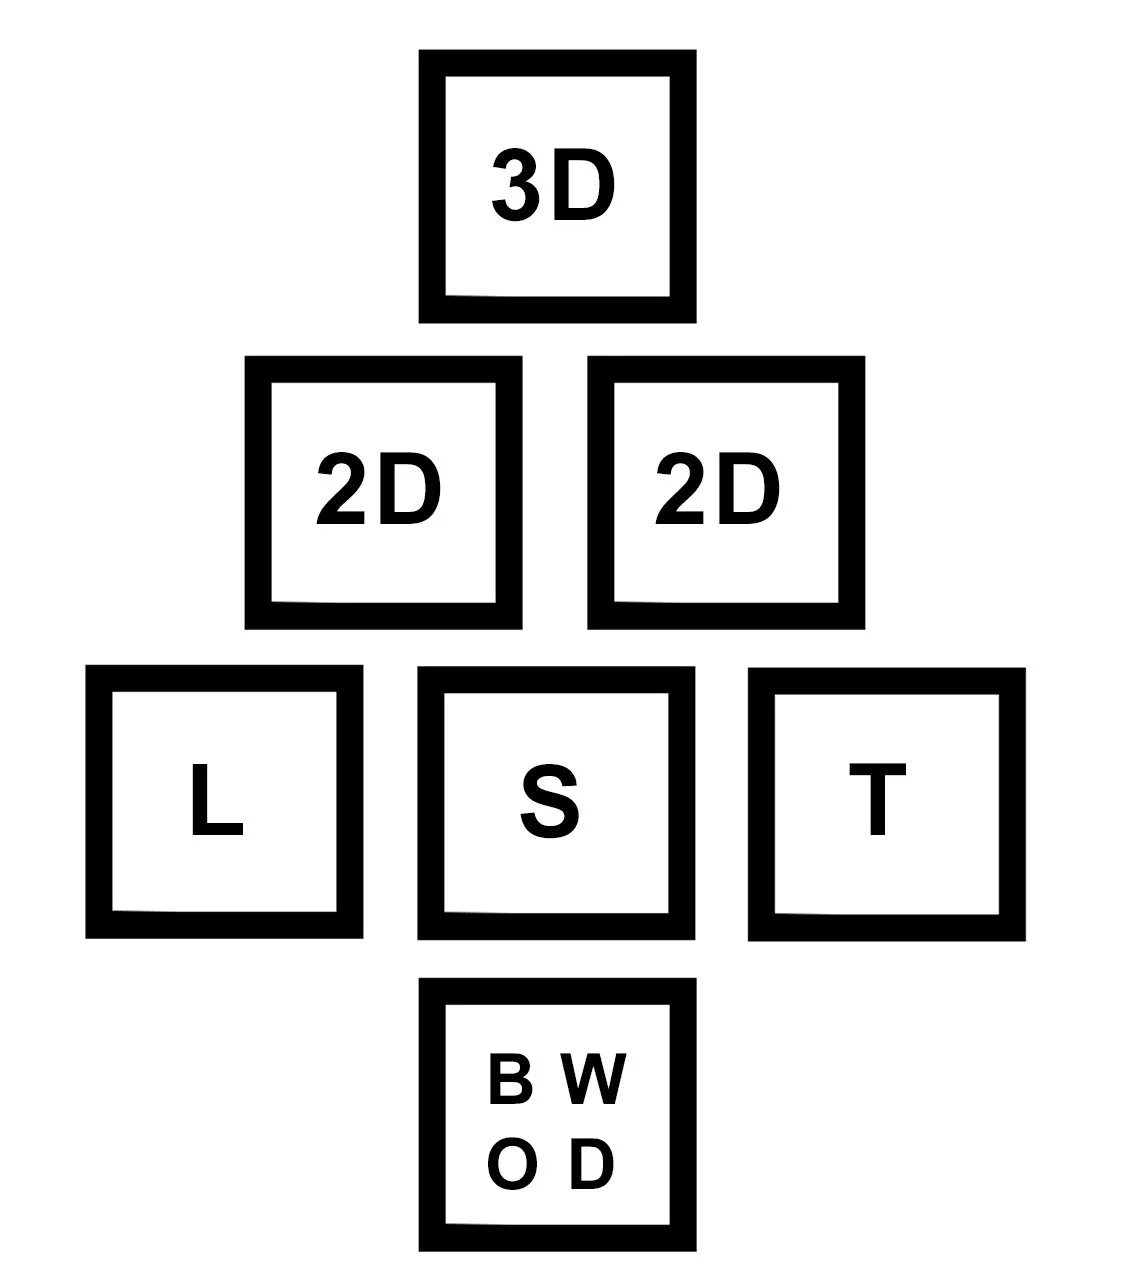
You first take a “brick-wall-overcast-day” image (or “BWOD” as it’s been labeled in the diagram)……then take three images in which you exploit each differential the scene has, one at a time (Light, Space, and Time), ……and then you make a couple of attempts to combine two of those differentials in the same shot…..and then finally, you make one last attempt to see if you can combine all three in the same shot.
Either way you want to look at it, the main idea behind this challenge is to: 1) practice breaking a scene down into its malleable components, and then 2) practice building those components back together into different configurations.
However, this is also about reinforcing your awareness of how a scene needs to be aligned if you want to UTILIZE certain differentials, as opposed to if you want to NEUTRALIZE certain differentials. This is all about developing that pattern recognition and that mental schema. We’re essentially revisiting the idea that certain angles on a scene open up certain techniques….and other angles on a scene close off certain techniques. And it’s actually just as valuable to know how to neutralize a differential as it is to know how to enable it. Thus, this exercises forces you to map out the entire set of angles on a scene that both enable and neutralize certain techniques. From the “BWOD” shot that neutralizes ALL techniques…..to the “3D” shot that enables ALL techniques…..while every shot in between enables some while neutralizing others.
If I could wave a magic wand, I’d make it so every photographer could immediately map out these possibilities upon entering a scene. And this exercise is meant to get you there.
So again, this is more of a developmental training exercise than an “end-game” challenge. It trains your brain to recognize a scene’s assets and to establish a more comprehensive pre-visualization of how those assets can be combined.
==============================
Challenge #2:
Number vs Degree
Combining multiple differentials, all used very mildly …….VS…... using only one differential, but executed more forcefully.
This is a comparison exercise.
Take two intricately-structured images of the same scene/subject, but do so in the following manner:
1) The first shot needs to COMBINE mild uses of all three differentials (light, space, and time), all of which have been simultaneously exploited in the same construct.
compared to
2) An image that exploits only one differential…..but cranked up to an 11, on a scale of 1-10.
To put it another way, one image uses milder shifts in Light, Space, Time, (by “mild” we mean these shifts are nowhere near approaching the upper limits of what that particular technique can do to abstract the shot), but all three mild technical shifts are being used in COMBINATION with each other……while the other image uses only one technical shift, but executed to the utmost limits of what can be done with that particular technique.
The main idea here is that an image can be made more complex (or an image can be abstracted) either by the NUMBER of manipulations, or by the DEGREE of a given manipulation. Here we’re pitting those two approaches against each other in order to compare them.
If you’re looking for an example to get you started, some of you may recall staying after class on the final day of Photo1, and if you had, we probably discussed two photographers who I believe use each of these two opposing approaches.
The first was a photographer called “Dog Breath Studios:”
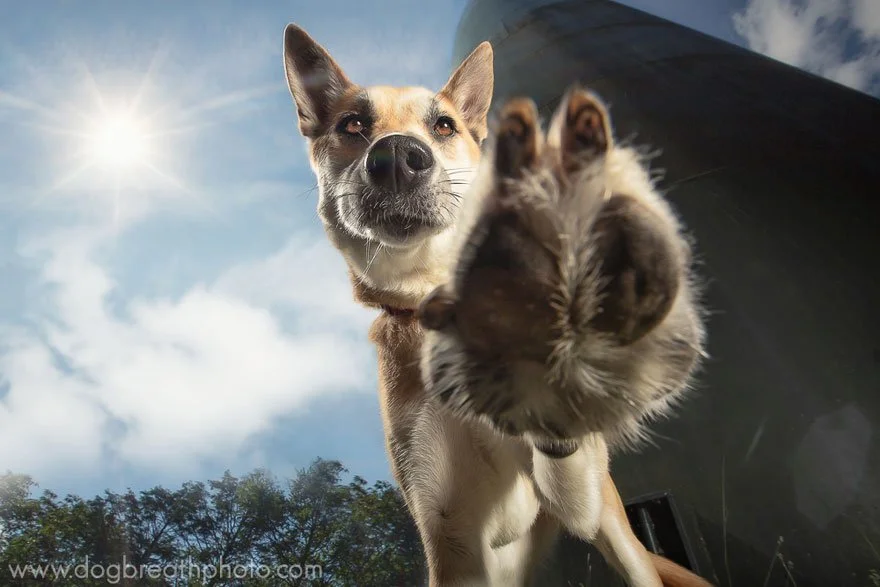
I had maintained that her pictures were made extra dramatic by using all three L, S, and T differentials….but none of them used particularly wildly or aggressively. In other words, in her case, it was less the DEGREE that each technique was used, and more that she had used all three at the same time.
Looking at the picture above, her use of Space alone wouldn’t have made the shot particularly abstract, and her use of Timing wouldn’t have either. She’s probably using Light a little more dramatically than those first two, but even then, it’s only when you combine all three of these minor shifts together that it gives the shot its dramatic, stylistic quality.
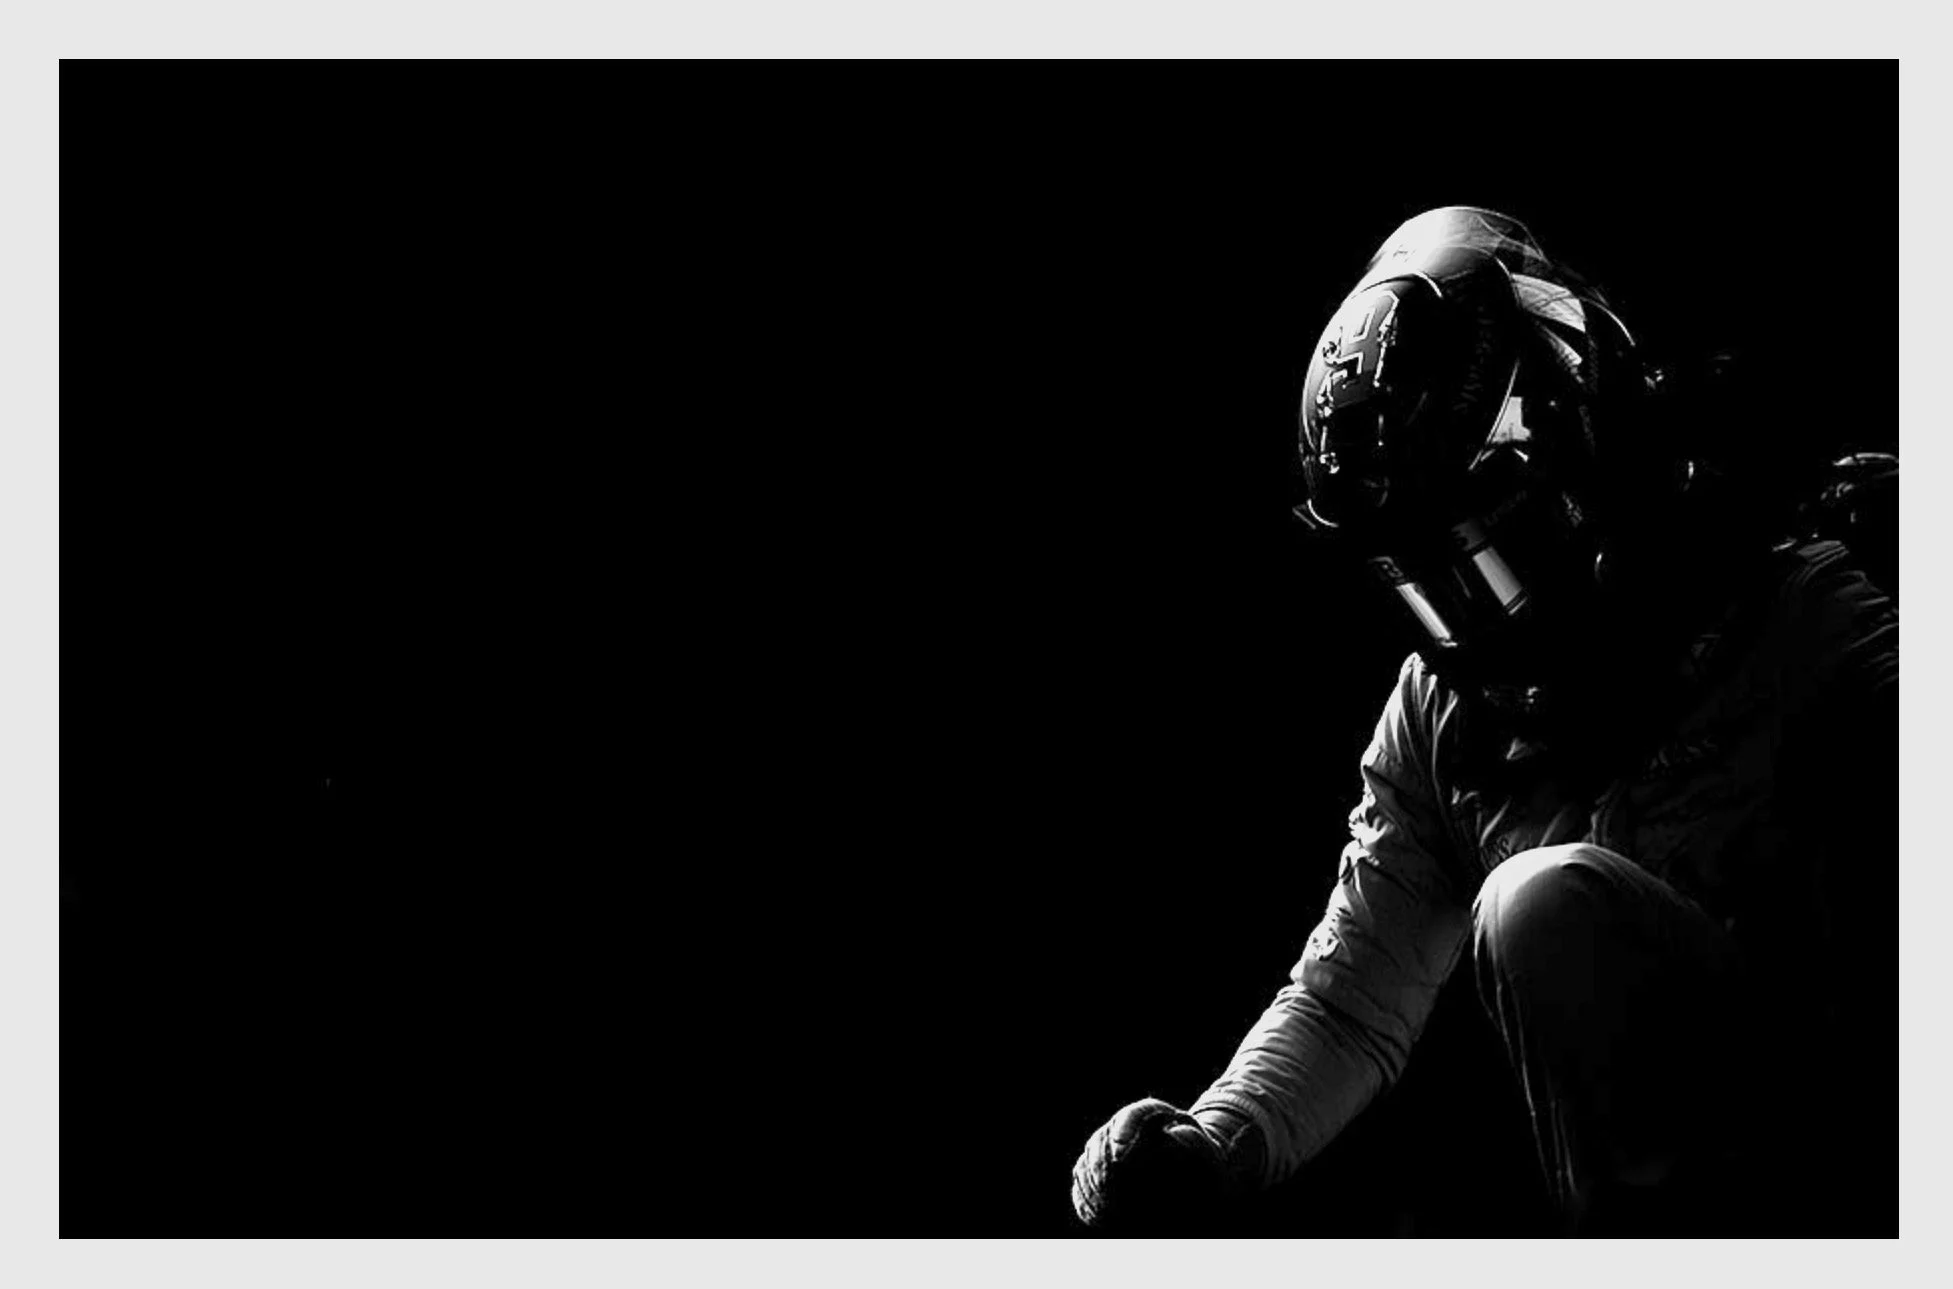
I then compared her portfolio to that of a Formula 1 photographer named Vladimir Rys, who seems to feature only one technique at a time in his shooting, but in each case, he cranks that technique up about as high as it can go.
Time:
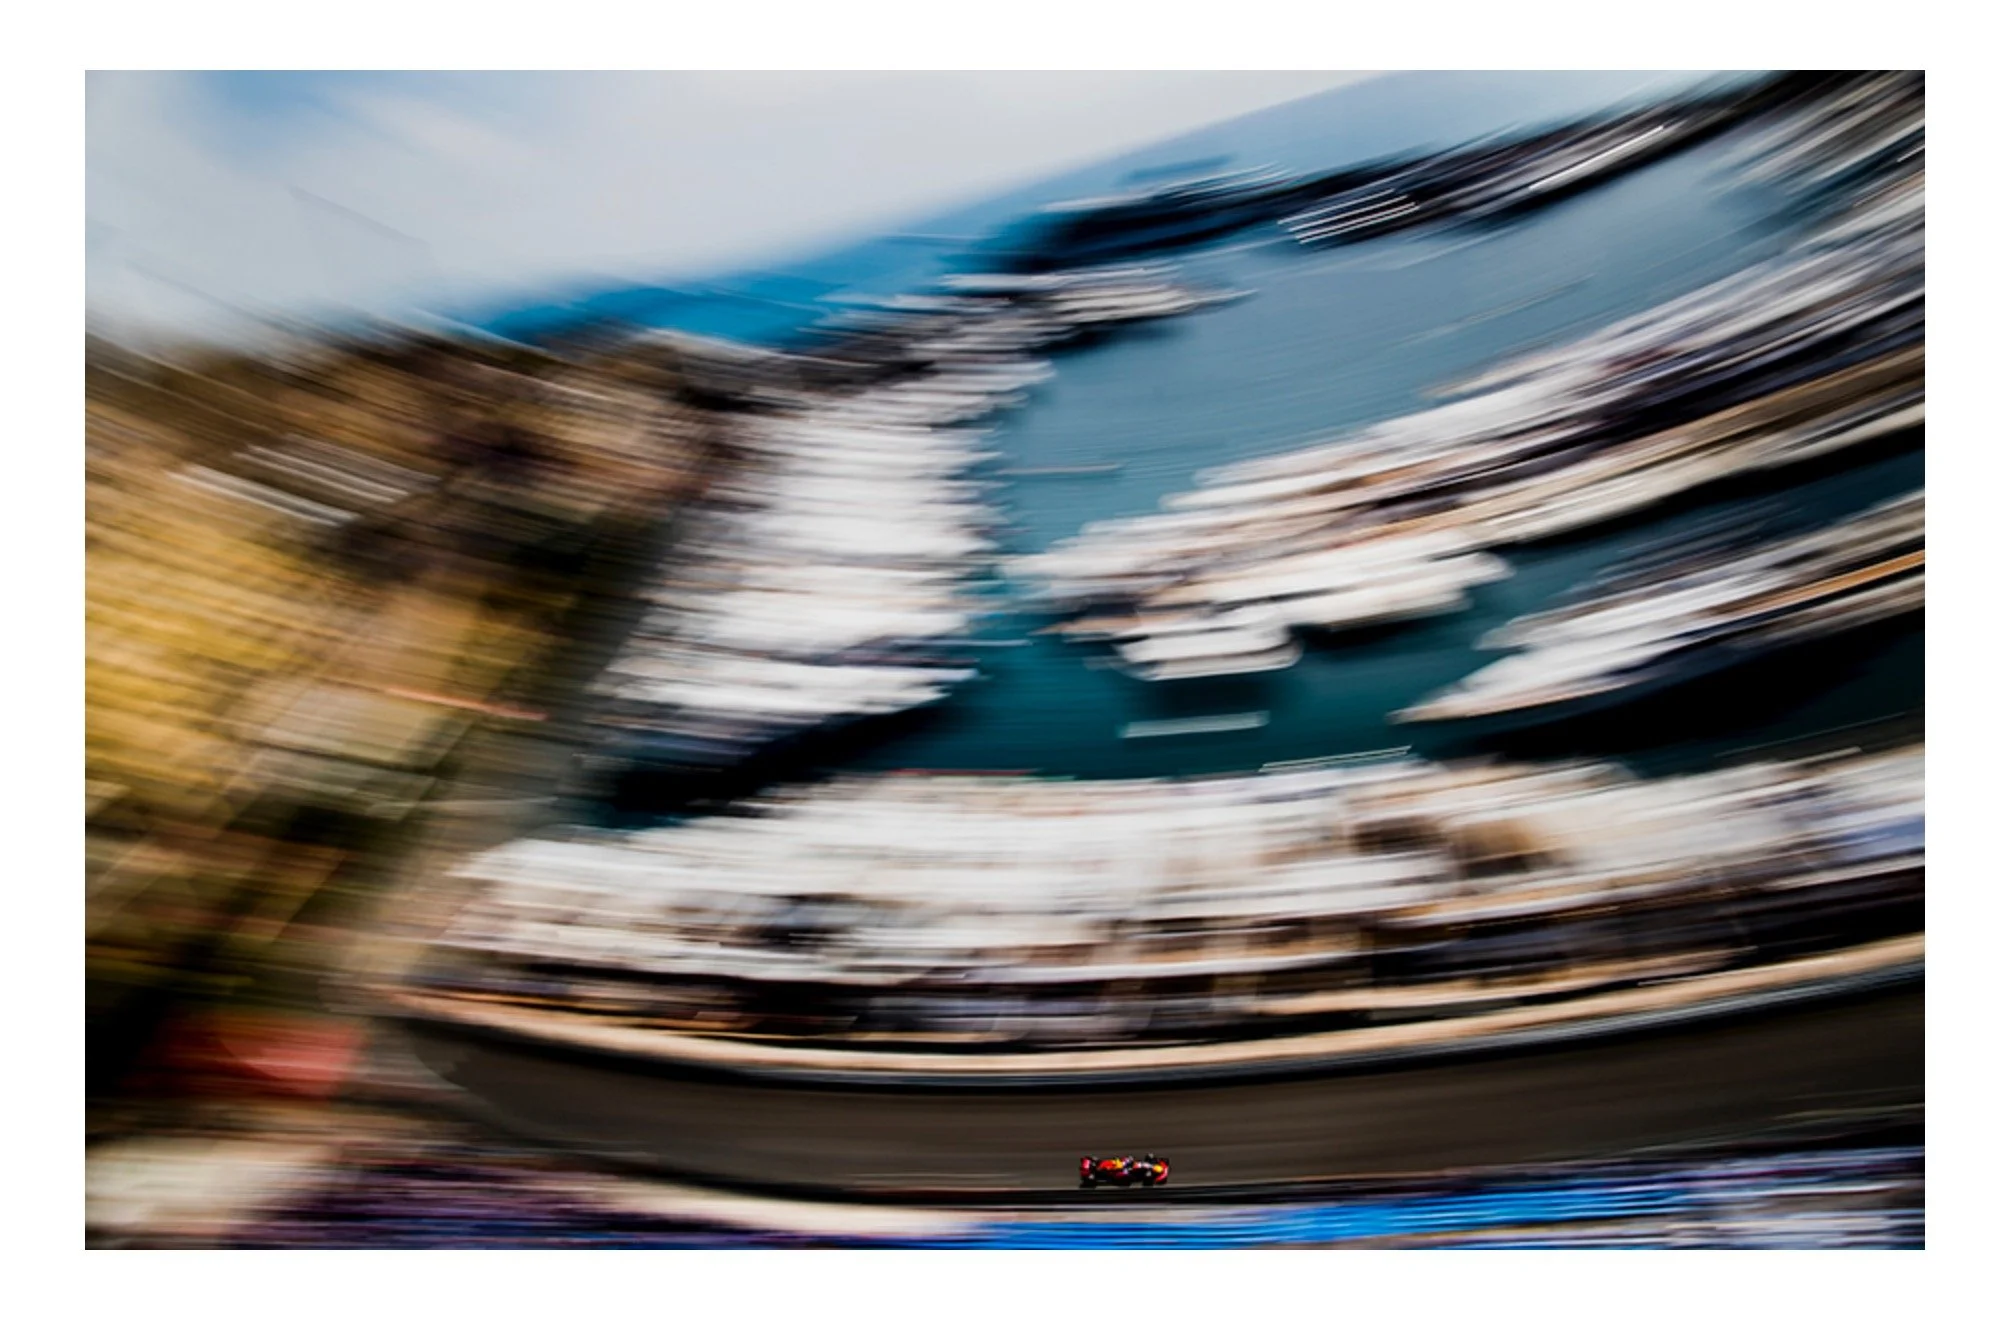
.
Light:
Space:
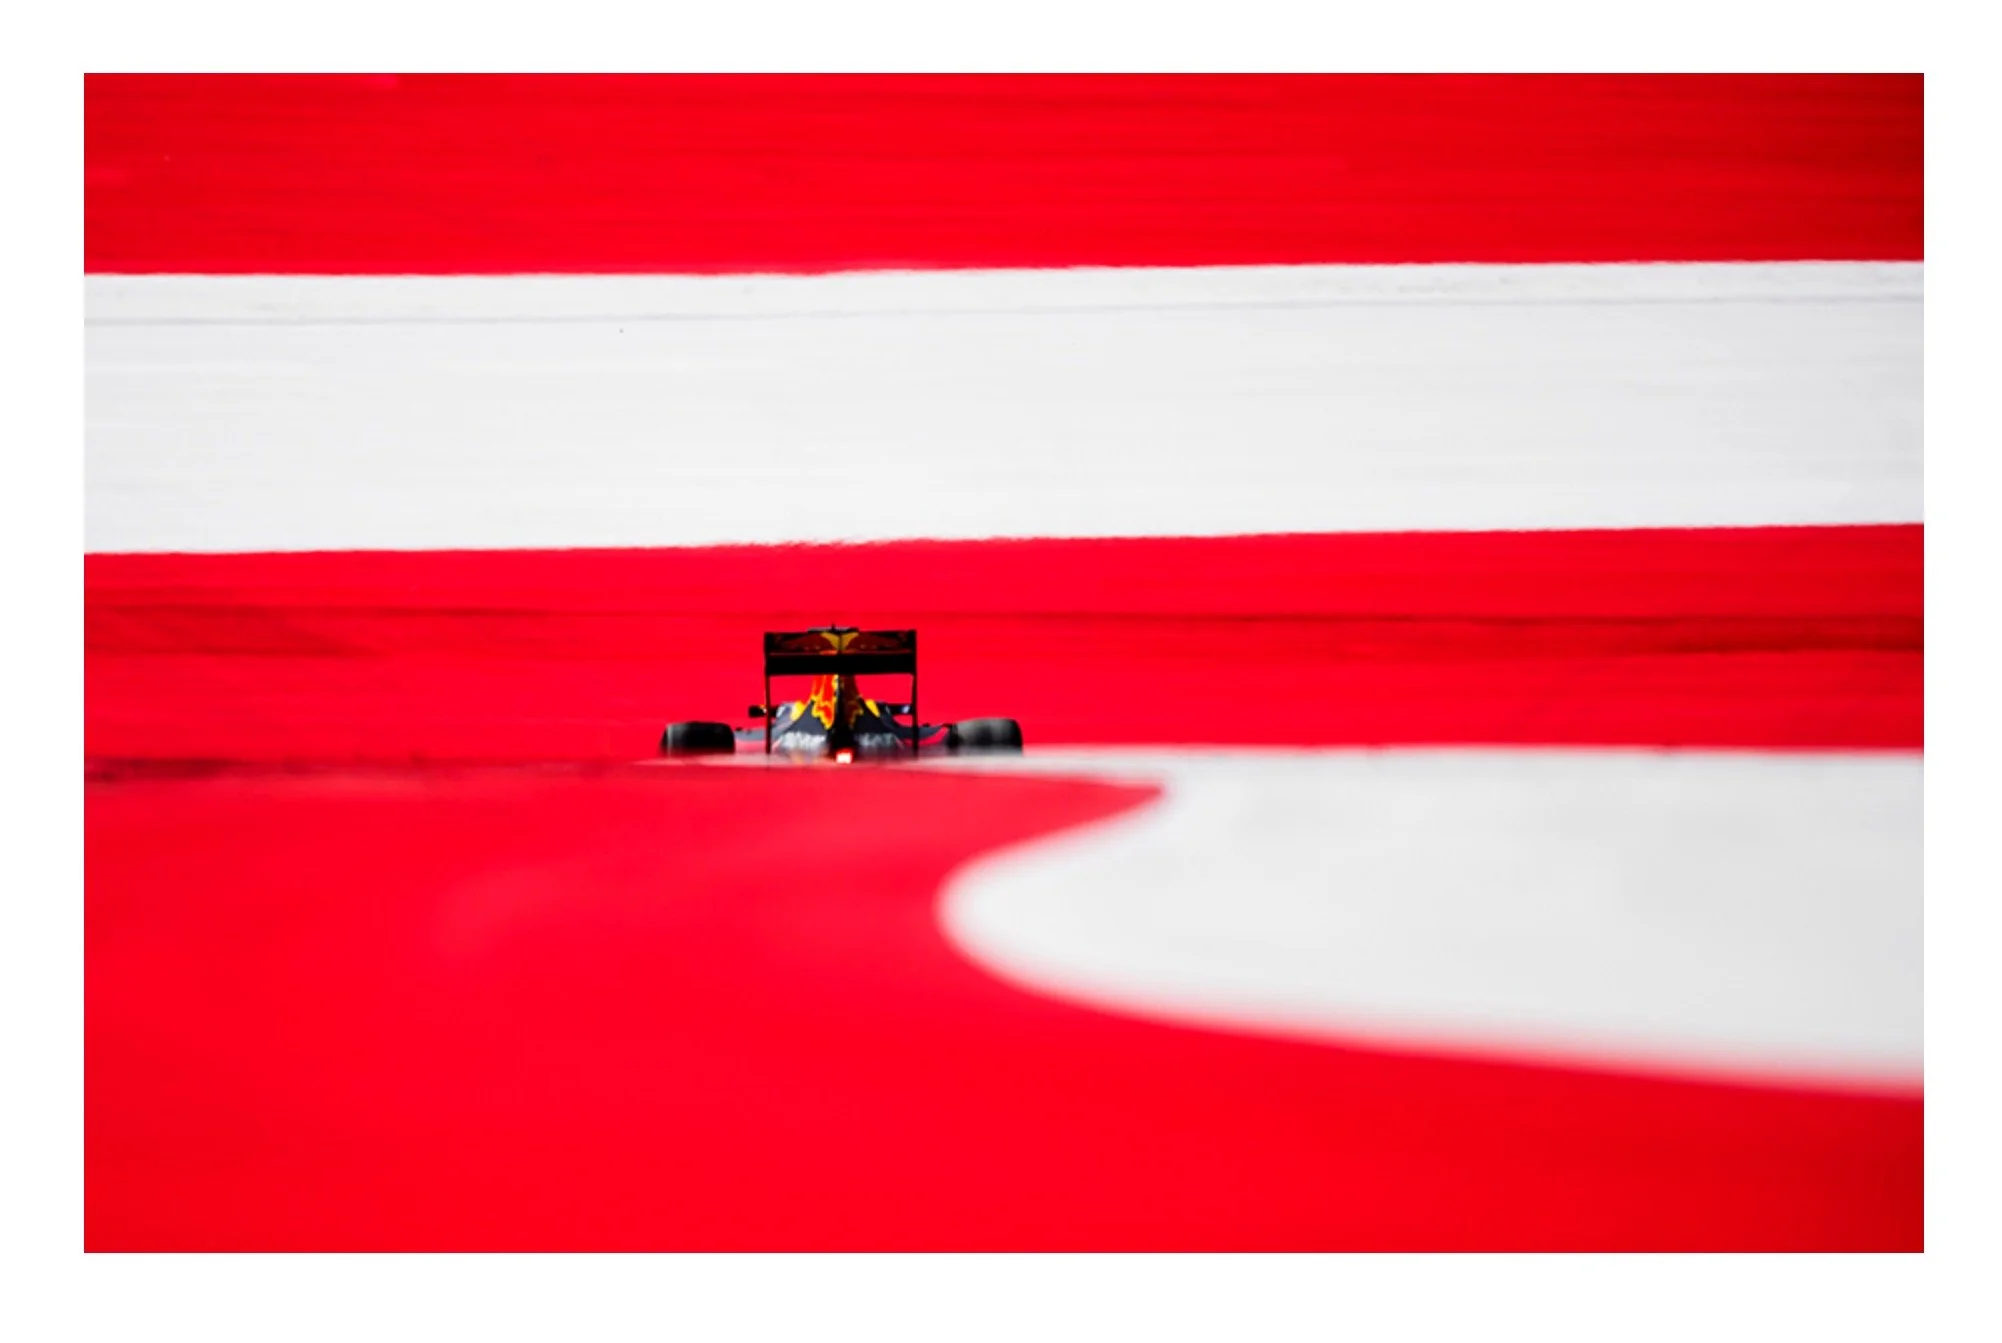
We’d said that both of these photographers are abstracting and dramatizing their images…..and we can even go one step further and say that both of them are using L/S/T in order to do so.
But they’ve found completely different approaches within that framework.
This challenge is about pitting those two approaches against each other. However, in this case, I think the comparison will be more insightful if both approaches are applied to the same scene/subject.
==============================
Challenge #3
“Space as the great enabler”
Space-management as a problem solver for other techniques
This is an image in which you’ve executed a fairly advanced application of one of the techniques we’ve learned, but one that couldn’t have been applied if the spatial relationships weren’t managed or “sorted out” first.
We discussed some examples of this throughout the curriculum. Recall that back in Photo1 we had discussed how Ray Metzker can’t really take advantage of the Light Differentials in his scene until he first aligns and manages his spatial relationships. In other words, he had to align a bright layer of space in front of a dark layer of space (or vice versa), and then use his lens to manage the two layers of space so that they coherently work together…..AND ONLY THEN might his shifts in exposure appear coherent to us.
Or recall that in the Studio class we discussed a theoretical shot of one skateboarder jumping over another skateboarder. In that instance we posited that one skateboarder could be “motion blurred” in the foreground (using a “constant” light soruce), while another skateboarder could be “frozen” in the background (using a flash). But we had said that if you use a long enough lens to compress them together, it’ll look like a frozen skateboarder is *impossibly* jumping over a blurred skateboarder.
So once again, the idea here is to demonstrate that managing your spatial relationships — with your lens —can often “unlock” other technical maneuvers, maneuvers that would have been near-impossible if you hadn’t managed those spatial relationships first.
It is my view that this is one of the most important mental frameworks a photographer can develop.
=========================
Challenge #4:
Contradictory vs Compounded Emphasis
This is another comparison exercise.
Here you want to find a scene that has at least two differentials in it, and apply both differentials toward the goal of creating emphasis within the shot. However, you want to do so in two slightly different ways, which means you’ll be taking two shots for comparison:
1) For the first shot, use both differentials in order to impose emphasis onto the SAME part of the scene.
For instance, you can choose to make the same part of the scene both bigger AND sharper than the rest of the scene…..or you can choose to make the same part of the scene both sharper AND better exposed than the rest of the scene…..or you can choose to make the same subject bigger AND more stable than the rest of the scene (ie: it’s frozen while everything else in the scene is moving). Etc. Etc, Etc.. There are dozens of potential combinations here, but the common thread is that two methods of technical emphasis are being imposed onto the same part of the scene. Thus the emphasis has been COMPOUNDED.
2) For the second shot, use the EXACT SAME two differentials, but now use them to DISTRIBUTE emphasis to two different parts of the scene.
So if in the above shot you made one part of the scene both bigger and sharper, then here you would need to split the emphasis by making one part of the scene bigger, while the other part of the scene is sharper. Or if in the above shot you used both sharpness and exposure to compound emphasis in one part of the scene, here you need to use exposure to emphasize one part of the scene, and focus to emphasize another. Etc. Etc.
So again, the comparison here is between two shots — of the same scene — utilizing the exact same two assets (the same differentials). One shot where the differentials have been used to doubly emphasize the same part of the scene, and then one shot in which the same two differentials have been used to split the emphasis of the scene.
*This is one of many challenges that will involve distributing your use of differentials, within the same shot, but for different strategic purposes.
========================
Challenge #5:
Emphasis vs Archetype
Throughout the entirety of the ASOP curriculum, we made a big deal out of the idea that any given technique (or any given differential) can be used to create emphasis, or archetype. Which is to say that if your scene has any one of our Light/Space/Time assets, then you can use that asset to control where the viewer will look in the frame (how they’ll “read” the scene with their eyes), or, and completely independent from that, you can also use the very same differential to impose a cultural “idea” or “trope” onto the subject, so that the viewer forms a particular association around the subject — like the idea that the subject is scary, or heroic, or chaotic, or tense, or sentimental, etc.
So for this challenge, you need to find a scene that has at least two differentials in it, and exploit one differential for emphasis, and the other differential for archetype……in the same shot.
See if you can control how the viewer’s eyes “scan the frame” using one differential, AND ALSO how the viewer “perceives the subject matter” or “culturally references the subject” using another differential ….in the same image.
*This is yet another challenge that involves distributing your use of differentials, within the same shot, but for different strategic purposes.
===========================
Challenge #6:
Let’s Combine Challenges #4 and #5
In the same scene (and with the same subject), seek out two differentials….and then COMBINE your use of those two differentials in the following ways:
1) use both techniques to compound emphasis in one part of the shot,
2) use the same two techniques used above in order to create distributive emphasis, by applying them to two separate parts of the scene,
3) then finally, use the same two techniques, but one deployed for emphasis, while the other is being deployed for archetype.
This is essentially a combination of the previous two challenges. But done with the same two differentials, and in the same scene. Extra difficult, but extra developmental as well.
*This is yet another challenge that involves distributing your use of differentials, within the same shot, but for different strategic purposes.
==========================
Challenge #7
Structural “Modules” (Part 1)
Take two intricately structured images, both sharing one common structural “module,”…..but using one extra, divergent technique in order to differentiate the two images.
For background, you may recall that in Photo2 we had discussed how both the “Hero” archetype, and the “Creepy'“ archetype, each began with the same structural module, as each construct starts out with the same two maneuvers: 1) getting to a low, upward facing perspective, and then 2) using a wide angle lens.
We had said that that particular combination of decisions (upward and wide angle) is often permanently linked together in a lot of peoples’ minds, because, in concert, those two decisions tend to make something look “bigger.” But then from there, we discussed how the hero trope diverges by using a brighter shift in exposure, so that the subject is now “Big and glowing,” …..whereas the creepy trope diverges by shifting the exposure lower so that the subject is “big and dark.”
Again, both constructs start out with the same structural “module.” But then each diverges from the other through the use of one additional maneuver.
The main idea behind this challenge is that we want to be able to recognize how photographic maneuvers can often pair together — very logically — to the extent that we may begin to see them as one single maneuver. And how doing so can help a photographer create mental short-cuts. If we can begin to see 4 decisions as being only 2 maneuvers, then we can increase the complexity - and the efficiency- of our apporach.
This exercise is meant to explore that method of thinking.
The short version: this challenge requires that you take two images, each sharing a structural “module”…..but then DIVERGE the images from one another via a further technique you’ve used in order to differentiate the two constructs.
===================
Challenge #8
Structural “Modules” (Part 2)
Building on the previous challenge, take two images that share the same module, but now get the images to diverge from each other via a SECOND MODULE.
In other words, in the previous challenge the two image-constructs diverged from each other via the use of one single technical maneuver. IE: They shared one common module but diverged via one single technique.
Here we want to see if we can get the two images to diverge from each other via an entire module. So now the two images share one common module, but each has had a second, divergent module imposed in order to differentiate the two shots.
This is simply a more advanced version of the previous challenge.
====================
Challenge #9
Timing as a function of structure… not a function of content or action.
Find a scene with narrative motion or narrative action, and shoot an image in which your TIMING is less attached to the action (or narrative) of the subject matter, and instead incentivized more by the coming together of useful photographic variables.
For instance, imagine a scene in which there is action occurring, it could be a sports shot, or a journalistic “action” shot…….and now imagine that most people base their “timing” of the shot around the action itself (ex: you might time your shot based on when an athlete throws a ball, or a takes a swing with their bat, etc.).
But consider that there’s another incentive for “timing” your shot: the momentary coming together of photographic variables.
The idea here is that there are image structures that are available to you for only a fraction of a second, and that you can learn to base your timing (and your muscle memory) around trying to harness those very temporarily available constructs.
For instance, when a subject on one layer of space is about to cross in front of another layer of space (which would momentarily enable your lens to create spatial hierarchies that it couldn’t create a moment ago - or a moment later)…….or when a brightly lit subject is about to cross in front of a darker area of your scene (enabling a shift in exposure that wasn’t possible a moment ago - or a moment later).
Most photographers are taught to think solely about “what their subject is doing, narratively” when they learn how to time their shots. And thus, they seem to devote the entirety of their muscle memory development around it.
However, learning to base the timing of your shot on the changing physics of your scene can absolutely develop a new pattern recognition, or a new muscle memory, that will be highly and practically actionable for you.
==============================